Converting Marplain
Crossing to TrainPlayer 7 - Advanced Operations
1 – Getting Started
– Working with older TrainPlayer Ops plans
|
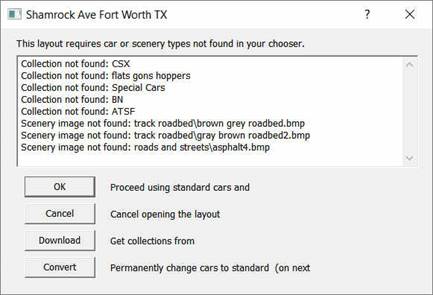
With many of the older TP Ops plans that are included in our Layout Chooser, you may see an alert about missing car collections or scenery items This pop-up on the right-side, indicates there are several car collections which are not in your current car collections. If these are older 26px collections, they may no longer be available since most have been replaced with 50px sized car collection. You can opt to convert those cars to Default 50px cars for the layout and then you can either edit them or replace them once the layout opens. |
|
|
In this screen shot, there are some older scenery items which are not found in the current Scenery library. In most cases you can easily delete those items after opening the layout. Just press on any empty colored rectangle which appears on the layout and press Delete. If there a lot of old scenery items, it would likely be best to convert the entire background image to a new version using our current vector graphics images called SCNs which are included with TrainPlayer since TrainPlayer 6.0 |
|
|
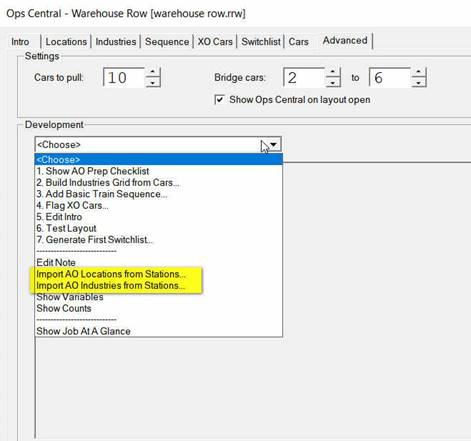
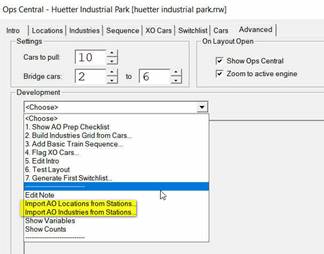
The preferred process for converting most TP Ops plans is to use the tools found in the Operations Central [OC] under the Advanced Tab Your first step should be to “import AO locations from Stations”. This feature converts all old “stations” into locations for that Tab and it will also create a track label for each location. You may need to go to View/Feature/Track Labels to activate and then see those track labels. |
|
|
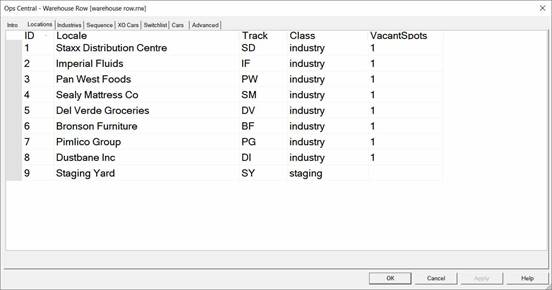
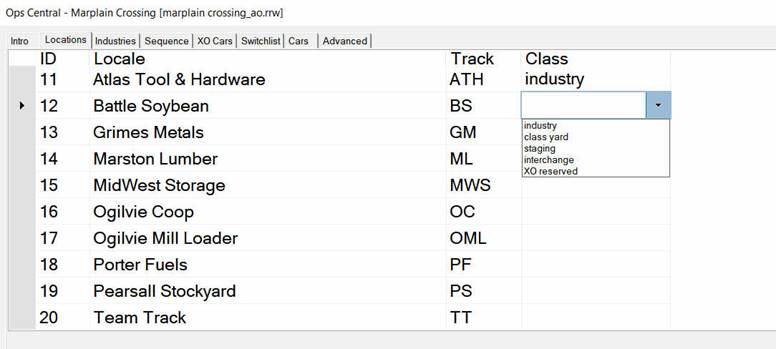
This is what the Location tab looks like once you have run the “Import AO locations from Stations” feature. The conversion process will use the name you gave to the old Station as the Locale Name. In most cases, the feature assigns “Industry” as the Class for that location. You may need to edit that input if the location is a Classification or Staging Yard, an Interchange or a location only used by dedicated passenger cars or “block/unit” train cars. To edit the Class, click on the right side of the box to see your choices Generally you will not need to touch the “vacant spots” value since the AO generator bases its car volume on the number of cars standing at an industry location. For example, 3 cars standing at Dustbane will set the maximum value at 3 + 1 extra. So make sure you place a suitable number of cars at each location NOW. |
|
|
Depending upon your preference, you may leave the track labels as they were generated OR you can change them to something else. |
|
|
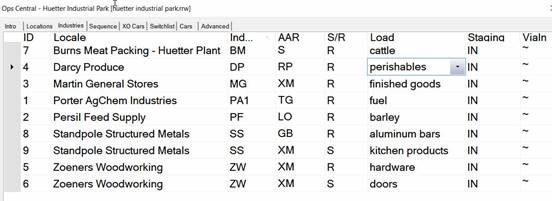
Next - you will want to “populate” those industries in the Location tab with rail cars suitable for each industry. From the Ops Console/ Advanced tab, you can “Import AO Industries from Stations” The wizard then looks at all existing cars standing at an industry site and places one entry in the industry grid for each different AAR car type. It also by default sets up each car as a “R” for receive which you can edit and change to “S” for ship. The wizard also place a load on each car based on the original “industry data” from the original TP Ops. Again you can edit that information to better suit your specific industries . You can easily add more and different cars to each industry by using the “Duplicate” feature. As for the routing to the railcars, this conversion of old TP Industries to AO industries uses a default routing which consists of a tilde or “~” in each column for Staging, Via In, Via Out. This routing essentially means that all cars will go back to the main staging yard(s) almost directly on each switch list. There is more information on “Building the Industry” further along in this presentation under the heading – “The Industries” tab |
|

2. Converting a TP Ops Plan to Advance Ops AND creating a New background file
|
1 – Open the existing Marplain Crossing from the Layouts\Layouts 2014\UK_World folder. Note: This plan is set up for the old version of TrainPlayer OPS |
|
|
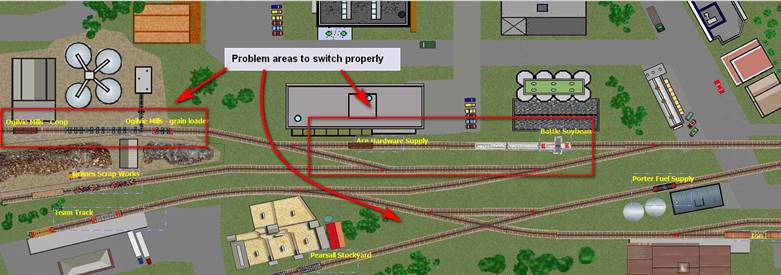
2 – Review the plan for shortcomings that would hinder the flow of operations |
|
|
3 – identify the problem areas and devise a solution. For example, the bigger industries are bunched together and there is little room to temporarily store rail cars while doing your “pulls” and “spots”. And it is not realistic for the switch engine to run back and forth from the yard constantly hauling 1 or 2 cars. |
|
|
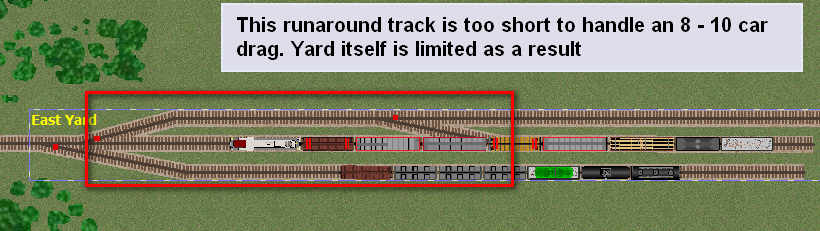
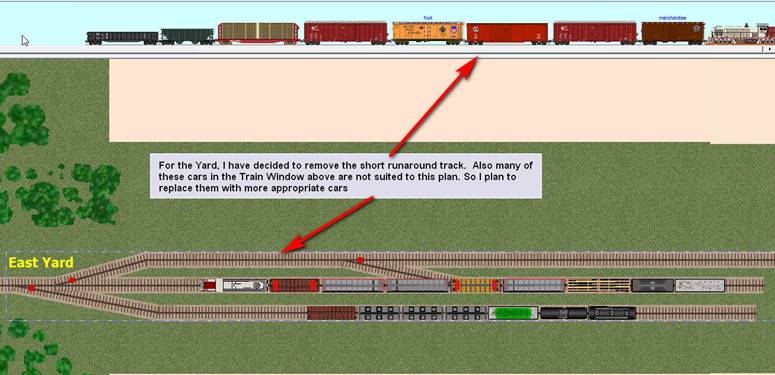
4 – likewise for the East Yard location, the existing runaround track is too short and uses up too much valuable yard space |
|
|
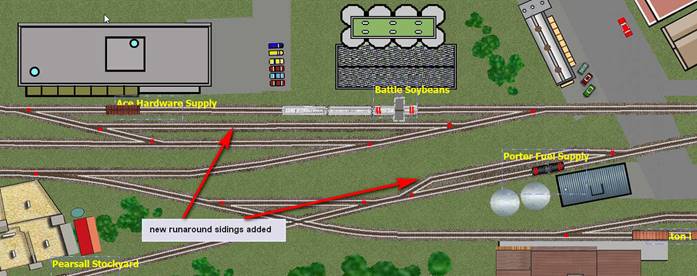
4 – in this case, the best solution is to add a couple of short runaround tracks at some key industry sites and to remove the runaround in the yard area. |
|
|
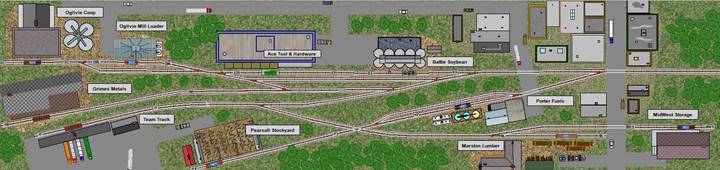
5 – At this point, you could decide to retain the existing fixed background image for Marplain OR you could decide to re-work the plan using our newest vector graphics SCN feature. I opted to re-work the plan with new scenery. Here’s what the final version now looks like. For a tutorial on how to apply the new SCN based scenery, go to Help/Contents/TrackLayer/Scenery Toolkit/ Jamestown tutorial |
|

2 – Prepping for Advanced Operations:
|
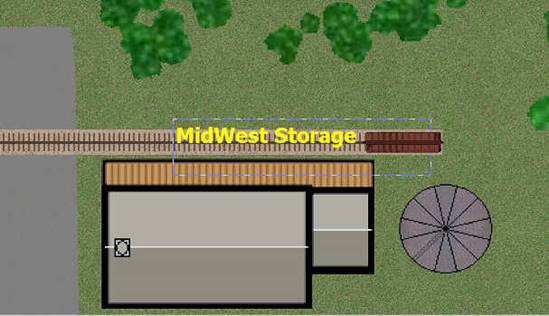
Step 1 So now starting with your choice of a new Scenery layer or the existing background image, we need to remove the old TP OPS items and replace them with the new features of Advance Operation. We’ll start by removing the old “Station” designation and replacing it with a new Industry marker Click on your Station icon or use View/Features/Stations to light up the stations on Marplain Crossing |
|
|
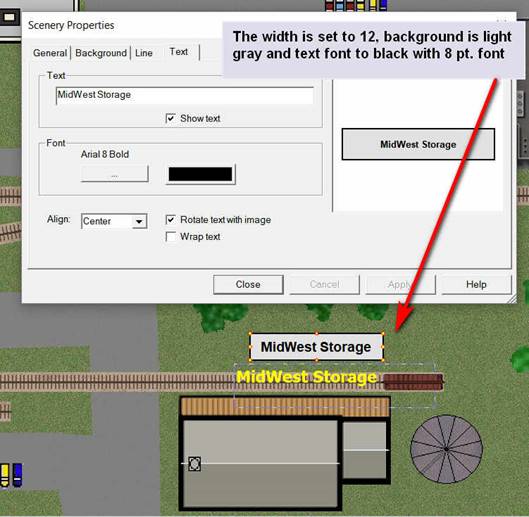
To create the new industry marker, click on the Scenery tool menu for the Text [large A icon]. Then in that menu, change the line width to 12 in black, change the background color to a light gray and for the Text select a black color with about an 8- 10pt font size Then insert the name of the Industry in the Text tab. |
|
|
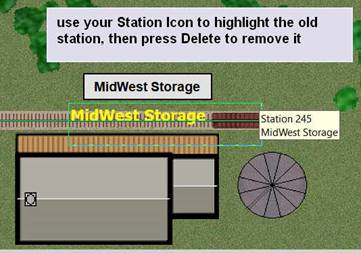
With the new industry marker ready to go, delete the old station designation |
|
|
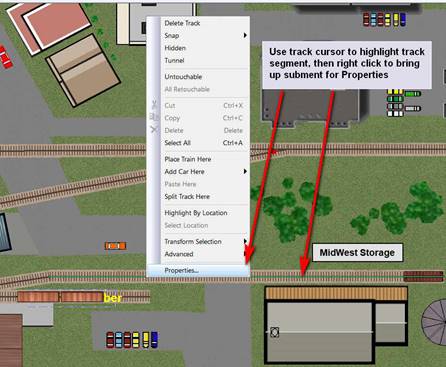
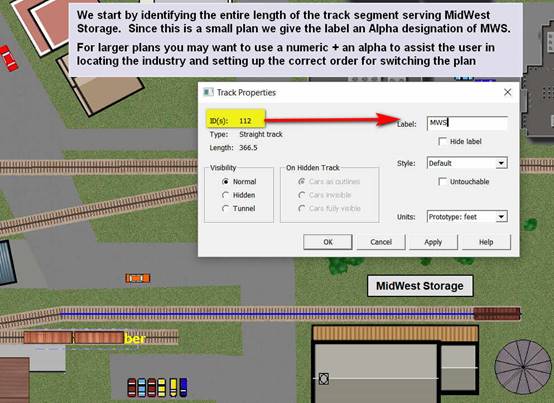
Step 2 – Adding the Track
Label |
|
|
|
|
|
|
|
|
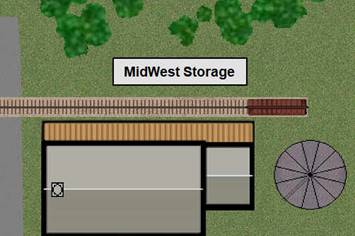
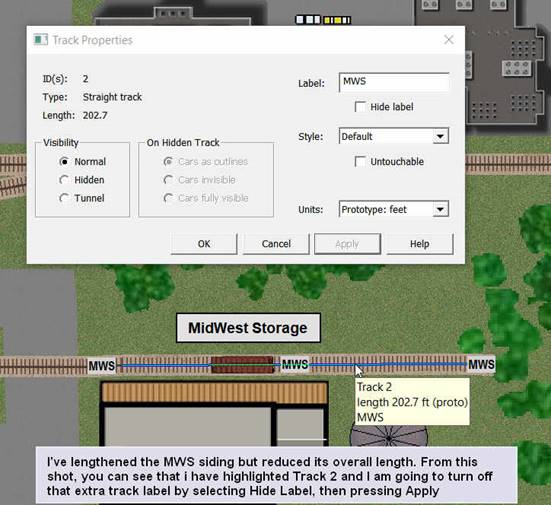
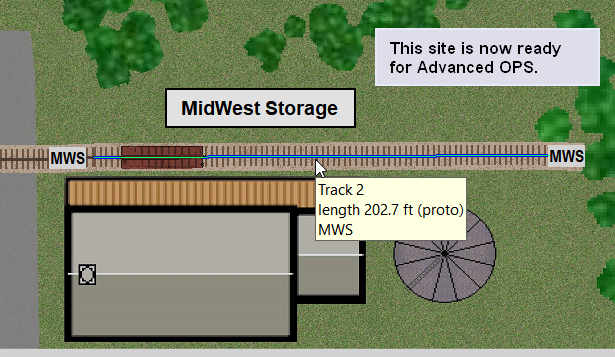
MidWest Storage [MWS] now has its siding labelled and its total length clearly marked. I usually place an appropriate rail car on the spur at this point OR when I am building the Industry profile in the Operations Central [OC] panel You can now move to each other
station/industry and repeat this same
conversion process |
|
|
Stage 3 – Setting up the Staging
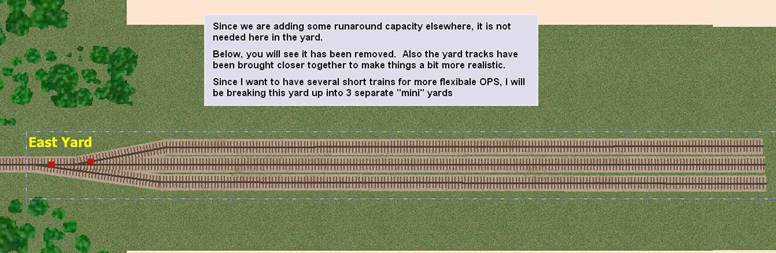
Yard Yards are the key focal point for Advanced Operations. All railcars originate from yards and are routed out through them. Marplain Crossing only has the one yard. Since it is accessible via an “add-on” shelf/board and represents the “wide world”, we will be setting it up as a Staging Yard. As discussed the issue with the original staging yard was its size
was being compromised by the runaround track within the yard limits and we
want to change that aspect. |
|
|
In this view, you can see that we have streamlined the staging yard, making it narrower than it was, and, we have removed the runaround. This change now allows us to have about 8 railcars per track with some extra space if it is needed after switching |
|
|
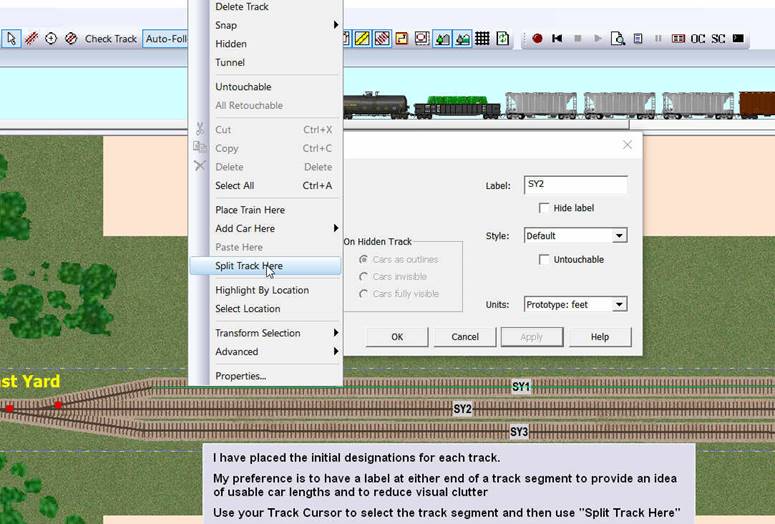
Staging Yards: As we did at MWS, we set up our initial track labels. You can see that I have identified each track separately for extra OPS switching flexibility BUT you may choose to have all track segments labelled as SY. |
|
|
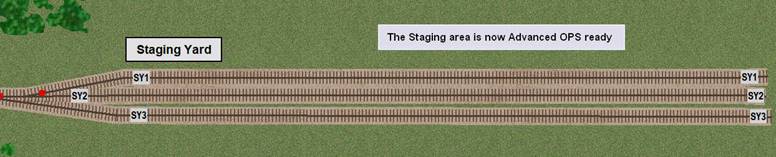
With 3 separate segments SY1-SY2-SY3, I can set up 3 different yard jobs for this plan without adding a great deal of complexity to the routing required on the OC/Industries tab, which we will get to shortly |
|
Setting up OPS with the Operations
Central [OC] tabs
|
1. The Location Grid Once you have labelled all of your industries on Marplain Crossing and if you used a strictly Alpha designation and place your Industry Names close to their tracks, when you go to View/Windows/Ops Central and specifically to the Locations tab, it should look like this -> All you need to do is click on the “Class” column and from the drop down menu, select Industry to add it to the grid and the Ops generator list. If you see the Track Label identified correctly but no name is visible,
then you will need to manually enter each industry name and identify it as an
industry. REMEMBER When you have finished editing your Industry tab, press the Apply button to lock down your changes |
|
|
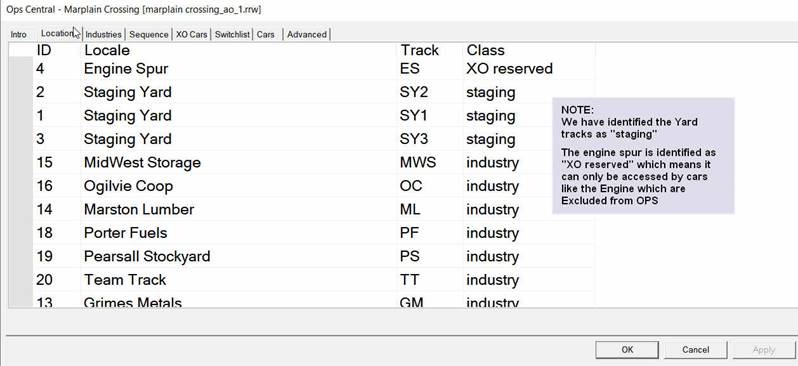
At this point we have already identified the 3 separate Staging yard spurs and the spur which will be used for storing the yard switcher at the start / end of each OPS round. XO tracks are also used for Industries which handle “block” unit trains i.e. coal, ore, grain, refineries etc. Class Yards are the jumping off points for “local” switching which might service a city/town or a very large industry. Rail cars are usually routed to/from these “end” industry points via a class yard. While a Staging yard can also perform the pick-up/delivery function too, on larger layouts, they tend to serve as “off plan” destination points for your industries |
|
|
The Industries Tab |
|
|
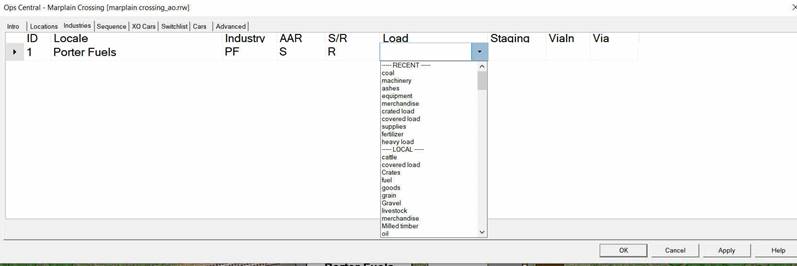
Inside the Industries tab there are several fields which require your input. Start by clicking on the Industry column. This will drop down a list of track labels reflecting your industries. Select any one and then move to the AAR tab. NOTE: the industry Locale name should “auto-fill”. For the AAR tab, select a suitable AAR code for a supplier to Porter Fuels, say a TM or TG tanker. Then assign the value S for shipping out and R for receiving. Move to the Load column, click on it to see some options for the load type this industry will receive or ship. The last 3 columns indicate the routing this car will take to/from this industry. Since this plan does NOT have a Class Yard, we use a special character called a tilde or “~” for each of these three columns |
|
|
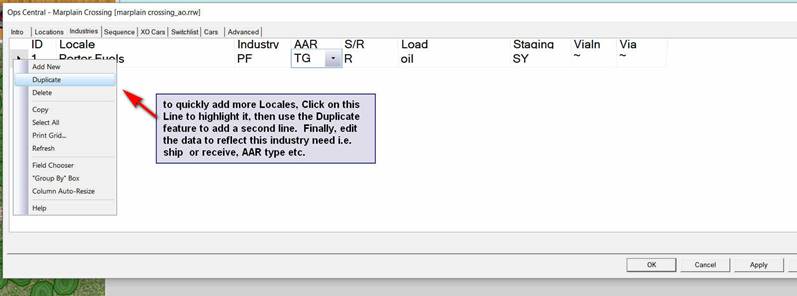
Once you have added your first industry, then you can use the “duplicate” feature to quickly add more cars and industries to the grid. REMEMBER to click “apply” frequently to lock in your choices as you work through the grid |
|
|
Once you’ve finished “Porter Fuels” you can still use the duplicate feature to add the next industry so long as you remember to edit the Industry track label, AAR, S/R and load tabs HINT: As I fill out the Industries tab, I usually go back to each industry to check which car types are already located there. I may add a different AAR car and I might remove a car whose AAR does not suit this industry Again – remember to hit Apply to save your changes |
|
|
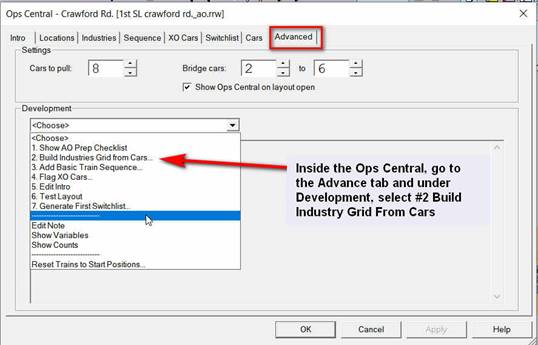
Industries Tab – Alternative
Approach If you have completed labelling your Track / Industry segments and have placed suitable car types at every industry location, then you can use the “Build Industries Grid from Cars” located on the Advanced/Development tab |
|

|
The Sequence Tab |
|
|
|||
|
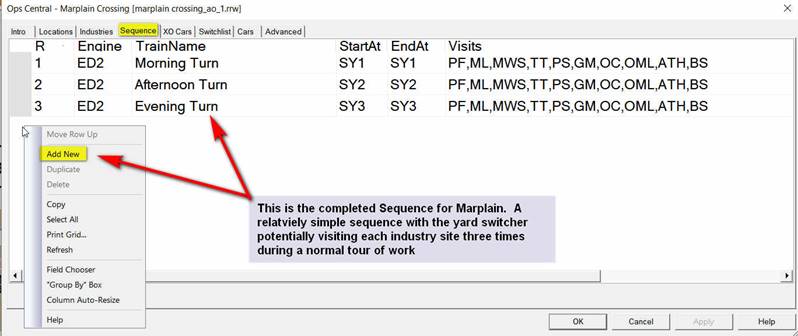
Since Marplain Terminal was intended to be a beginning layout for those interested in Ops, I have kept the Sequence of train jobs relatively simple as well. To start, right click on any empty line and select “Add New”. You will be prompted for which engine to select from another drop down list. Then name your train job. I’ve assumed a 3 trick day for 3 crews working Marplain but you may want to call these trains Monday Wednesday and Friday. It is called a Turn job because it starts and ends at the same point of origin. The visits would include only those industries you wanted the crew to visit on each assignment. The visits list can be whatever you wish BUT remember to include each industry at least once in the Sequence, or its cars will never move If you chose to have only a single SY designation for all the staging yard tracks, your Sequence will only have one train job, but it will vary in terms of number and types of cars called for each successive switch list |
|
|
|||
|
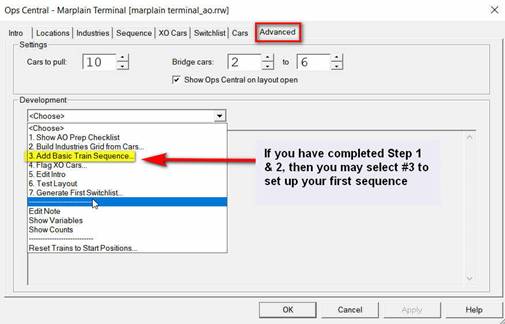
Sequence Tab – Alternative Approach If you have labeled your industry /track segments and labeled your yards, and completed the Industries grid, then you can proceed to #3 ion the Advanced Grid- Add Basic Train Sequence. Remember this feature merely selects ANY engine and ANY Staging area and adds ALL possible Industry sites to the OPS Sequence. It is a good starting point only For added reality, you MUST edit it to reflect your preferred Trains for your plan |
|
|
|||
|
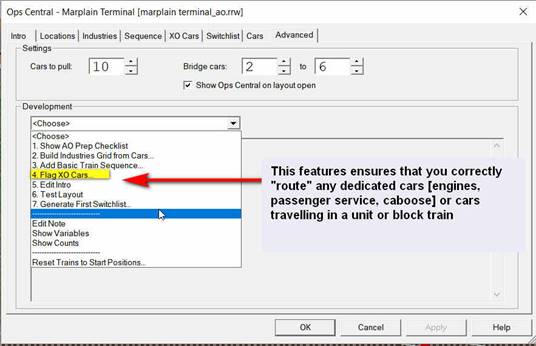
Flag XO Cars – An XO car is a dedicated car – engines, tenders, caboose, passenger, mail cars AND any other car type which would usually be routed together in a unit or block train. XO cars carry the RED car tabs and are NOT part of the same mix for OPS choices like the normal BLUE car tabbed cars. XO cars get special treatment and always operate in the same manner |
|
|
|||
|
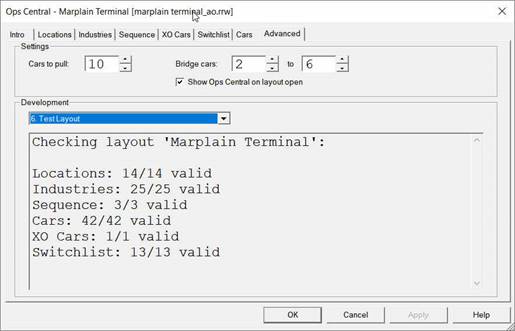
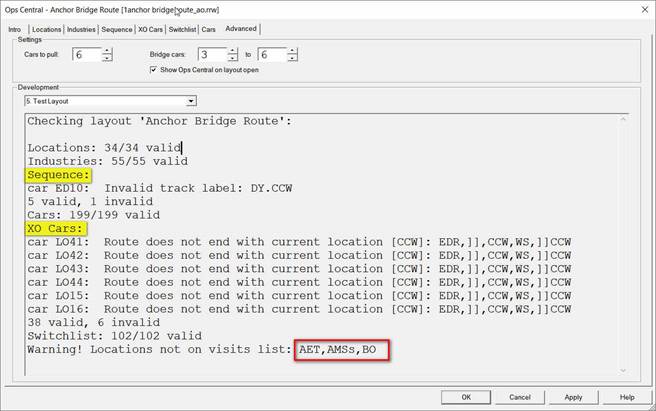
TEST Layout feature The extremely useful feature quickly runs check for errors and reports on missing data. From the screen shot you will see that Marplain Terminal is “clean”. If there were errors identified, you would find the specific details under the Tab heading on this screen It is Imperative that you FIND & FIX the errors identified before
running the initial set up feature |
|
|
|||
|
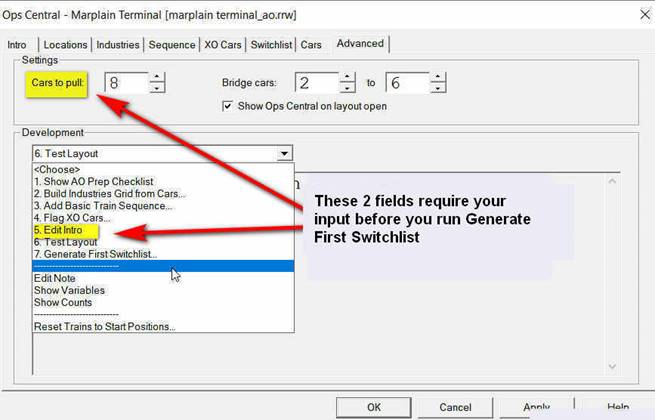
The Advanced Tab Car to Pull – this number is used by the built in random generator to determine the total number of cars involved on most switch lists it generates. The Default setting is 8 which can still translate to a much higher number of cars appearing on a switch list. For Marplain, that number is more than adequate Since there is only 1 Staging Yard, there will be no bridge traffic between Staging points You need to provide some details in the “Edit Intro” describing the layout, the time period, any specific Ops requirements [I. e. switching speed, how your labels are set up, use of a caboose etc.]. Finally you should provide a list to the trains the User will be driving/operating on this plan. |
|
|
|||
|
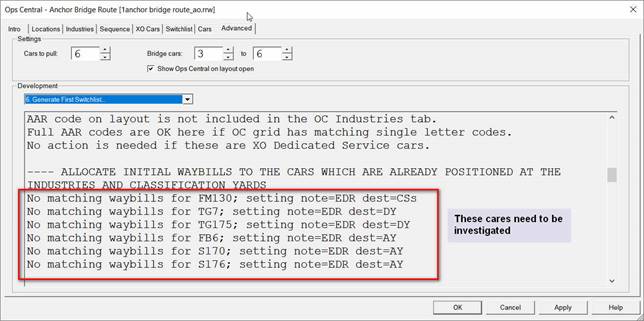
Generating
First Switch List [GFSL] This feature generates a lot of information about the layout. It also populates the Car and Switch list tabs with relevant data In the on-screen report generated by GFSL, if you scroll the top of the list you will find an “ALLOCATE INITIAL WAYBILLS” heading . A “no matching waybill” report means that that particular car has a waybill which will not be accepted at the industry it is destined for, or cannot be routed via a Class Yard which has been identified on the waybill.
To resolve this issue, if the car is sitting at an industry, you can check your industry tab to ensure the AAR code matches for that industry. If it does NOT, you should either ADD that ARR code to that Industry with a new entry OR cut and paste the car to a Staging Yard. If the car is at a Class Yard which services a number of local industries, then again you can add a new entry to one of those industries to allow it to accept the AAR code for the affected car OR, alternatively cut and paste the car to a Staging Yard. Once you have addressed all the “no matching waybill cars”, you will need to run “GFSL” again to update the changes. Finally review your new on screen report to ensure the problem has been fixed. You will be prompted to SAVE your layout after first running GFSL and each time you re-run it thereafter. ALWAYS accept the offer and SAVE your work. |
|
||||
|
Test Running Your Layout This is a critical
step that ensures that your design will operate smoothly and that no single
industry will end up swamped with railcars.
Often times, during the testing phase, some re-work of you design may
be required to improve the overall traffic flow. That could take the form of rearranging the
train jobs in the Sequence by moving a train up or down in the queue. It might also mean ripping out some track
work and rebuilding a section of the plan.
For this reason, I usually prefer to work with only the new SCN vector
graphics for the Scenery layer because it is far easier to tear down and
rebuild that recreate then entire background image again to move 2 or 3 track
segments or to swap out one industry for another, For Testing, I usually will work through a minimum of 3 complete rounds of all the trains listed in the Sequence until I find no errors or blockages on the plan |
|
||||