Industries
Version 3.4.PR.2, Aug 1, 2010
With this pre-release version, we introduce a system for defining industries on your layout. Industries give your railroad a purpose. By defining industries, in conjunction with the load system, you are specifying what sorts of goods are to be transported, from where to where, and by what means. You are not ready to operate until you've spent some time on this step.
This feature gets your layout set up for operation, but doesn't yet go beyond that. You can input data about industries and loads, but at this stage the program does not do anything with it. That comes next.
About Industries
Industries. An industry in TrainPlayer is defined as a place where goods are exchanged -- where cars are loaded and unloaded. Industry properties include a name, a location, and two lists of load types, incoming and outgoing. The loads in turn define what sorts of cars are required to haul them.
Industries are different from other TrainPlayer objects -- they do not have icons, and are not selected from a chooser or downloaded from the web. Actually we do provide a list you can choose from, but it is mainly designed to give you ideas and templates you can modify. Most industries you just make up as you go along.
Stations. The location of an industry is specified by attaching it to a "station," a named area on the track. A single industry can span several stations, each with its own list of incoming and outgoing loads. For example, a manufacturing industry might have two stations: a factory siding where raw materials arrive in hoppers, and a loading platform where finished goods go out in boxcars.
Closed-car loads. The previous version came with a Loads collection, containing a fairly large variety of visual loads for open-top cars. In this version, we recognize that there is a huge variety of closed-car loads not mentioned in that collection. A long list of these is now provided in a special new folder called "closed-car loads," which can be easily extended to include whatever types you need. Closed-car loads do not have images; they are displayed as text strings on top of the car icons.
Operation Setup Overview
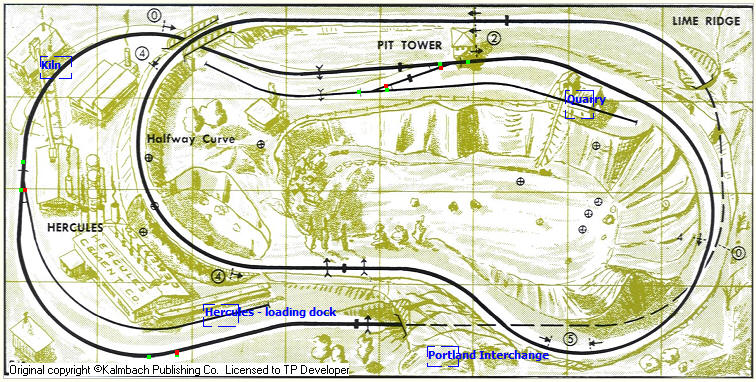
Before we get into the dialogs and details, let's take a look at what it would take to set up a small layout for some operation. For this example we'll use a slightly-modified version of the Lime Ridge, Hercules & Portland RR (#30 in 101 Track Plans). It's a simple, roomy layout with nice Westcott artwork suggesting an operational theme like the following.
The LRH&P is a branch line which services the Hercules Cement Co, located in the countryside near a limestone quarry. Hoppers deliver stone from the quarry to the kiln, where cement is produced and dumped into gondolas for the short trip to the main plant. There it is bagged and set out on the loading dock, to be transported in boxcars to an interchange with the main line to Portland. We added a branch along the south edge to represent this interchange.
The first step in setting up for operation is to define the load/unload locations. This is done with the Station tool, a rather old-fashioned device with quirks and limitations, but which gets the job done if used carefully. In the above screen shot we added the four stations where goods will be exchanged: at the quarry, next to the kiln, by the main plant, and at the interchange.
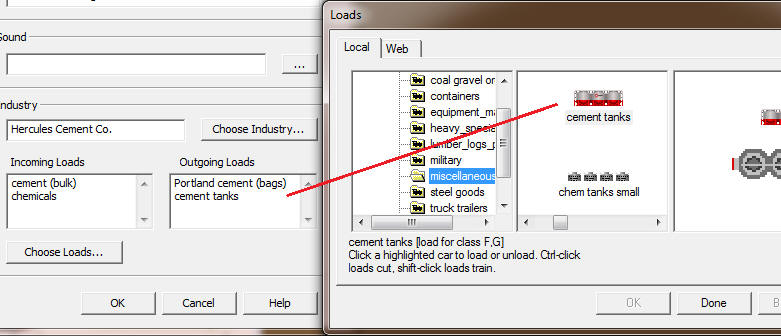
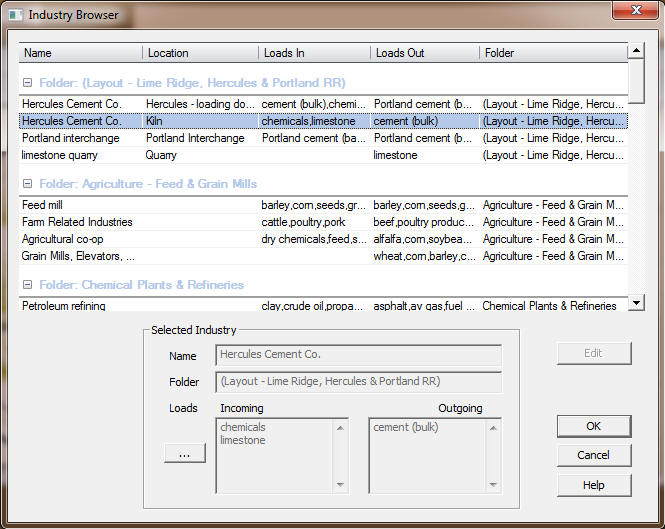
Now to establish the industries. One way to do this is to use the Industry Browser to see if a suitable one is already available. In this case we are in luck -- there is a Cement industry in the Mining section, showing typical in and out loads for this type of industry. It doesn't quite work for our purposes, but we can use it for reference.
To define an industry, we need to specify the incoming and outgoing loads at each station. The quarry will ship out limestone, the kiln will take in limestone and ship out cement, the plant will take in raw cement and ship out bags. (We will also need coal or fuel and chemical agents for the factory, but let's keep it simple.) To input this information, we go to each station, right-click and bring up Station Properties, and fill in the Industry section of the dialog. There are few restrictions here -- we can pretty much just make up stuff and type it in -- and choosers are available to help.
Some of the loads we need are already available in the Loads collection, but most are not. For example, there is no load called "bags of cement." To handle this, while defining the industry, the program calls up the Load Definition dialog to prompt for the one piece of information it needs about this load: the car type required to carry it. We give it an X for boxcar, and a new load is added to the list. We can now load any boxcar with it, and it shows up as "bags of cement" on top of the car icon.
The last step is to populate the layout with appropriate cars. At the moment there is no automatic way to do this; if necessary you can consult the properties of each load to find out what car types it requires. In our case, we already know we need hoppers, gondolas, and boxcars, because we just finished setting it up this way.
Then what? We have industries to ship and receive goods, and cars to carry them, and we're ready for some work orders. This is where the current version ends and the next one begins. In the next round we will be able to randomly generate operational plans, provide tools for keeping track of load movements, and begin developing some serious paperwork.
Here are the general steps for creating an industry on your layout. Details are given below, under the linked topics.
1. Decide where load exchange will take place.
You will need a single section of track where cars must sit to be loaded or unloaded. This should normally be short -- a car length or two. To isolate this, you may have to chop or redraw a longer section.
2. Create a station there.
Activate the Station tool
![]() . Press and drag a small rectangle so
it highlights just the loading track, then let go. The
Station Properties dialog
appears
. Press and drag a small rectangle so
it highlights just the loading track, then let go. The
Station Properties dialog
appears
3. Enter station properties -- name and optional sound.
Name the station in a way that describes the location. This name will show up in messages like "Train 5 arriving at <station name>." If you like, choose a sound to be played when it gets there. (For more on this topic, see "Stations" in the help index.)
4. Choose or enter industry properties.
The bottom half of the dialog is where you define the industry and specify incoming and outgoing loads at this station. You can choose a predefined one from the Industry Browser, or just type in an industry name and some load names.
5. Click OK.
This checks the data you entered, and if valid, copies it to the selected station. If the data is not valid, you will be prompted to fix it. If the incoming or outgoing lists contain load names not known to the system, you will be asked to define them in the next step.
6. Define unknown loads.
Unknown loads are presented in the Load Definition Dialog, where you can fix mistyped names or define new ones. Loads you create here are added to the "closed-car loads" folder in the Loads collection.
7. Save the layout.
The modified station properties are not saved to disk until you save the layout.
The Station Properties dialog is where you define a station and optionally its industry. To bring it up, (a) activate the Station tool so that stations are visible, (b) right-click a station border and choose Properties. The data you see and edit here applies to the selected station.

Controls in this dialog are:
Station Name: a name to identify the track location.
You can give a station any name you like, but it must be unique on this layout; if not, you will be alerted on clicking OK. For operational purposes, it should be specific to a particular track. For example, in a yard, the station name would normally include the track number ("Dundas Yard, Track 2"). The station name is used for reporting car and train locations.
Sound: sound to be played when a train passes into the station area.
Use the button (...) to browse in the Sound Chooser. For information about station-based sounds, see "Stations" in help.
Industry Name: name of the industry at this station, if any.
If goods are to be exchanged at this station, then it must have a non-blank industry name and at least one incoming or outgoing load. Normally the industry name is that of a firm where goods are shipped and received, but it might also be the name of an interchange, dock, storage location, etc. -- whatever name goes on the paperwork.
The industry name does not have to be unique -- more than one station can attach to the same industry. Once you define an industry at one station, it goes on the list so you can choose it at the others.
Choose Industry... button: brings up the Industry Browser for browsing pre-defined industries.
For convenience when defining industries, we have assembled a collection of standard types with typical load lists. You can browse these in a new dialog called the Industry Browser, which shows the standard types along with all the industries defined on the current layout, plus any types you might have added to the collection yourself.
When you make a selection from the Browser, it fills the industry-related fields of the current dialog. You can then edit these to suit the industry you are defining.
Incoming/Outgoing Loads: types of load arriving at / shipping from this station.
The load list windows are simple text boxes. You can type in load names, delete existing ones, copy and paste, etc. Load names may be entered on separate lines (the Enter key works safely in these boxes) or as comma-delimited lines with multiple names per line ("coal,oil,fuel").
If you enter a name not known in the master load list, it will be brought to your attention when you click OK, and you will be given a chance to add it to the master list. How this works is described below.
Instead of (or in addition to) typing load names, you may choose incoming/outgoing loads from the Load Chooser, as follows.
Choose Loads... button: brings up the Load Chooser for selecting incoming and outgoing loads.
The Load Chooser gives you browsable access to the entire collection of loads on your machine and the web. It was introduced in a previous version and is described elsewhere, but in the current situation it works a bit differently.
When the Load Chooser is called up from incoming/outgoing text boxes, it arranges itself so the two windows are side by side, and operates by drag-and-drop. You select a load in the chooser window, drag it to either the Incoming or Outgoing Loads box, and it adds the load name to the list. The chooser window remains up so that you can do this repeatedly.
Or, instead of drag-and-drop, you can select a load and click OK. This will dismiss the chooser, and add the load to either the Incoming or Outgoing box, whichever most recently had the focus.
OK: validates, saves changes and dismisses the dialog.
When you click OK, the data are checked for validity before the dialog is dismissed. If the station name is blank or a duplicate of an existing station, you are alerted and prevented from proceeding. If any of the load names in either list box is not found in the loads collection, you are presented with the Load Definition Dialog which offers to create new loads for you.
Changes made in the Station Properties dialog apply to the selected station. They are not actually saved on disk until you save the layout.
Cancel: discards changes and dismisses the dialog.
No warning is given if you made changes and are about to discard them.
Help: at the moment brings up the old help page, without the industry info.
The Industry Browser is a new style of dialog for viewing and managing a list of templates you can use to create your own industries.
The initial list comes from the factory, and includes over fifty types of railroad-oriented industry with typical lists of incoming and outgoing loads, grouped into a half dozen convenient folders. A special additional folder shows the set of industries currently defined on the layout. Sooner or later the list will probably expand as you add templates of your own.
Structured display of the list is made possible by a nice new grid control (BCGPGrid from BCGSoft). In this control, you can choose, organize, and group columns as you see fit. We plan to employ this grid for other purposes in future versions.
At the bottom of the control is a panel displaying the details of the current selection, dimmed by default to prevent accidental editing. Click Edit, and this panel works pretty much the same as the corresponding set of boxes in Station Properties.
Controls in this dialog:
Grid control: foldered grid display of the industry template list. Most of the operation of the grid is done via the context menu (below), but other operations are possible:
To change column width, horizontally drag the divider between two column headers.
To reorder columns, press a column header button, drag and drop to the left or right of another header button.
To expand or collapse folders (groups): click the +/- sign at the left end of the folder (group) row.
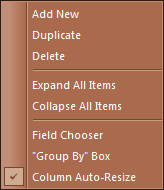 Grid context
menu: grid control and list management commands.
Right-click a row to see the menu. Commands are:
Grid context
menu: grid control and list management commands.
Right-click a row to see the menu. Commands are:
Add New: create a new, empty row in the same folder as the selection. Choosing this command creates a new industry with a generic name and empty load lists, then activates it for editing. When you are finished editing the new entry, validate and commit the changes by clicking OK or selecting a different record in the list.
Duplicate: create a new industry with the same properties as the selection, except for the name, which is modified to become unique. Duplicate works like Add New, except that it copies data into the new record before you edit.
Delete: delete the selected industry from the list. You are prompted to confirm before deleting.
The above commands are dimmed if the selected row is an industry in the current layout folder. These can only be edited in Station Properties on the corresponding stations.
Expand All Items: show all rows within each folder. All rows are expanded by default when the dialog comes up. (Note that "within each folder" may not be the right wording if you have grouped the grid on some other field.)
Collapse All Items: collapse all folder contents and show only folder names. Folders can then be expanded one by one.
Field Chooser: display a popup window containing a button for each column not already visible in the grid. To add one of these to the grid, drag it from the Field Chooser to the desired spot on the grid header. To remove a column from the grid, drag it off the grid header; it will automatically move into the Field Chooser.
"Group By" Box: display a panel at the top of the grid for grouping by selected columns. When the Group By box is visible, drag column headers into and out of it to specify how you want the grid rows to be grouped. By default the rows are grouped by Folder. Other groupings are not very meaningful in the Industry Browser, but feel free to experiment.
Column Auto-Resize: specifies whether columns resize proportionally as the window is resized. By default this is on. If you turn it off, resizing the window will not affect column widths.
Selected Industry: panel of details for the selected row. Not editable unless you click Edit. When editing, most of the operation is the same as described under Station Properties.
Name: name of the selected industry.
Folder: folder containing the selected industry. This is read-only under all circumstances; you cannot change the folder of an existing entry -- you must delete and re-create in a different folder.
Loads Incoming/Outgoing: load lists for the selected industry. These boxes work as described under Station Properties.
Browse (...) button: brings up the Load Chooser for selecting incoming/outgoing loads.
Edit button: unlock selection to allow editing. This button is dimmed if the selection is in the local layout folder; local industry definitions can only be edited in Station Properties. Clicking Edit activates the name and load boxes so you can modify their contents. To validate and commit the changes, click OK or select a different record in the list.
OK: validate, save changes and dismiss dialog. The same validations apply as in Station Properties. If you click OK, you save all the changes you have made to the industry list.
Cancel: discard changes and dismiss dialog. All changes made to the list are discarded, not just those on the current record.
Help: for now, brings up an alert saying the help page not available.
When you click OK to leave Station Properties or Industry Browser dialogs, the program checks Incoming and Outgoing boxes to see if all names are known among the load collections. If any are not, the Load Definition dialog appears, where you can add new loads or correct mis-entered names.
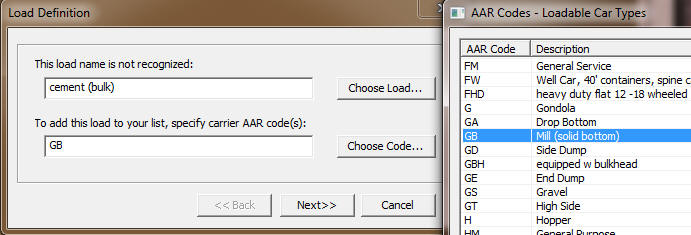
In order to add a new load to the system, you need to provide a load name and one or more AAR codes indicating the types of car suitable to carry it. Given this data, the program creates a new image-free load in the closed-car collection. If the load you need is for an open car (flatcar, hopper, gondola), consider using one of the existing loads with images, or create one in the Load Collection Editor, where you can supply images for it.
If you have more than one unknown load, the Load Definition dialog operates in a Wizard-like way. You edit one item at a time, and use Next and Back buttons to browse through the list. At the last item, Next changes to OK, which saves all the changes and dismisses the dialog.
Controls in this dialog:
Load name not recognized: name of the load as entered in the Incoming or Outgoing box.
If the name is that of a valid load which you wish to add to the list, proceed to the next box. If it is a misspelled version of an existing load, you can edit to correct the spelling. As soon as the name becomes recognizable, the text above the box changes to "known load" and its AAR code is displayed (dimmed, not editable for a known load).
Choose Load... button: click to bring up the Load Chooser if you want to look for a known load rather than create a new one. The chooser is modal in this case: find the load you want, double-click it, or click to select and click OK to return. The selected load is shown as "known load," with AAR code displayed but not editable.
AAR code(s): a comma-delimited string of AAR codes indicating car types suitable to carry the load.
Usually you enter a single code for a closed car: X boxcar, T tank car, S stock car, R refrigerator car, LO covered hopper. If more than one type can be used for this load, enter a list; for example "RB,RBL,XI" -- all can carry boxed fruit. (For more about AAR codes, see "AAR Codes" in the help index; also see the Loads doc.)
Choose Code... button: click to display the AAR Codes dialog for choosing one or more codes.
The list of codes defined in TP are presented in a list box. Click a row and the selected code is entered in the text box. Shift- or ctl-click to select multiple rows, and a list of codes is generated.
<<Back, Next>>: move to previous or next load being defined. Next changes to OK at the end of the list; click to save all the changes and return to the calling dialog.
Cancel: dismiss dialog without adding or modifying any loads.
If you have problems, suggestions, complaints, ideas, or bug reports: send e-mail.
| web | www.trainplayer.com |
| info@trainplayer.com | |
| forum | groups.yahoo.com/group/TrainPlayer |
| 4200 Arcadian Dr., Castro Valley, CA 94546 | |
| phone | 707 320-4246 |