Car Loads and Default Car Sets
Version 3.4.PR.1, May 22, 2010
Version 3.4
The next phase in the evolution of TrainPlayer is railroad operation. We aim to provide a complete system for managing your railroad realistically -- hauling goods to and from industries on and off the layout, following company schedules and dispatcher instructions, keeping track of it all -- in a package that it is easy to use and understand. It will require several new components. One was introduced in 3.3.1 (AAR codes). This version brings two more: Car Loads and Default Car Sets.
This version is called 3.4 PR-1 -- the first pre-release of what will eventually become 3.4 (the Ops version). We still have a few components to work out, and intend to post them as they become available. We are hoping to have the full package ready by the end of summer, 2010.
![]()
A load is a batch of goods you can carry in a freight car. It has a name, like "coal" or "pipes," along with top and side images which get superimposed on the car images when you load a car. Associated with each load is a list of car types of eligible to carry the load, so you can't put coal in a flatcar or farm equipment in a hopper.
This version comes with a collection of almost a hundred load types, and has easy ways to browse and deposit them in cars. These loads come ready to use -- open a random layout, and you'll see that every freight car has already been assigned a typical load, ready to be loaded or unloaded with a click. You can change the load associated with any car, and you can also set a default load for the car type (details under Default Loads).A Tour of the Load Machinery
There are a lot of moving parts associated with loads. This section introduces them to you one after another.
Load Menu
1. Right-click a freight car to see the new Load submenu.
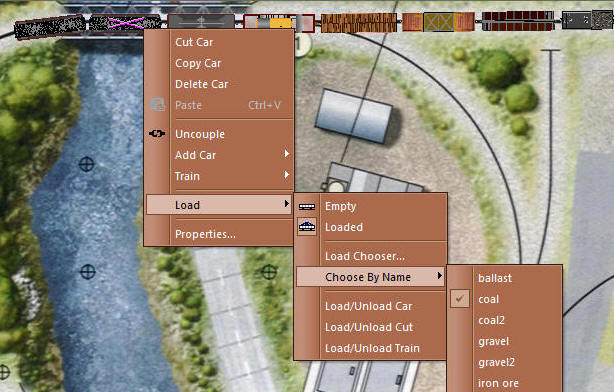
The menu does not appear for unloadable cars -- locomotives, tenders, passenger cars, or cabooses. Commands on the menu are:
Note: the Load menu is also available from the main menu under Train > Car. This makes it accessible in Tools Customize, so you can create your own keyboard shortcuts or toolbar buttons for load commands.
2. To continue the tour, select Load Chooser.
Load Chooser
The Load Chooser appears when you (a) select Load Chooser from the Load menu, (b) choose Loaded for a car which has not yet been assigned a load, or (c) double-click the Load Car toolbar icon. This chooser is very much like the Car Chooser. To operate:
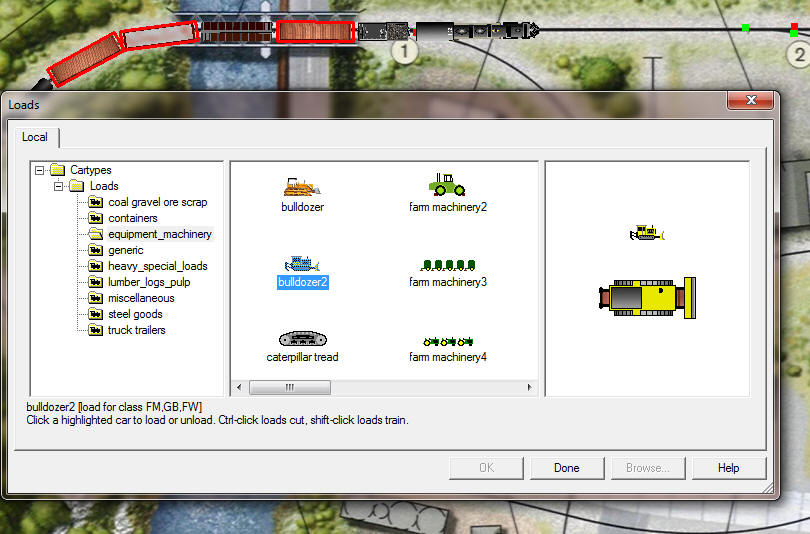
3. Browse the collection -- click a folder in the tree to see its contents.
4. Select a load by clicking its image in the middle panel. Note the indication on the status bar at lower left: it shows the types of car (by AAR code) which are suitable for carrying the selected load.
Notice what happens on the layout when you click a load: all cars eligible to carry the selected load are highlighted with a red border.
5. Click one of the highlighted cars on the layout. This deposits the load in the car and marks it as loaded.
6. Click other cars to deposit the same load. Use Ctrl-click to load the cut around a car, or Shift-click to load all cars of the same type in the same train. Clicking an already-loaded car retains the load but toggles the car status to empty.
7. To continue the tour, right-click a load image and choose Properties.
Load Collection Editor
The Load Collection Editor is like the Car Collection Editor, minus a couple of sections which don't apply to loads. For Version 3.4, this dialog has been expanded and improved in several ways: there is now a separate tab for choosing and modifying images; you can go to a specific record by typing its number; you can add a new type or delete an existing one using buttons on the dialog.
To explore the dialog:
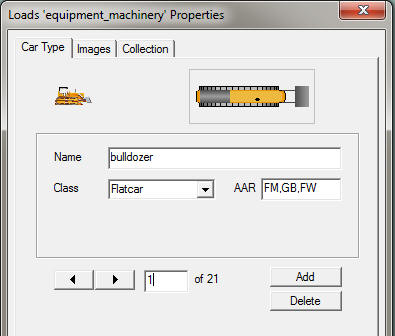
8. Click the arrows to browse and see details about each load in the selected folder. To go to a particular item in the list, type a number in the box next to the arrows and press Return.
9. Note the contents of the AAR box. For a load, this is a list of AAR types capable of carrying the load. In some cases there are special characters to modify the list in certain ways (see Notes for details).
To edit the AAR list, you can type a string of comma-separated codes, or you can use the AAR Codes dialog, as described in the next step.
To add a new load to the selected folder, click Add. This blanks the boxes of the dialog so you can fill them in with values for the new load. You will need to have image files ready -- go to the Images tab and navigate to them or draw them. Supply a name and AAR code(s), then click OK or go to a different record.
To delete a load from the list, browse to it and click Delete. You will be prompted whether you just want to remove it from the list, or remove it and delete its image files.
Changes made in the Collection Editor will not apply if you click Cancel when leaving (and then confirm that you want to discard the changes).
10. To continue the tour, expand the Class drop-down and choose AAR Types List.
AAR Codes Dialog
The AAR Codes Dialog shows a list of AAR codes and car type descriptions. When you are using it from within the Load Collection, it only shows types suitable for loading (i.e., freight cars).
This dialog is not editable. The contents come from a file called carcodes.csv (in your application data folder), which you can edit in a text editor as long as you're careful.
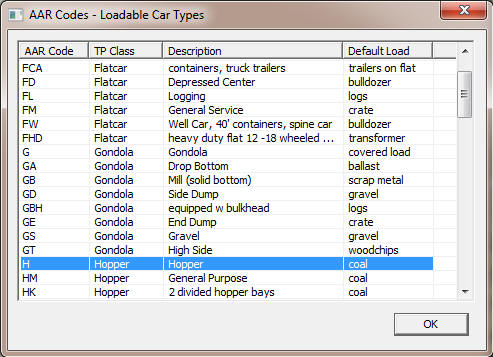
11. Notice the "Default Load" listed with each type -- this is the load a car type gets if no other load has been specified for it. See Default Loads.
12. Click a row in the dialog. This replaces the contents of the AAR box in the Collection Editor, unless the contents end with comma, in which case the selected code is appended. For example, click H, then add a comma so it says "H,", then click G -- the result it "H,G."
Clicking a row also changes the car highlights on the layout to match the selected type. This is a convenient way to see what types of cars you have on your layout -- click around in this list and watch the car highlights change.
13. To continue the tour, dismiss all dialogs, right-click a freight car, and choose Properties.
Car Properties
The Car Properties dialog has been updated for 3.4. There is a new Load section, where you can choose a load for the car, set the car's loaded/empty status, and see how it looks when loaded. The load you choose in this dialog applies only to the selected car.
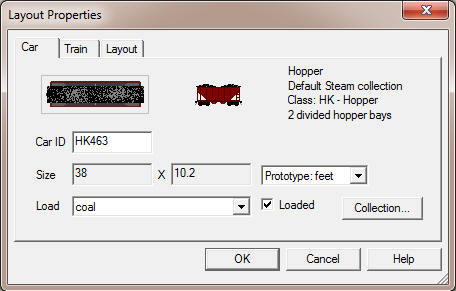
14. Expand the Load drop-down to see a list of loads suitable for the car. Select one and it becomes the load assigned to the car.
15. Check or uncheck the Loaded box to see or hide the load in the car pictures and change the car loaded status.
16. To continue the tour, click Collection.
Car Collection Properties
The Car Collection Editor has been updated for 3.4, and now has a Default Load section. Here you can specify a load to be assigned to all cars of this type you create in the future. For example, take a look at the following screen shot. It says that every time you add a gondola from the given collection, its load will be "covered load" until you specify otherwise for a particular car.
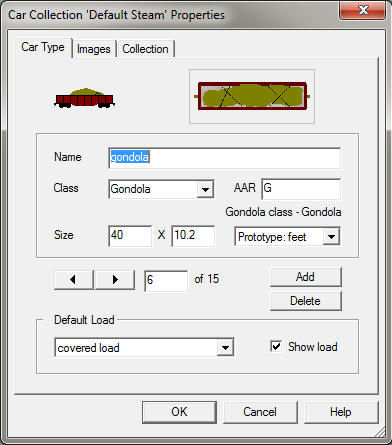
17. Choose a load from the Default Load drop-down. This becomes the default load you will get the next time you create a car of this type.
18. Check or uncheck the Show Load box to see or hide the load in the car pictures. This does not affect the loaded status of any cars.
The Add and Delete buttons allow you to manage the car collection, as described previously.
This ends the tour.
The load system features a scheme of "cascading defaults," designed to make it easy to use loads without a lot of setup. The following diagram illustrates this.
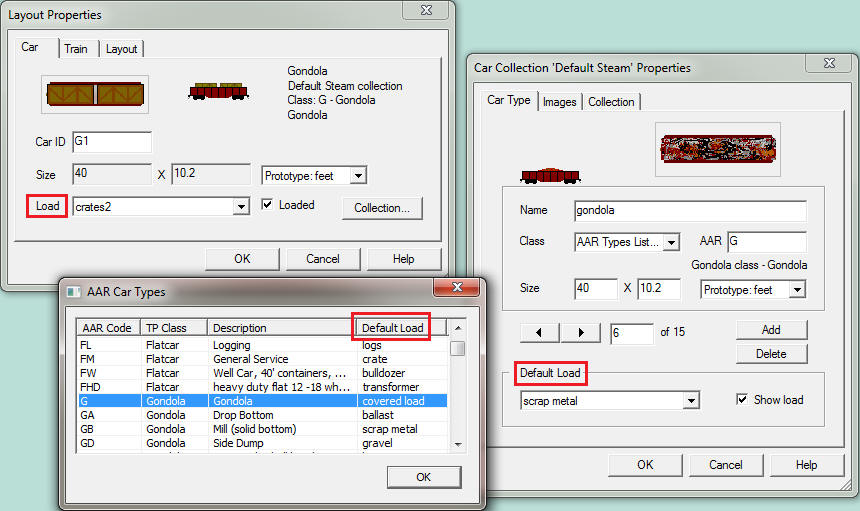
In the AAR Car Types list (just above), you can see that a default load is assigned to each car class, or AAR type. This allows you to open a random layout and find meaningful loads on all cars without having to specify anything.
The default loads in this list are assigned at the factory, and not editable from within the program. However, you can edit it yourself if so inclined. The data is in your application data directory in the text file carcodes.csv, editable in Notepad or Excel.
In the Car Collection Editor (above right), a default load can be assigned to each car type, overriding the default based on the AAR code. The default load for a car type applies only when you create a car of that type -- it does not automatically change the load of every such car on the layout. For example, the diagram shows that the next time you create a gondola (class G) from the named collection, its load will be "scrap metal."
The default load for a car type is stored in the definition file of the car collection. At this point, few of the TP car collections have default loads assigned, but this will change over time. (Exceptions are the Default Car Sets, described below).
In the Car Properties dialog (top left), a specific load can be assigned to any car on the layout, overriding any defaults. The same result is achieved by dropping a load on the car from the load chooser, or choosing it by name from the load menu. In the illustrated example, gondola G1 is modified to have the load "crates2."
 The easiest way to add a car to a train is by clicking one of the
buttons on the car toolbar. Unfortunately, many users avoid this,
because what it gets you is one of the little cartoon-like car images
from 1991.
The easiest way to add a car to a train is by clicking one of the
buttons on the car toolbar. Unfortunately, many users avoid this,
because what it gets you is one of the little cartoon-like car images
from 1991.
Until now, that is. In the latest version, not only have we upgraded the default set of cars to a classier look, we've also provided more than one default set and a way to choose a favorite for each layout.
New Default Car Sets
A "default car set" is a car collection which meets certain requirements so it can be accessed from the car toolbar and menu. It contains one of each of the twelve standard types, and may contain other types too. The current version comes with three default sets:
with more to come from our web collections over time.
The first twelve cars in the set can be accessed from the car
toolbar. ![]() In some cases, the
pictures on the buttons do not quite match what you get; for example,
the Modern set has no need of a tender, so that button gets you a diesel
switcher instead.
In some cases, the
pictures on the buttons do not quite match what you get; for example,
the Modern set has no need of a tender, so that button gets you a diesel
switcher instead.
Cars beyond the first twelve are available on the Add Car menu (shown at right), or from the Car Chooser. The default sets show up in a new "Defaults" folder in the car chooser. To avoid confusion, the chooser hides any previous collection called "Default." It remains on your disk but will no longer be used.
To See Default Car Sets In Action
1. Open a random layout, say from 101 Track Plans. Note the new look! All cars formerly in TP style are now in either Steam or Modern style.
How does the program decide which style to use on what layout? It counts the locomotives. If there are more diesels, you get Modern style, otherwise Steam.
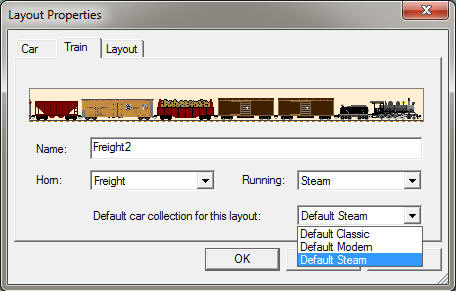 2. Right-click the layout, choose Properties, and go to the
Train tab:
2. Right-click the layout, choose Properties, and go to the
Train tab:
Note the new drop-down list, where you can choose the default car collection for the layout.
3. Try choosing a different set. Changing the default redraws all the non-collection cars on the layout, so you see immediately how it looks with different defaults.
4. Save the layout if you changed the default set, so it will remember the set you want when it opens.
Creating Your Own Default Set
There is a white paper on this subject in the How-To section of our website; see Customizing Default Cars. There are additional tricks now available, and we will be updating the how-to accordingly.
1. The Load Chooser in 3.4 PR1 does not have a Web tab. At the moment all the content you need is included in the installer. Before release we will add this tab and provide some additional loads and default car sets on the web.
2. If you have been using "pre-loaded" car collections, such as PLL Freight Loads or MJ Ops Cars -- those having loaded car images -- please be patient. We are in the process of reworking these collections to adapt to the new load scheme. Soon you will see the same set of cars with the same names, but with removable loads.
3. A "load code" is a list of AAR codes indicating what car types can carry a given load. This appears in the AAR box in the Load Collection Editor. In general it is a comma-delimited list of codes from the AAR list. A single-letter code represents all car types of the same class; for example, "G" means "all types starting with G." A minus sign before a code means "except this type;" for example, "F,-FA" means "all types F except FA."
A letter in parentheses is a display code for modifying the appearance of the load. At the moment there is only one such code: "(S)" => "stretchable," meaning the load image is to be stretched horizontally to cover the entire car top. Other codes are in the works.
If you have problems, suggestions, complaints, ideas, or bug reports: send e-mail.
| web | www.trainplayer.com |
| info@trainplayer.com | |
| forum | groups.yahoo.com/group/TrainPlayer |
| 4200 Arcadian Dr., Castro Valley, CA 94546 | |
| phone | 707 320-4246 |