TrainPlayer Ops
Version 3.4.PR.4, Feb 6, 2011
Contents
| Overview | |
| Quick Start | |
| Concepts | Generators Ops sessions Scheduled trains Switchlists Stubs and spurs Stations Yards and interchanges |
| The Generators | Station Generator Industry Generator Ops Generator |
| Ops Windows | Scheduled Train Window Switchlist Window Cars Window Schedule Window |
| Other Tools | Color codes Route Finder |
| Ops Wizard | |
| Contact |
The TrainPlayer Operations System (Ops) was developed to answer the question you might find yourself asking after you've opened a layout and run the trains around a while -- "Now what?" On a real railroad, you would report to the yard first thing in the morning, punch in, get your work orders from the dispatcher, climb into your cab, and head out to make money for the railroad. On a club layout, it's the same idea except for the early-morning and the money parts. But if you're an old guy sitting in front of a computer all by yourself, there's nobody to tell you what to do -- you have to just make it up as you go along. Until now, that is. Meet your new dispatcher, TrainPlayer Ops.
There are two general approaches to Ops. For you, the expert, with your own large, carefully-constructed layout, you can create stations and industries to fit your theme and background. You can create scheduled trains and switchlists according to your operating plan. You can do this by hand, save the results with the layout, and run your trains regularly, just like a real railroad.
For the rest of us -- those who never operated an actual railroad, or read Bruce Chubb's book, and just want to open a layout and have someone hand us some work orders -- there is the Ops Generator. Click a button, and the layout will be automatically populated with stations and industries; detailed orders will be issued specifying realistic movements of appropriate cars; and you will have a full session of switching activity ahead. Don't like that order sheet? No problem! Click it again to get a different set of orders.
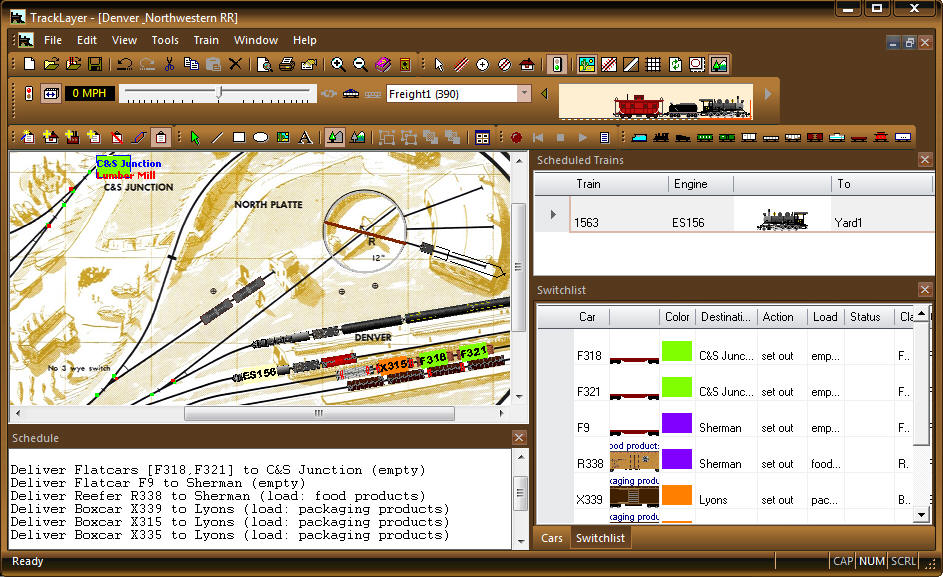
There is a lot of new gadgetry here -- new computational engines for generating random choices, new objects, data structures, and lists, new windows, menus, toolbars, and display features, and this lengthy new document about it all -- but we've done our best to make it easy to figure out and use. Take a look at the picture below and see if you can make sense of it. If so, you're ready to click something and get started.
An ops session in action. Click the image to see a full-size view.
In the current version, Ops supports only freight traffic, not passenger -- the two types of activity are just too different to be handled by a single scheme. We plan to support passenger ops in a future version. Another limitation at present is that Ops will not extend beyond a single layout -- if you work with linked layouts, watch for them to be supported in a future release.
If you want to get started without reading all this, go for it! Bring up a layout with some freight cars on it, then try the new Tools > Ops menu or the Ops Toolbar.

What these commands do:
![]() Ops Wizard. Leads
you through a step-by-step procedure for setting up your layout and
obtaining your session work orders. This is the best place to
start. The wizard covers all the major steps below, one by one,
with explanations and choices along the way. Ops
Wizard.
Ops Wizard. Leads
you through a step-by-step procedure for setting up your layout and
obtaining your session work orders. This is the best place to
start. The wizard covers all the major steps below, one by one,
with explanations and choices along the way. Ops
Wizard.
![]() Generate Ops.
Creates a random switchlist for you to operate. And does more,
depending on the layout: if there are no stations, it creates some, and
ditto for industries. This is a one-click alternative to going
through the wizard. Ops Generator.
Generate Ops.
Creates a random switchlist for you to operate. And does more,
depending on the layout: if there are no stations, it creates some, and
ditto for industries. This is a one-click alternative to going
through the wizard. Ops Generator.
![]() Generate Stations.
Creates a random set of stations (named locations) around the layout.
All existing stations are erased, but the command is undo-able if you
want to go back. Each click creates a new, different set. Also
generates yards and interchanges.
Station Generator.
Generate Stations.
Creates a random set of stations (named locations) around the layout.
All existing stations are erased, but the command is undo-able if you
want to go back. Each click creates a new, different set. Also
generates yards and interchanges.
Station Generator.
![]() Generate Industries.
Brings up a dialog where you assign industries to each station, either
by randomly generating or picking from a list. Industries are
chosen based on the available rolling stock, so you'll get a more
interesting result if you start with an wider assortment of freight cars on
your layout. Industry Generator.
Generate Industries.
Brings up a dialog where you assign industries to each station, either
by randomly generating or picking from a list. Industries are
chosen based on the available rolling stock, so you'll get a more
interesting result if you start with an wider assortment of freight cars on
your layout. Industry Generator.
![]() Route Finder.
Finds all track paths between any given pair of junctions or stations.
Brings up a dialog where you choose locations and options and view
results. This feature is just for fun -- it doesn't (yet) play a role in
Ops
generation. Route Finder.
Route Finder.
Finds all track paths between any given pair of junctions or stations.
Brings up a dialog where you choose locations and options and view
results. This feature is just for fun -- it doesn't (yet) play a role in
Ops
generation. Route Finder.
![]() Clear Ops. Erases
the current Ops session and clears all windows.
Clear Ops. Erases
the current Ops session and clears all windows.
![]() View Operations.
Shows or hides the Ops windows, a set of docking windows which come up
automatically when you generate a session. This command is a
toggle to show or hide them all at once.
View Operations.
Shows or hides the Ops windows, a set of docking windows which come up
automatically when you generate a session. This command is a
toggle to show or hide them all at once.
View Color Codes. Shows or hides color blocks on car tops and stations. Ops generation assigns colors to indicate which cars go where. This command turns them off or back on again.
Note: Most ops commands will make modifications to your layout. You might want to use Save As to make a copy before you start using these commands.
Some terminology:
Generators. We use the term generator to mean a device which comes up with a random set of something. It produces a list of candidates according to some rules, ranks them by desirability according to other rules, then randomly picks some number of them, starting at the top. It's a handy gadget, and Ops has several of them -- they choose random locations for creating stations, random cars to be involved in the operation, locations for car deliveries and pickups, etc. -- all working the same way but with their own sets of rules.
For example: the interchange generator attempts to find a long spur which might serve as an interchange point with another railroad. It looks at the list of all spurs on the layout, ranks them according to length and location, and picks a random one from the top few choices.
Ops sessions. An ops session is a series of activities you might consider your "daily run." In a typical session, you are assigned to drive a particular engine to deliver a given group of cars to specified destinations. The assignments are made by the program, then it's your job to carry them out by driving the engine. Once you've delivered all the cars, the session is over, and you can save it to run again, or toss it and generate a new one.
The process of preparing your layout and creating the assignments for a session is called generating ops. This can be done with one click, or a trip through the Ops Wizard, or by hand -- the end result is a session with a set of instructions.
There is only one session per layout at any given time. When you save the layout, the session is saved, and comes back in the same state next time you open the layout. When you generate a new session, it replaces the existing one.
Scheduled trains. The train you operate in a session is called a scheduled train. Unlike a train in the TP sense -- defined as a contiguous string of cars on the track -- a scheduled train is a more abstract entity, representing a route and a set of customers to be served. It is has these properties: train name, starting location, destination, direction, engine, and switchlist. (Future plans call for addtional properties, like frequency.) You might summarize a scheduled train like this:
Train 1012, Eastbound, Guelph to Toronto via Oakville. Loco ES352. Daily. See switchlist for today's deliveries.
An ops session consists of one or more scheduled trains to be run. In the current version, the generator creates only one per session, but more can be added by hand.
Switchlists. The work orders for a scheduled train are called a switchlist. This is not a list of switches :-) The way we define it, it is a list of actions, where each involves one car and one location -- you either take the car to that location or pick it up there. The location is always a station, even for a pickup sitting near but not at a station. The switchlist is displayed in a grid with one row per car, and also presented as a set of readable instructions for you to follow.
Each scheduled train has one and only one switchlist. Creating the switchlist is the last step in ops generation; once you have it, the dispatcher's job is done, and yours begins.
Stubs and spurs. We need to define these terms for what comes below. A stub is a single section of track -- straight or curve -- attached to another track at one end only; in other words, a dead end track. A spur is a length of track, one or more sections, straight or curved, with a stub on one end and a switch on the other; in other words, a dead-end branch.
Stations. The concept of "stations" has been around as long as TrainPlayer, and users have complained about the choice of terminology the whole time. A station is not necessarily a passenger station, it does not necessarily even have a building -- it is simply a named location on the track where trains can arrive and depart. If you haven't worked with stations, you might want to read about them under "Stations" in the help index.
A typical station has a rectangle on top of a section of track. You create it using the Station tool -- drag a rectangle around one or more sections of track, then let go and fill out a dialog of properties. For this type of station, when the lead car of a train is moving along the track and enters the rectangle, then the train and all its cars are reported as arriving. When the last car of a train leaves the rectangle, it's departing.
Yards and interchanges. These are new types of station, called yard-style, which work a little differently. Each consists of more than one section of track, and a large rectangle which surrounds the whole set but is disregarded in determining arrivals and departures. You arrive at a yard-style station when train moves onto ANY of the associated tracks; you depart when the last car leaves all of them.
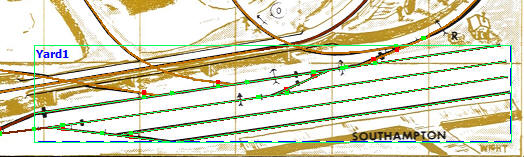
To view the tracks associated with a yard-style (or any) station, there is a new feature: when the Station tool is active, if you hover over the border of a station, the associated tracks are highlighted, as shown in this example:
To create a yard-style station, you do NOT use the Station tool. Instead, use the Edit tool. Click and shift-click to select every track you want to include (turn them all blue), then right-click any of them and choose Selection To Station. This creates a rectangle around the set, flags it as a yard-style station, then brings up the usual dialog for entering name and properties.
Or, let the generators do the job for you. The yard generator finds all the yards on your layout, or at least those which meet the following rather stringent requirements: every track must be a straight, not a curve; must be a stub, not connected on both ends; must have at least one track parallel to it and at a specific distance away from it (where that distance is the "parallel" distance found in the track snap settings). The interchange generator finds at most one spur which has its stub end near the perimeter of the layout and is long enough for several cars at least.
Ops has three main generators: one to create stations, one to assign industries, and one to make switchlists. They can be called up individually or in combination. This section describes how they work.
Station Generator. We didn't originally plan to offer a station generator. Stations are not that hard to create, and if they are to match the layout scenery, they need to be made by hand. Still, on a big layout, spending an hour making stations is a barrier to getting started with ops, so we looked into creating them automatically. The results turned out to be fun.
Here's what the station generator does:
1. Uses the yard generator to find all the yards it can recognize, and adds most of them to the layout as stations named "Yard1," "Yard2," etc. It doesn't usually find many, because the rules are fairly restrictive.
2. Uses the interchange generator to find a spur suitable for use as an interchange. If it finds one, it adds it to the layout and names it "Interchange."
3. Generates a random set of standard stations distributed around the layout. The number you get depends on layout size -- figure about two or three per square yard. Station names are chosen randomly from a list names taken from 101 Track Plans -- over 500 of them (this list is in your TrainPlayer data folder, named "stn_names.txt"). Preferential locations are near the ends of spurs, or in the middle of long straight or curved sections.
There is no dialog for the station generator -- you just click Generate Stations, and it replaces all existing stations with a new random set. If you don't like the results, you can (a) revert using Edit > Undo, (b) click again to get a different random set, or (c) take what it gives you and modify to suit, using the Station tool to move, resize, rename, etc.
The
other way to generate stations is from the Ops Wizard. This gives you a
bit more flexibility -- you can create stations and yards/interchange as
separate independent steps.
Industry Generator. Industries are stations where goods can be exchanged. An industry has a name and a list of incoming and outgoing car types, used by the ops generator to decide what sorts of cars can come and go there. Like stations, industries can be created by hand, either by choosing from a master list or inventing on the spot, but it's faster and more interesting to let the industry generator do the job.
Industries were introduced in a pre-release version last summer, and documented on the website (see Industries). What the Ops version adds is the Industry Generator, which works like this:
1. Assigns the special types "Yard Tracks" and "Interchange" to all yards and interchanges. These have generous lists of car types you can set out or pick up on yards and interchanges. (Actually this step is done during station generation.)
2. Goes to each station on the layout and chooses a random industry from the master list. The choice is based on car types located in the vicinity -- for example, at a siding where there are tank cars, the selected industry might be a dairy. Stations with no cars nearby may not get an industry assigned.
3. Updates the stations on the layout to show the industry names.
These steps are done automatically when you use Generate Ops. A more interactive approach is to use the Ops Wizard or the Generate Industries command. These bring up the Industry Generator dialog:
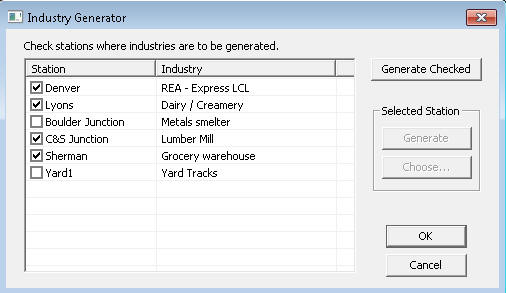
Here you can choose where and how to generate industries, in a couple of ways:
Either way, you can see what the generator came up
with, and cancel or do it again if you don't like the results.
Ops Generator. This creates a scheduled train with switchlist and instructions. It is a multi-step process which does this:
1. Chooses an engine. This may be from the selected train, or the choice you made in the wizard, or a random choice.
2. Chooses a set of outgoing cars. A random selection is made from cars attached to or in the vicinity of the chosen engine. The number of cars it chooses depends on a setting you can make in the wizard -- minimum about 5, maximum 20.
3. Chooses a destination for each outgoing car. Choices are limited to industries which can receive or dispatch that car type; a random selection is made from these.
4. Selects some cars to be picked up at some of the destinations. If you are going to be making a delivery at Joe's Lumber, and Joe has an empty flatcar on his siding, you might need to pick it up as you pass through.
5. Expands some of the selected cars to include cuts. If you have two identical coupled hoppers, then the switchlist is likely to send them both to the same place.
6. Selects one of the destinations as the end point of the trip, and creates a scheduled train to go there.
7. Creates a switchlist from the car/destination choices, and attaches it to the scheduled train.
8. Assigns a load and a loaded/empty status to each car in the list. Destination industries are taken into account when assigning loads; you can take a loaded car to an industry which receives that load, or an empty car to one which ships it, but not vice-versa.
9. Displays the results. One new row goes in the scheduled train window, cars and destinations become rows in the switchlist window, and a set of text instructions is created and displayed in the schedule window. Color codes are enabled and displayed. Car labels are shown on the cars involved in the switchlist. All ops windows are brought up if not already on display.
The ops generator replaces any existing scheduled train and switchlist with the generated one. If you undo an ops generation, it goes back to the previous version.
About Ops Windows. The Ops version features a new type of window for presenting data, and gives you three of them: one for scheduled trains, one for the selected switchlist, and one for a full car inventory. All of these are dockable panels containing interactive grids; with any of them you can:
Another window also plays a role in Ops -- the Schedule Window. This is where text instructions for a switchlist are displayed.
Scheduled Train Window. Shows a list of all scheduled trains in the session. Currently the generator produces only one of these per session, so you will only have one row in this window unless you add scheduled trains by hand. Each row by default shows the name of the scheduled train, its engine, and destination. Several other fields are also available for display -- right-click and look in the Field Chooser. For example, there is a Comments field you can display if you want to add notes to a train.
Clicking a row in this window selects the corresponding engine on the layout, and updates the Switchlist Window to show the associated switchlist. Right-click and choose Zoom To if you want to see a closeup of that engine on the track.
To add a new scheduled train by hand, right-click and choose Add New. This creates a new, empty row at the bottom of the list. Select an engine from the drop-down, choose a destination station in the To column, and type a name in the Train column.
Switchlist Window. Shows the switchlist for the selected scheduled train. Each row shows a single car and where it is to be delivered or picked up. The Status column is empty until the car has reached its destination; then it changes to say COMPLETED, and you hear a triumphant little sound.
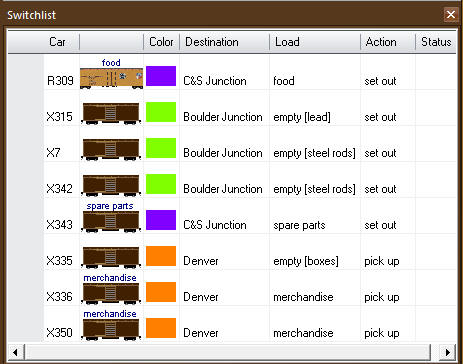
Clicking a row in this window selects the corresponding car on the layout. If color coding is enabled, selecting a row turns off all color codes except for the selected car and destination. To locate the selected car on the layout, right-click and choose Zoom To.
To add a new car to the switchlist, do one of the following:
Cars Window. Shows the complete inventory of cars on the layout. Each row shows a car along with several of its properties. Any car involved in the current switchlist shows its color in the Color column.
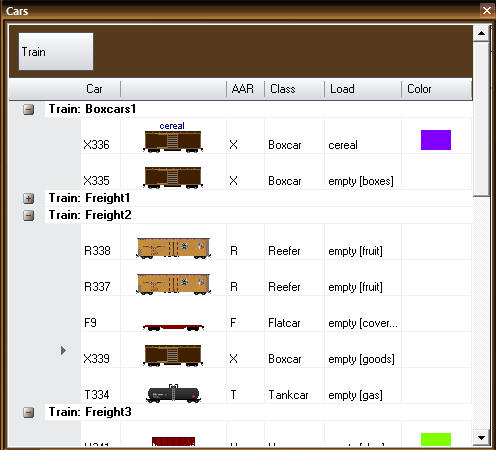
In this picture, the grid has been grouped by Train, using the Group By Box. When a grid is grouped, it becomes a sort of tree -- you can expand and collapse items by clicking the +/- icons on the left.
The Cars Window is read-only -- you cannot add or edit rows. But you can select a row, as in the other windows, to select a car on the layout.
Schedule Window. Shows text instructions for a generated ops session. These instructions correspond to data in the switchlist, expressed in sentences instead of grid rows. When a cut of cars is to be moved, all are listed together in square brackets as a single instruction.

The Schedule Window has been around a while -- it is not a grid, just a scrolling text box. It serves various purposes, such as announcing train arrivals and departures, so once you start moving, your ops instructions may scroll away. You might want to copy and paste them into a Notepad window to keep on the screen for reference.
Note 1: At the moment it
doesn't work to use Ctrl-C to copy text out of the Schedule Window.
You must right-click and choose Copy from the menu. We intend to
fix this.
Note 2: You can reduce the
activity in this window by right-clicking and unchecking Show Stations
or Show Script Output.
Color codes. When you are presented with a new switchlist, it helps to visualize what you are being asked to deliver where. Ops color coding helps you do this.
In a generated switchlist, each destination is assigned a random color. All cars bound for that destination are then assigned the same color. You can then look at the layout and see your job at a glance, and could summarize it as something like "deliver the orange cars to the orange station and the blue cars to the blue."
After an ops generation, color codes are automatically shown on all cars and stations in the switchlist, and car id's are also displayed on the cars. To turn on or off all color codes, use View > Color Codes on the main menu. To turn car id's on or off, use Train > Show Car ID's.
You can interact with the switchlist
window for a more detailed look at your assigned job. Click to select a
row in the switchlist window, and it will turn off all color codes
EXCEPT the one on that car and its destination. This gives you a handy
way to click down through the list and see where each car is located and
where it's going. If the car is part of a cut, the whole cut is colored.
To turn all color codes back on again, click any empty spot on the
layout or the bottom of the switchlist window.
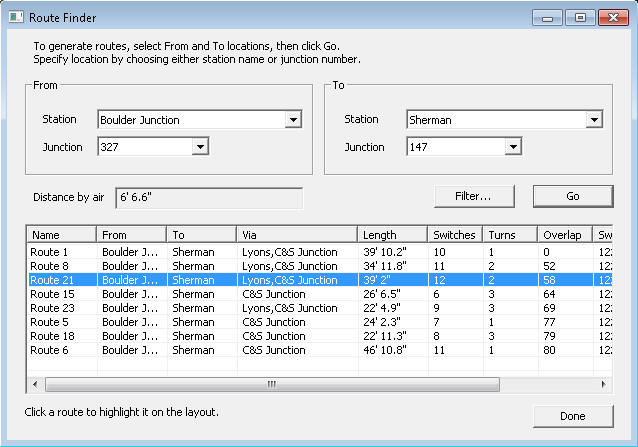
Route Finder. If the dispatcher tells you to deliver a string of hoppers to Punky Junction, the first thing you'll need to know is how to get there. Even on a small layout, it's not always easy to figure this out. That's why we developed the Route Finder, a device which calculates all possible routes between two points and displays them interactively so you can choose one.
To use, select the Route Finder menu command or click the Find Routes toolbar button. You see this dialog:
To operate:
1. In the From and To boxes, select the endpoints of the route you want to find. For each end, you can select either a station by name or a junction by number, using drop-down menus.
If you select a station, the route will go to or from the junction nearest the center of the station rectangle. As soon as you have made choices for both ends, the dialog will display the distance a crow would fly between the two points.
2. Click Go. The program begins finding routes, and displays a new row in the list for each one it finds. The information shown for each route is:
3. If the resulting list is too long, click the Filter button to bring up the Route Finder Filters dialog:
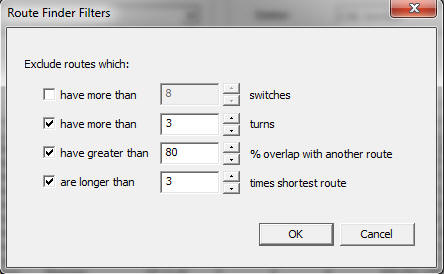
Here you can trim down the number of results by eliminating those which are too long, or have too many switches or turns, or which overlap too much with another route. Changing the settings does not require a new route calculation; the list is filtered instantly.
4. Click a row in the list and the corresponding route is highlighted in pink on the layout, like this:
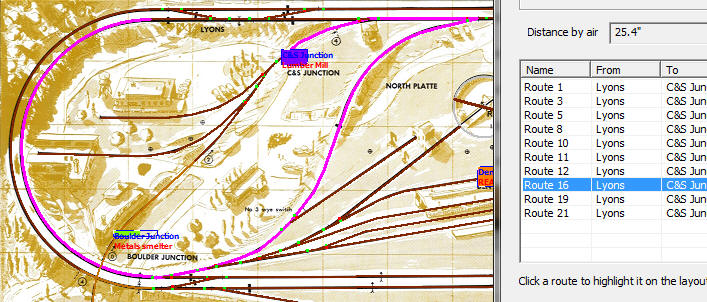
At the moment this is as far as you can go with this tool. Routes are not saved anywhere or used by the ops generators. In a future version we intend to associate a specific route with each scheduled train.
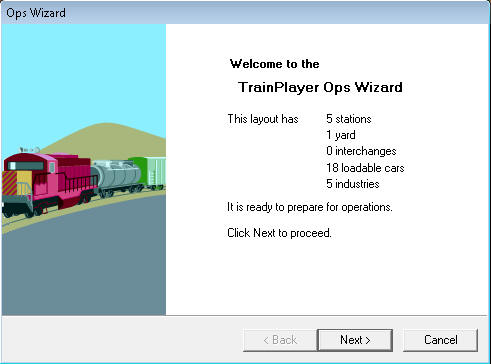
To start the Ops Wizard, choose Tools > Ops > Ops Wizard from the menu, or click the Ops Wizard button on the toolbar. Then follow along.
Welcome page. Shows some information about your layout. If the layout is not suitable for ops (for example, has no trains), this page will say so and give you no choice but to cancel. Otherwise click Next to continue.
Stations page. Calls the Station Generator to create new stations if you want or need them.
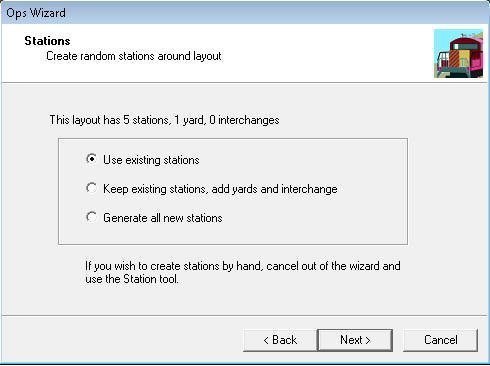
Choose one:
If you select one of the two latter choices, clicking Next does not take you to the next page. Instead, it does the generation, displays the new stations on the layout, then moves the radio button to Use Existing Stations. At that point, you can click Next to go on, or make a different choice and repeat the generation until you get results you like.
Industries page. Calls the Industry Generator to assign random industries to stations.
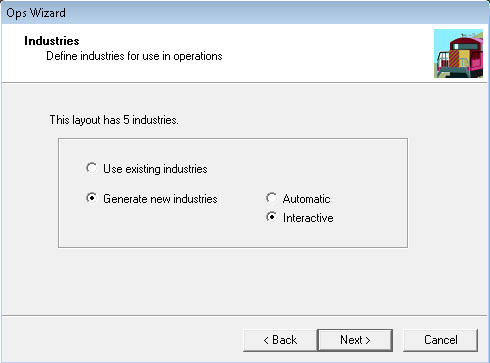
Choose one:
As on the Stations page, when you create new industries, the wizard remains on this page until you choose Use Existing and click Next. This gives you a chance to review the results and retry as needed.
Starting Train page. Allows you to choose the engine you will operate.
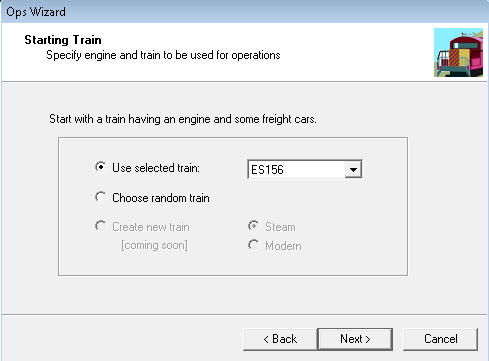
Choose one:
Settings page. Offers choices for tailoring the results.
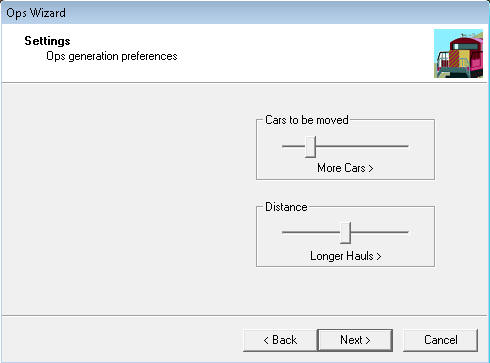
At the moment there are only two adjustable options. More are on the way.
Finish page. Summarizes the results. Click Finish to perform the ops generation and present the results, or Cancel to abort.
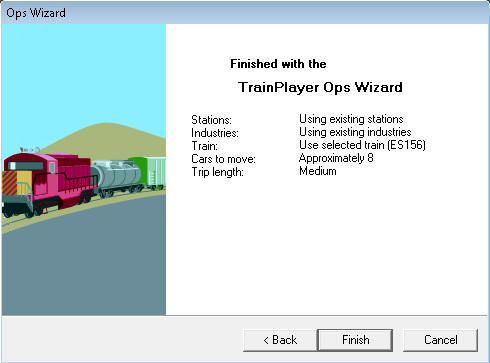
Note: if you generated stations or industries during the wizard, clicking Cancel will not undo those. Use Edit > Undo if you want to revert back to the pre-Wizard state.
Have fun with Ops! Thank you for reading all the way down to here, or at least scrolling.
If you have problems, suggestions, complaints, ideas, or bug reports: send e-mail.
| web | www.trainplayer.com |
| info@trainplayer.com | |
| forum | groups.yahoo.com/group/TrainPlayer |
| 4200 Arcadian Dr., Castro Valley, CA 94546 | |
| phone | 707 320-4246 |