Easy Ops - Step by Step

Introduction

This document will explain how to add a functioning Ops layer to an existing TrainPlayer layout.

The tutorial is accompanied by an example layout ez-ops.rrw which is based on an imported N Scale, 8 ft x 4 ft, Anyrail design sent to us back in 2011 by John Sebastian. Thank you John.

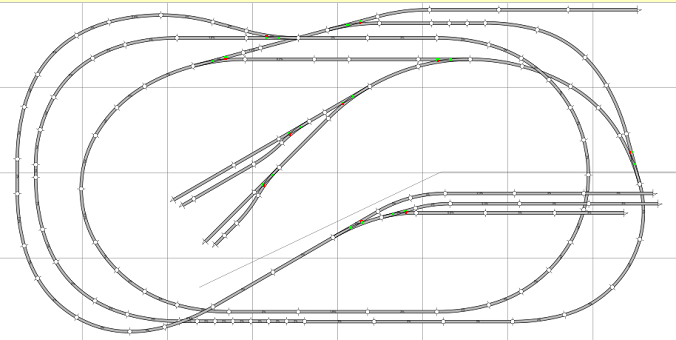
John's track plan has a long mainline run for displaying his trains and a small storage yard. There isn't a lot of scope for adding many industries but TrainPlayer Ops is still quite feasible on this layout so we decided to use it as it is without making any track modifications.

This tutorial document is also intended to be suitable for use as a general guide on how to add a basic Ops layer to a copy of your own personal layout.


Adding Scenery

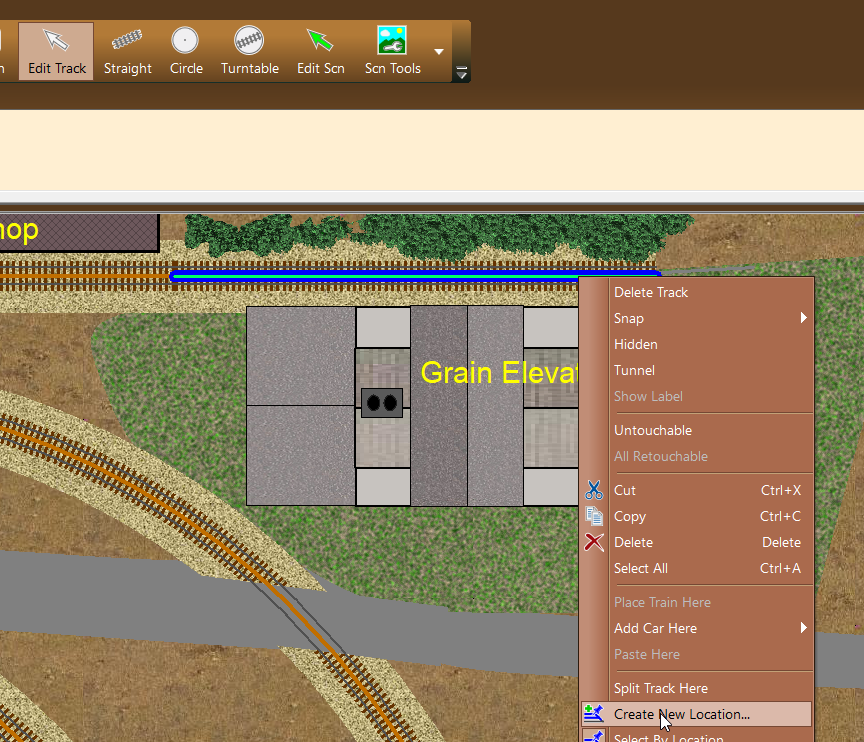
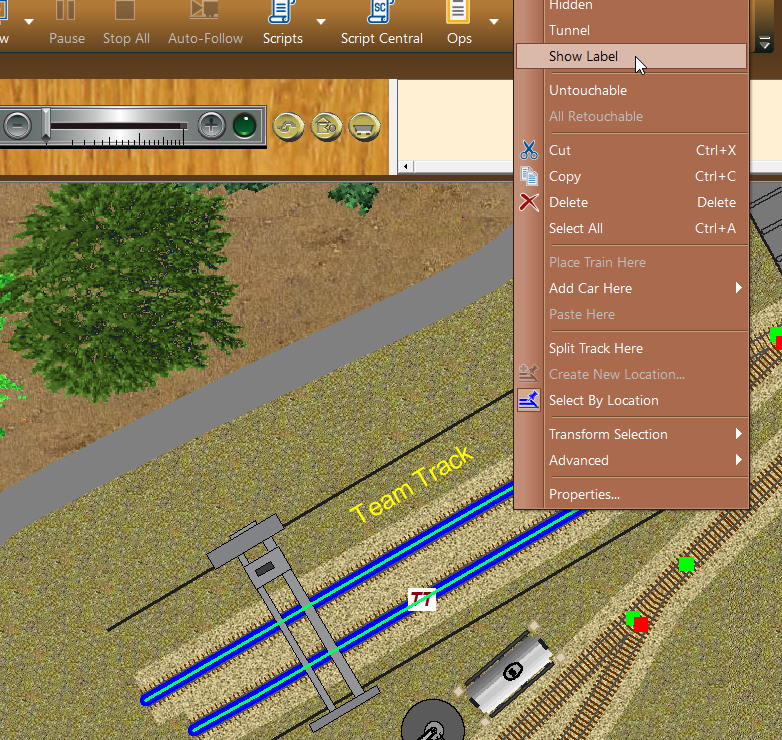
First we needed to add some scenery to John's track plan to get some idea of how we wanted to see it operate. The preferred position for a staging yard is fairly obvious at center right. In order to avoid fouling the main running line we are going to need to place our industries on the remaining spur tracks.

It will probably be easier to start with a layout completely devoid of cars but this isn't essential, however it's important that your cars are not placed where they will obstruct the main line running. So they should only be placed at locations which you intend to label and use as Yards or Industries.

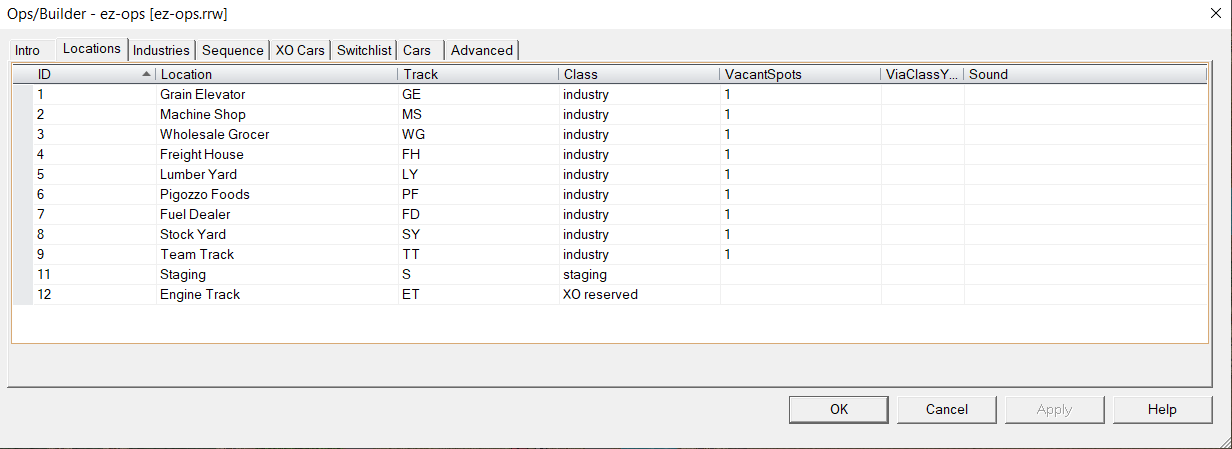
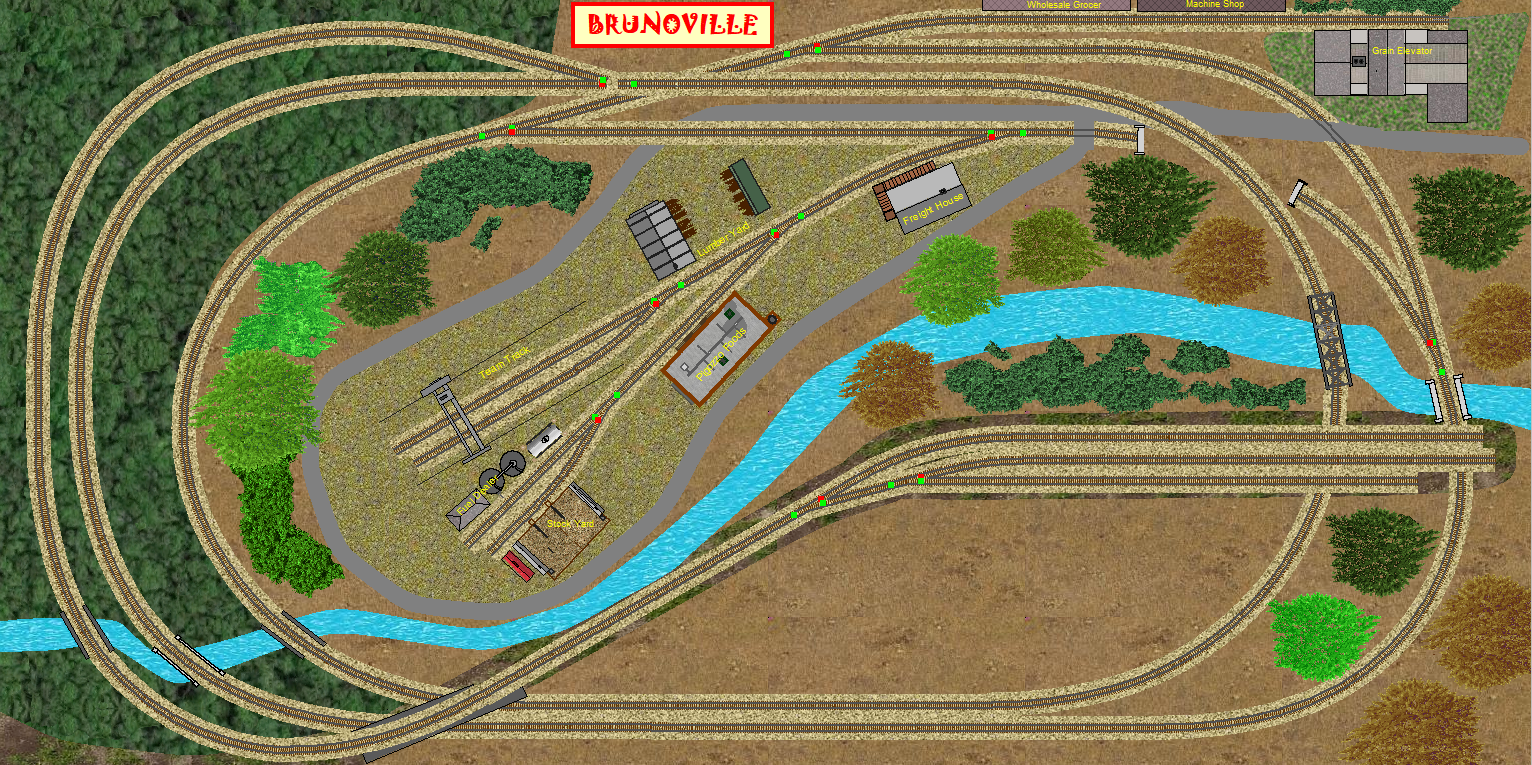
This is an image of our example layout after applying the scenery treatment. We have managed to squeeze in enough scenery objects onto John's plan to service nine different industries.

Adding scenery is not considered to be part of the Ops set up procedures and is not covered in any depth here.

If you do need help with scenery a video demo is available on the TrainPlayer YouTube channel here.

For reasons of nostalgia we intend to name our finished example layout as Brunoville but for now we will start working with the unfinished "ez-ops.rrw" file which is located in the "Advanced Ops Layouts > Tutorials" folder of your Layout Chooser. Most of the scenery objects used on this layout came from designs by Bruno.

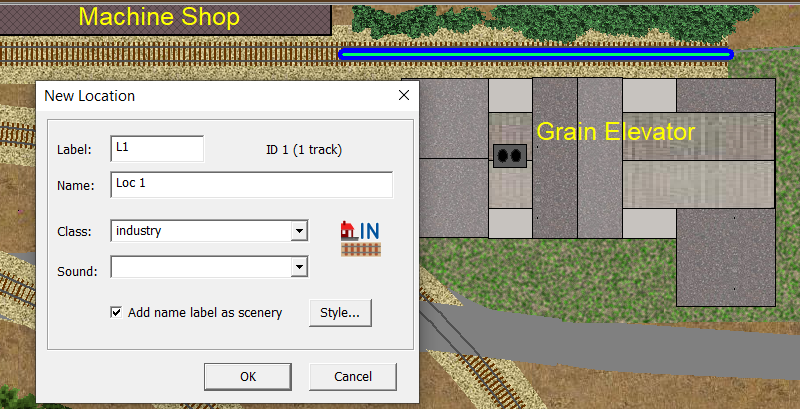
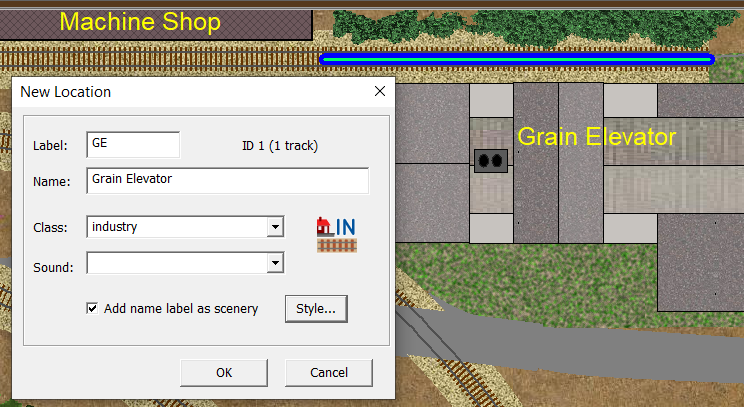
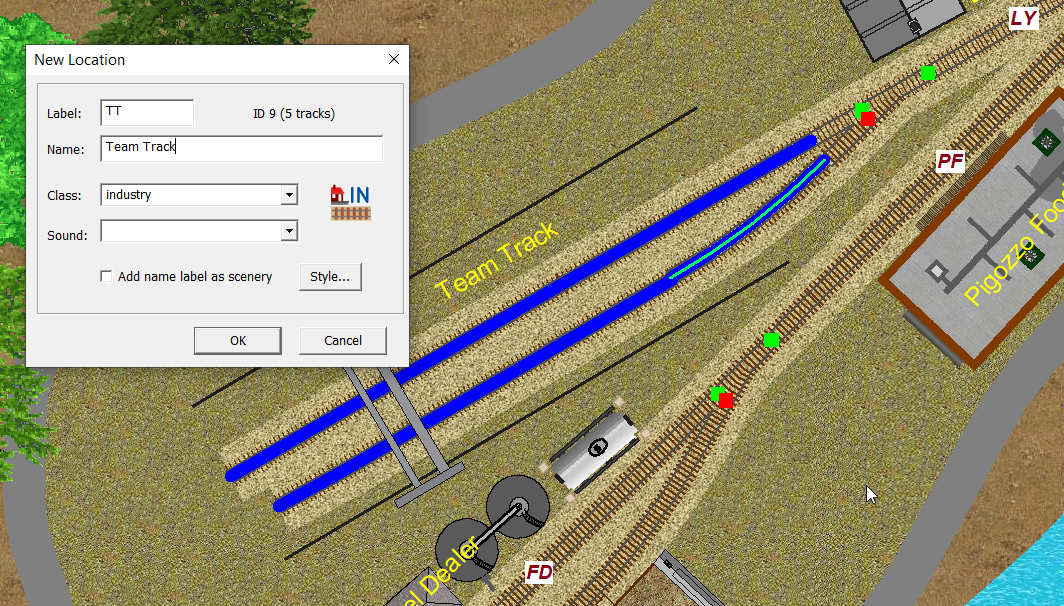
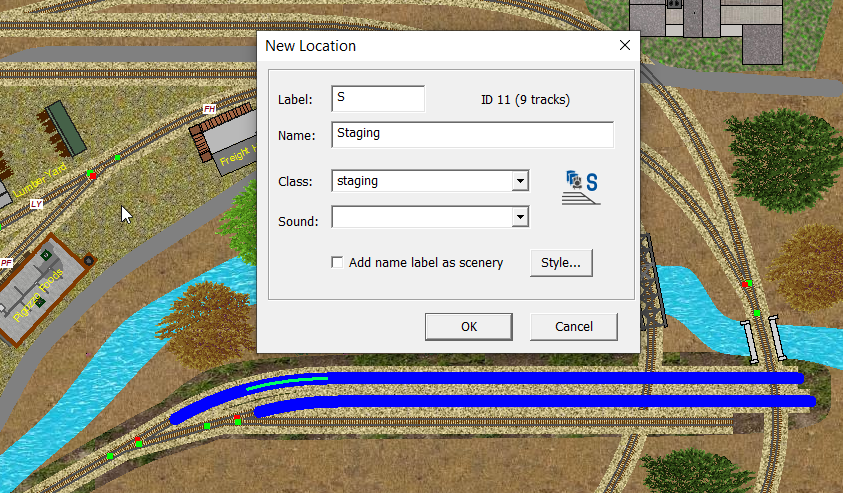
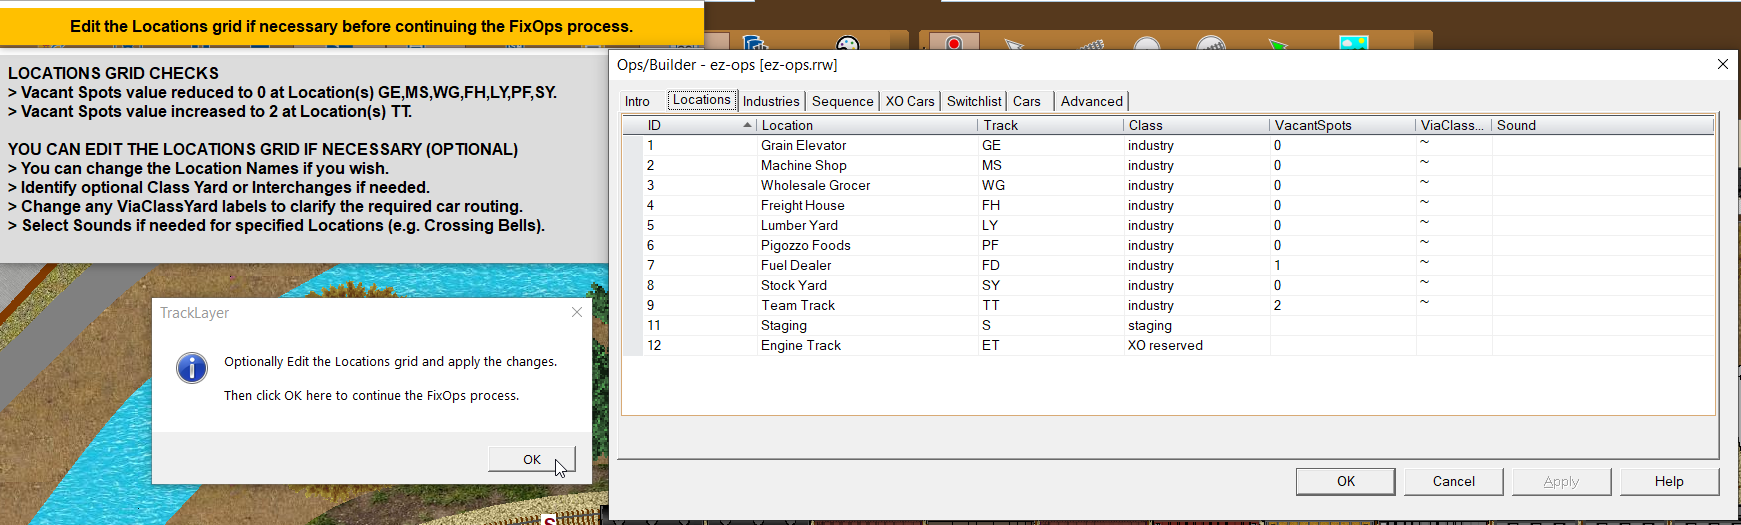
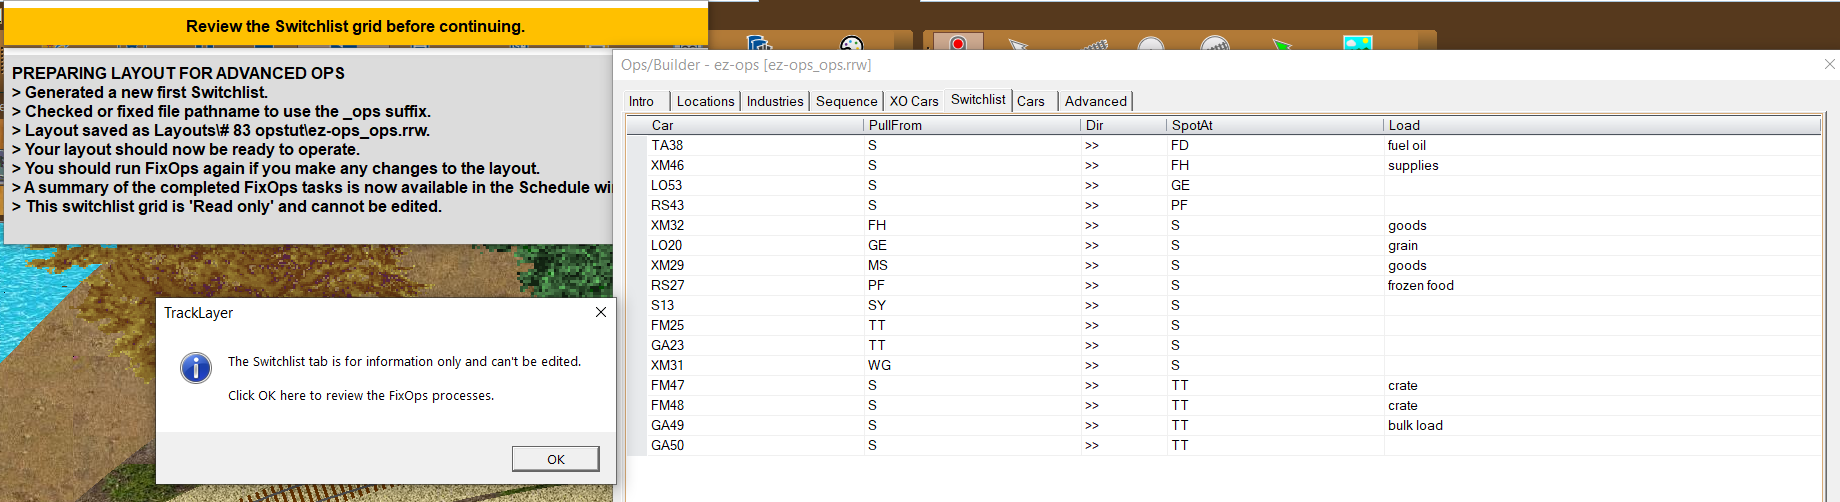
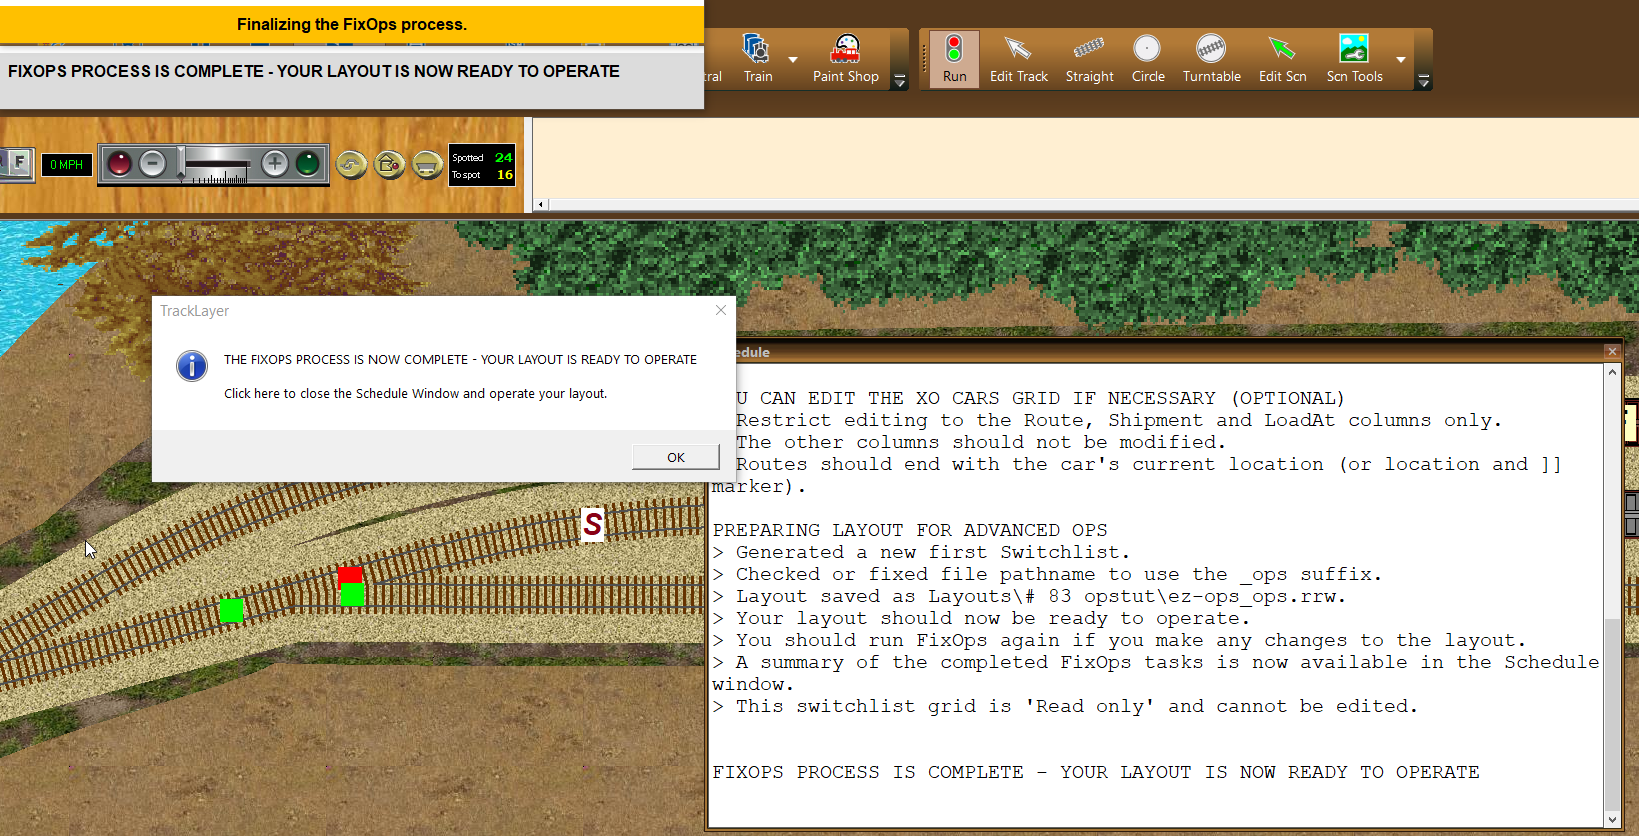
TrainPlayer Ops generates Car Orders, or Waybills, to move cars between different Locations, Each location has a Class attribute which can be Industry, Staging, Interchange, Class Yard, XO reserved or Sound Only. The minimum requirement for Advanced Ops is one Staging yard (or Interchange) and several Industries. For this tutorial we will also be using an "XO reserved" track to store our engines.

Step 1 - Creating, labeling, naming and classifying the Locations.

We will leave the yard area for now and concentrate first on setting up the Locations for all the industries.

We can start by creating New Location data for the Grain Elevator which can be found in the top right hand corner of the layout.

Select the track or tracks for the New Location

Select the Edit Track tool on the Build toolbar, then select the track (or tracks) which will hold the cars which are to service the Grain Elevator. Then right click on the selection and choose Create New Location from the context menu.

Creating a new Location

This will display the New Location dialog which will always initially default to Class "Industry" and provide an auto-generated label and name.

If you wish you can retain the default Label and Name but we recommend that you change them for something meaningful.

The Class combo menu lets you classify the location as Industry, Class Yard, Staging, Interchange, XO reserved or Sound Only.

For this location we need to retain the default Industry setting, and edit both the label and the name.

The settings required for the Grain Elevator

Label = GE, Name = Grain Elevator, Class = Industry (the default).

We will leave the Add name label as scenery box checked, although this is not strictly necessary as our scenery object for the Grain Elevator is already labeled.

The Sound menu enables you to select a Layout sound to be played whenever a train moves into the selected location.

The Style... button allows you to modify the background, font, color and outline of the text produced for the label.

Click OK to apply the Location Label to the track and to draw the text label to the image above the track.

If you need to reposition or delete the new text label you can do this by selecting it with the Edit Scenery tool.

Repeat the process to label the locations for the two remaining industries on this track. For these two industries you can uncheck the box which adds a scenery label as these industries are already labeled above the track.

Your track leading to the Grain Elevator should now look like this.

Although these industries were all drawn alongside fixed lengths of sectional track, with some layouts it may be necessary to highlight multiple track sections before using the Create New Location option from the context menu.

In cases where a track extends beyond an industry, into the territory of an another industry, then it may be necessary to split the track at the boundary between the two industries before making your selection. The option to split the track is available on the track context menu whenever the Edit Track tool is active.

Locations Grid

Before labeling the remaining industries it might be a good idea to take a quick look at the "Ops Central" Locations grid.

Depending on the sort order setting for the grid, it should look something like the image on the left.

Creating the remaining Industries

You should now have enough information to create and label the remaining six industries in the Brunoville yard.

You will then have nine industries listed in the Ops Central Locations tab.

The Team Track will require a multiple selection of various track segments across two separate tracks.

The Location label is applied to all of the highlighted track segments when you click OK but by default will only be displayed on one segment of the tracks that make up the Location.

You can also display the label on any other track segment by selecting it and choosing Show Label from the Track Context menu.

Creating the Staging yard.

In TrainPlayer Ops car orders and waybills are only allocated to the cars in Staging, or Interchanges. Waybills then travel with a car taking several sessions to complete all the stages of the waybill. When a car eventually gets back to Staging it is available for retasking.

Although we have three tracks available to use for our Yard we are only going to define two of these tracks as Staging.

This is because the layout has no facilities for turning a train arriving back in Staging. Of course in Staging it is permissible to physically pick up a train and turn it around (Flip Train) but this is not very realistic.

We could insert a crossover to facilitate running round the train but we didn't want to make any modifications which tamper with the original track plan.

Select all the track segments for the two track Staging yard, select Create New Location from the Track Context menu. Add a label and name to the Staging yard, and select staging from the Class combo menu.

Then use Show Label from the track context menu to display additional labels at the throat of the new yard.

Creating an XO Reserved Engine Track

We have opted to use the shortest of the three storage tracks as an engine storage track (XO reserved), this will enable us to use a different engine to haul a train clear and release the road engine, before returning the cars to the storage tracks.

Setting up an XO reserved track for engine storage uses the same procedure as we used to set up the two Staging tracks.

Locations Grid

With all our Locations labeled, named and classified we can reselect the Ops Central Locations grid from the Ops toolbar.

We can see that this is beginning to take shape now with nine Industry rows, one Staging row and one XO reserved row for the engines.

If you made any errors while using the New Location dialog you can still edit the relevant data in this grid.

Step 2 - Populating the Industries and Yards with appropriate cars.

Placing your cars at the industries and yards is quite straightforward but the process requires some thought regarding the selection of car types to ensure that the eventual ops plan is realistic.

Placing the Cars

Start by opening the Car Chooser from the Tools menu, or alternatively you can use the Car Inventory bar.

Select the required car image and drag it into position at the relevant industry or yard. Repeat this process until all your industries and yards have been populated with suitable cars.

Only car types appropriate to the functioning of each industry should be used. As our layout is quite small with tight curves we will only use short cars on this example layout.

It is important that the unlabeled tracks (or running lines) are kept completely clear of cars. The image above shows the three industries at the top right of the plan after the placement of the cars.

The distribution of these cars provides meaningful data for the switchlist generator. You will notice that the Machine Shop has one car, the Wholesale Grocer has two cars and the Grain Elevator has three cars. This means that WG will be tasked with twice the amount of the traffic as MS, whereas GE will handle three times the traffic of MS (or 1½ times the traffic of WG).

If you need an industry to handle more car types than the capacity of the industry permits you to place, this can be achieved by adding the additional car orders into the Industries Grid during Step 3 of this process.

When adding cars to Staging yards, Interchanges or Class Yards, it is important to only place cars with AAR codes that have already been placed at the Industries which will be serviced from the yard.

Cars placed on XO reserved tracks should be restricted to Engines, Tenders and Cabooses. Passenger cars are also treated as XO cars but the complex handling of passenger trains is not a topic for this "Easy Ops" tutorial.

We have now populated each of two staging tracks at location S with cars, all of which are cars with identical AAR codes to the cars which we have already placed at our industries. We have also added a caboose and three engines to the ET track adjacent to the staging. Your staging area and engine track should now look something like this, although the cars you have chosen to use will likely be different to ours.

With all our cars now in position, this would be a good time to give the layout a name and save it to disk.

Right click on the layout and select Layout Properties. Provide a name for the layout, we used "Brunoville", and Click OK. Then use Save As from the File menu to save the layout to a folder of your choosing as "Brunoville.rrw".

Step 3 - Building the Ops data in your Ops Central grids.

There is a hard way...

The Ops Central grids are covered in depth in our comprehensive guide Advanced Ops for the Expert which is available from this link if you want to study it.

...and an easy way

The purpose of this tutorial is to demonstrate a much easier "user friendly" introduction to TrainPlayer Ops using a revised and updated version of the FixOps subroutine.

FixOps is launched from the Command Box which you can access from the Scripts Toolbar.

FixOps formulates data in the Ops Central grids by analyzing information from the location names and car positions supplied by the layout designer.

While FixOps takes much of the hard work out of filling in the tabbed data in your Ops Central dialog, the subroutine isn't clairvoyant and you may need to check and adjust some of this data as the process proceeds.

Working with FixOps

Start by typing "FixOps" into the command prompt dialog (see above).

FixOps starts when you click OK.

Read the preamble and press F1 to start building your ops grids, be patient, some of the processes can take a couple of minutes on a complex layout.

Each time the processing pauses you will have an opportunity to study and edit the information generated up to that point.

Locations Grid

FixOps has reduced the VacantSpots value from 1 to 0 at several industries. This is because the subroutine has detected that there is insufficient space at these locations to accept another car until an existing car has been pulled. FixOps has also increased the VacantSpots value to 2 for the Team Track which has ample space to spare.

As we set up our locations using the Create New Location tool we shouldn't need to edit the names in the Location column, although we can still change this information if we wish before moving on.

When we are happy with the Locations grid we can Click OK in the small TrackLayer Alert to continue.

Industries Grid

FixOps now creates an Industries grid based on the information supplied in the Locations grid and the placement of specific car types at the various industries.

If you do nothing at all to change this grid you will still get a functioning ops system. However it is likely that you can make some improvements to this auto-generated data.

If we study the data which represents our available car orders we can make the following improvements:

  • Row 1, change the loadname to "frozen food", we have decided that our industry freezes and packages food for distribution by rail.
  • Row 3, change the loadname to "frozen food", our industry freezes and packages food for distribution by rail.
  • Row 7, change R to S in the S/R column, our Grain Elevator receives its grain from local farmers and ships this out by rail.
  • Row 8, right click on the id number and delete this row, we have decided that our lumber yard receives loads for distributing locally.
  • Row 12, right click to delete this row, we have decided that our wholesale grocer receives goods by rail but doesn't ship by rail.
  • Rows 16, 17, 18 and 19, we can change the load names if we wish, but we think the defaults here are acceptable for this tutorial exercise. The main purpose is to demonstrate how the user can control the traffic through the car order data that is listed here.

Note: Deleting rows from a grid does not cause the grid to be renumbered.

The number of times that a Location appears in this grid has no bearing on the percentage of traffic that it handles. That percentage is based on the number of cars that were actually present at the industry when the grid was created.

Once we are satisfied with our Industries grid we can click the Apply button, then click OK in the small TrackLayer Alert to move on and generate our Sequence grid.

Sequence Grid

Our Sequence grid now has a single Peddler, this was expected as there is only one Staging yard on the layout to supply the industries.

This train will repeat indefinitely with different consists and destination outcomes.

The only change we want to make to this grid is to reduce the default CarsToPull figure which has been automatically set to the default value of 10. This is too high for a layout with only nine very small industries because each repeat of the switchlist would likely turn out to be almost the same as its predecessor.

So we reduce the CarsToPull to 8 cars (that's 8 inbound and 8 outbound cars making around 16 cars per switchlist).

When this change has been made Click the Apply button, then click OK in the TrackLayer Alert to move on.

XO Cars Grid

This leads us to the XO cars checks. This layout has no complicated block trains or passenger trains so there is no need for any editing here.

The XO cars are the engines and caboose. This grid shows us the current location of each and its destination which will also be its current spot.

Review this information and then click OK in the small TrackLayer Alert to generate the first switchlist.

Switchlist Grid

As we anticipated there are 16 cars to spot.

The information in the Note window also tells us that the layout has already been saved to the source folder but is distinguishable from the original by a new _ops suffix.

The switchlist is "read only" and can't be edited.

After reviewing the Switchlist, click OK in the TrackLayer Alert.

Ready to Operate

This opens the Schedule window where you can review all the data that was displayed as you worked your way through the FixOps subroutine.

Just one final click on the OK button and you are ready to operate your layout.


The completed Ops layout from this tutorial has been renamed as Brunoville_v1_ops.rrw.

Brunoville_v1_ops can be found in the "1. Shelf Layouts" folder of our Advanced Ops Layouts collections should you wish to operate it.

This layout has been successfully tested through a sequence of 50 switchlists.

Richard Fletcher for TrainPlayer - June 2024