
|
|
|
ADDITIONAL RESOURCES Part 2 - Commands and Functions |
History and OverviewTrain Scripts were first introduced to TrainPlayer in 2006 with the implementation of a text based language designed specifically for the running of our virtual trains. This original scripting language made good use of two specific statement types, Commands to set the route and drive the trains, and Wait Conditions to control when, where or under what circumstances these commands would be executed. Each script was attached to a specific train which, if the script were played, would instruct the train to follow the speed, route and timing instructions applied to it by the script. Subroutines were introduced in 2012. A Subroutine is a series of script statements that may be needed several times during the operation of a layout, or common instructions used repetitively and needed by several different layouts. The Master Script which can be used to automatically execute a series of Commands when the layout is first loaded was introduced in 2014. Junction Actions, also introduced in 2014, are scripts attached directly to junctions These enable any passing trains to pick up new instructions as they cross the junction. Junction is defined as the numbered connection between two or more track segments. We introduced even more specialized scripting functions in 2021 to enable script savvy users to modify the data grids and variables used by the Advanced OPs system which had been released in 2019. The current version of the TrainPlayer Programming Language now uses a substantially enhanced set of statements, including complex conditional statements to control the flow of the program as it operates the trains. There are many new train commands and additional functions which can access and use the internal data. Customized Wait Conditions can be designed and a variety of new tools are available which allow the writer of a script to communicate directly with the user who is running that script and to monitor his actions. |
Types of ScriptEach of the four different Script types can be used in isolation to control a few simple tasks, or they can be used in combination with the other types of script to provide a high degree of layout automation and interaction between several trains. Users with experience of the earlier scripting language may prefer to start with the familiar Train Scripts, whereas a complete novice may find it easier to start with a Junction Action script. This could be used to perform a simple task such as loading cars under a tipple, or throwing a switch automatically to route a freight train into the yard. A user who already has a few basic programming skills should find it relatively easy to completely automate a small layout with several trains running at the same time. A Master Script is a script attached to a layout for executing only once as the layout is loaded. A Master Script is not attached to any train. It can be used to set variables, define new procedures and start the sequence of trains. The Master Script is initiated and edited from the Scripts tab of the Script Central dialogue. A layout can only have one Master Script. Train Scripts are scripts attached to a particular train or engine, they are initiated from the Train Script editor and can be edited by that same editor, or from the Scripts Tab of the Script Central dialogue. A layout can have multiple Train Scripts. Junction Actions are scripts placed on the track where they can be picked up and executed by any train that passes over that track connection (even non scripted trains). They are written using the Junction Action editor, but can be subsequently edited from the Junction Actions tab of the Script Central dialogue. A layout can have multiple Junction Actions. Subroutines are commonly used scripts which are are stored as external files in the Subroutines folder. This enables them to be accessed by different layouts, from other subroutines or by calling them directly from the Script Command Prompt. They need to be created with Windows Notepad, or another external editor. Once created they can be accessed and edited within TrainPlayer from the Subroutines tab of the Script Central dialogue. When you call a subroutine you can also pass additional arguments to it which are represented by placeholders in the script. Each of these script types will be explained in more detail once we have dispensed with the preliminaries of ensuring that TrainPlayer is properly set up for scripting work to begin. The aim of this first document is to introduce you to the concepts of the TrainPlayer Programming Language (which will now be referred to as TPL) by providing an explanation of the functioning of the different script types, and how to find and use the appropriate dialogue boxes to write and edit these scripts. |
Script Toolbar
The Script Toolbar is an essential tool for accessing the dedicated tools for writing or running any TrainPlayer script. To launch the "Script Toolbar" click the Scripts button on the Main toolbar or select "Script Tools" from the View > Toolbars submenu. |
||
|
|
||
|
Rewind All |
Rewinds all Scripts back to their original Start Positions. |
|
Stop All |
Stops all Scripts that are running to enable further edits to be made. |
|
Start All |
Starts all stored Train Scripts running simultaneously. |
|
Edit Script |
Opens the Train Script Editor for the selected Train. |
|
Script Central |
Opens the Script Central dialog (this is the hub for all Scripting activities). |
|
Command Box |
Opens the Script Command Prompt dialog. |
|
Schedule Window |
Opens the Schedule Window for viewing reports when testing scripts. |
|
Record |
Automatically records and writes a Train Script as you drive the selected train. |
|
Set Rewind Point |
Sets the Rewind point to reflect the current position of your trains. |
Script CentralTo open the Script Central dialogue just click the SC icon on the Script Toolbar. This dialogue is the gateway to recording and accessing all of your scripting data. It uses separate tabs for the different Script Types and includes some additional Reference and Settings information. |
||
Scripts Tab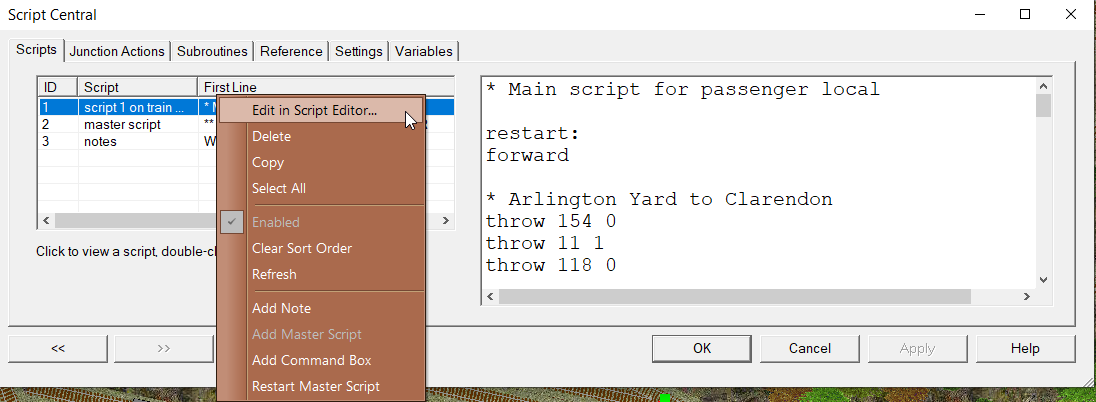
The Scripts tab is the active tab when the dialogue first opens. The left panel shows a list of any existing scripts on the layout, if there are no scripts then the left panel will be blank. The grid can be sorted on any column by clicking on the column heading. Clicking on any one of the occupied rows will show the relevant code, or text, in the right hand pane where it can be edited. Context MenuRight-click anywhere in the left panel to see a context menu which you can use to add your master script, edit any existing train scripts or to insert any optional developer notes. Use this menu to refresh the data, select, copy or delete rows, restart an existing master script or add a command box. |
||

Master ScriptThe Master Script differs from the other types of script in that it is not attached to any train or to any junction. It will execute automatically as soon as the layout is opened. A layout does not have to include a Master Script, but there can only be one of them. You can read more about the Master Script here. Train ScriptsIf you have a train script selected you can edit the existing script in the right panel. This is good for making small adjustments but the context menu also includes an option to edit and test the script using the dedicated Script Editor. |
||
Developer Notes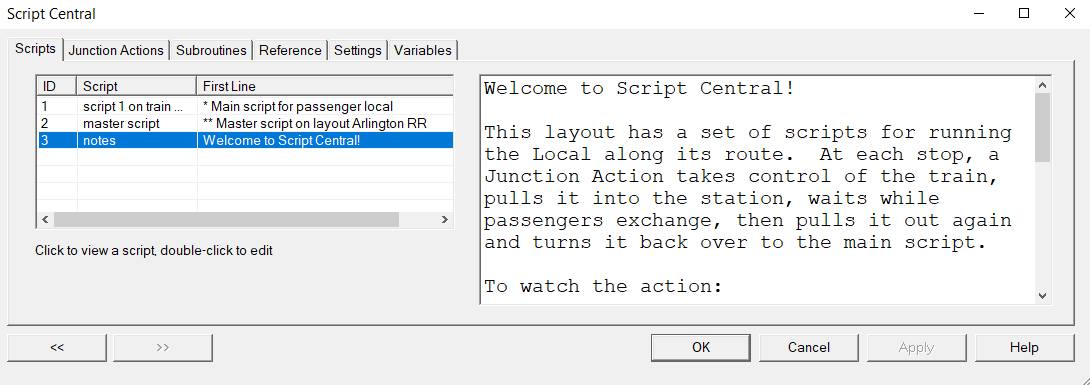
Notes can be used by the Script Developer to provide information about the layout and its scripts to the end user, or to maintain a record of his progress during the scripting process. To add a note, right click in the left panel to open the context menu, select "Add Note" and edit your note in the panel on the right. Here is an example note from our Arlington layout which can be downloaded from the the Scripts and Puzzles\Scripting Examples folder in the web tab of the Layout Chooser. |
||
Interactive Command Box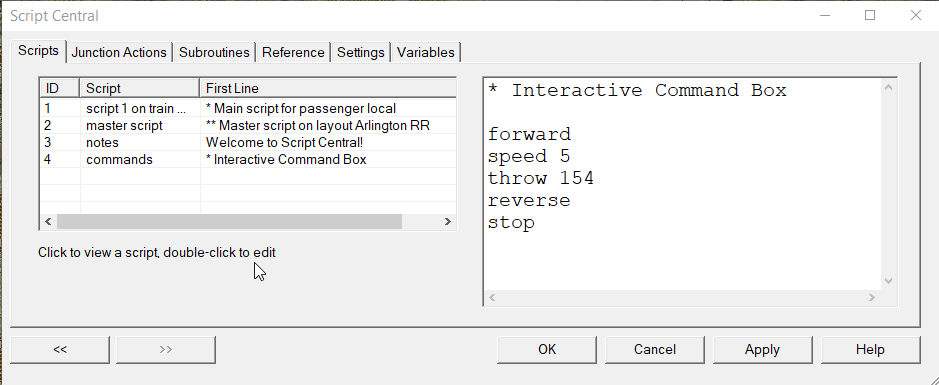
This is a useful tool for testing commands that you intend to use with your layout. To use this you only need to type a list of the commands you wish to test, either sequentially or in any order. Then position your cursor at the end of the line containing the command you want to test and press the Enter key to execute it. This is similar to the way the Script Command Prompt works but with the advantage that you can store many more entries here for testing. This data is saved with your layout and you may wish to delete the Command Box when the development work is completed. |
||
Junction Actions Tab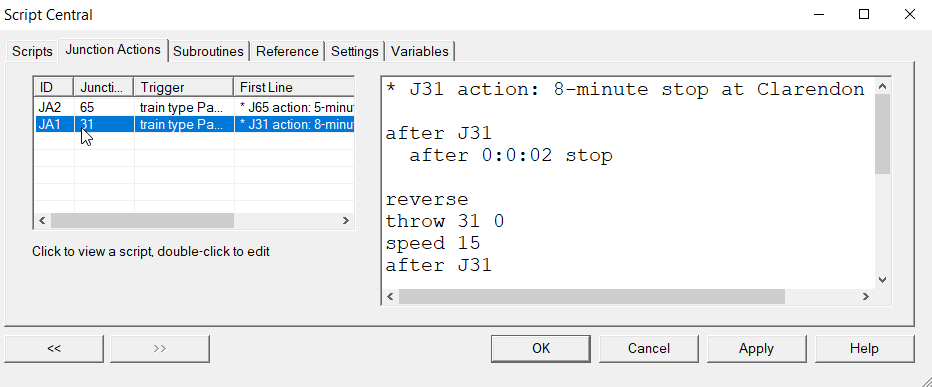
Junction Actions (sometimes just referred to as Actions) are listed here and can be edited on this tab if they already exist. Clicking a Script in the list will make its contents available for edit in the right hand pane. New Junction Actions must be first prepared in the dedicated Junction Action editor which is accessed through the Track Properties features on the Build toolbar (details below). The context menu on ths tab includes an option to perform the edit in the Junction Action Editor which includes additional features to enable you to modify the conditions for triggering the action. There is also a function on the context menu to attach, or move, the "Action" to a different junction number. |
||
Subroutines Tab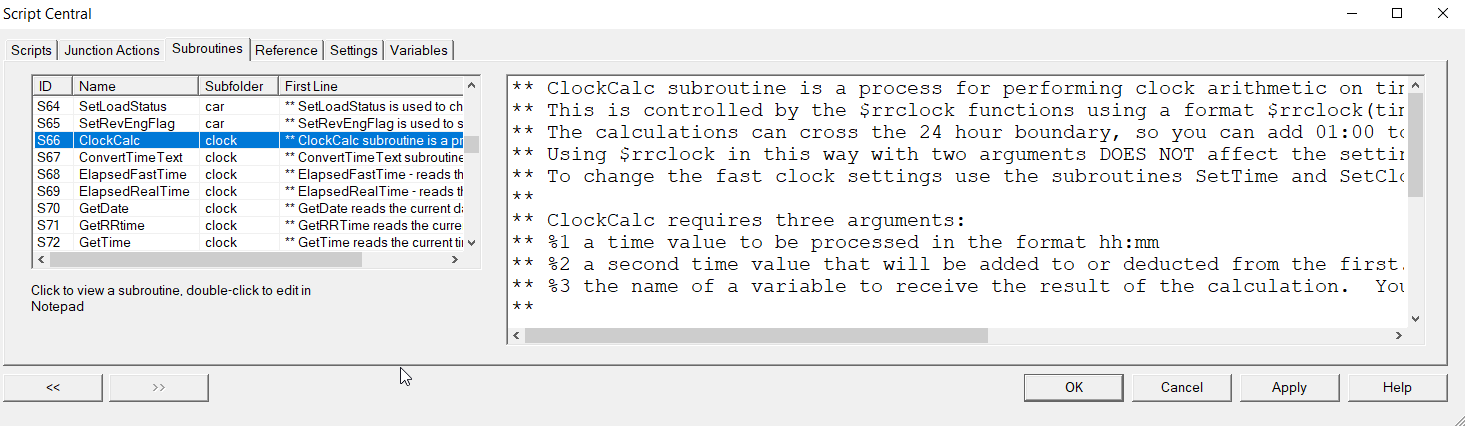
The Subroutines Tab presents a list of external script routines found on your current TrainPlayer installation. Subroutines are scripts that are stored as standard Windows text files in a Subroutines folder within your TrainPlayer AppData. They are not attached to the current layout and can be called up from any embedded script type on your layout using the CALL command. The use of Subroutines is described in detail in Part Two of this series of documents. |
||
Reference Tab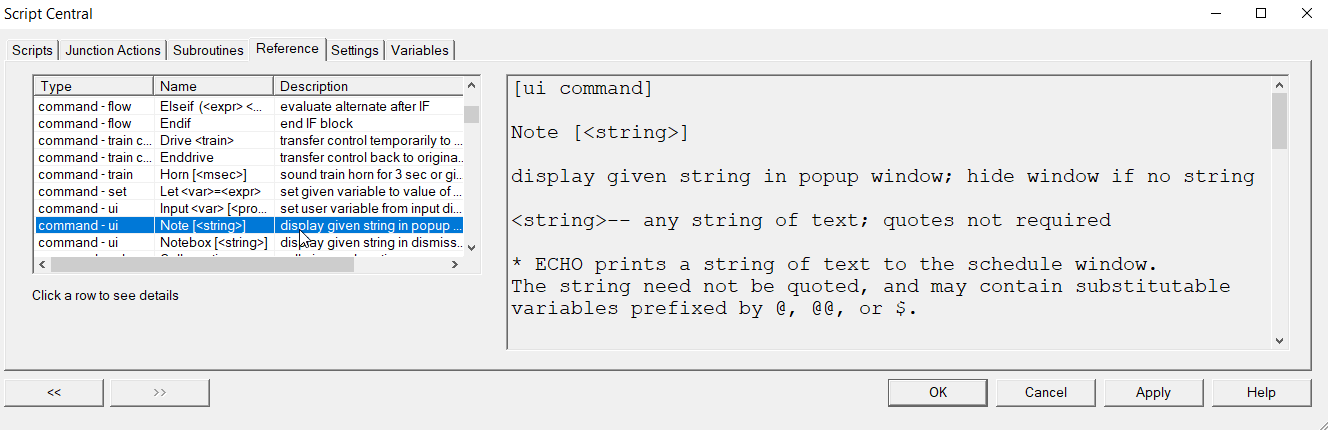
The Reference Tab provides a detailed list of all the commands available to you for writing scripts in TPL. Just take a quick look for now but don't worry at this stage about trying to understand them. TPL is very powerful but it can also function well at a lower level, with a small Command set, and there is no need to learn to use all of these commands to get started. When a script is running the reference tab also shows the current values of any control variables being used in the scripts. |
||
Settings Tab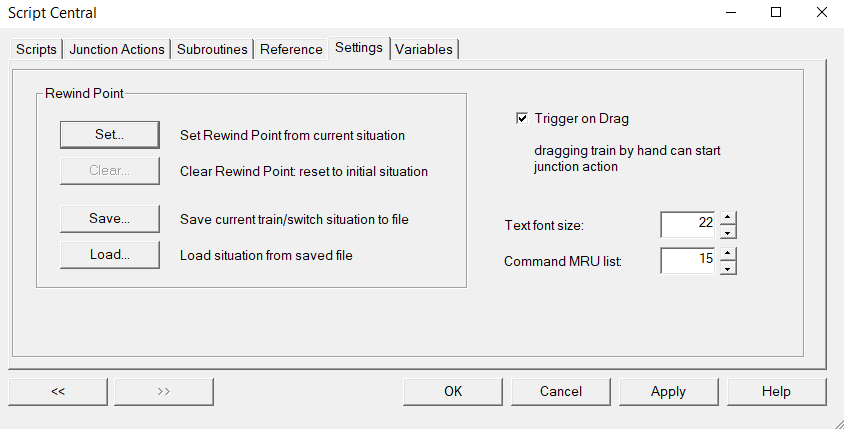
The Settings Tab allows you to save the positions of your trains and switches. To some extent this feature has been superseded by the "Set Rewind Point" button on the Script Toolbar which is more convenient. There is also a feature to save your current train positions and switch positions into a separate file, and to retrieve them later. Just add a check mark to the "Trigger on Drag" box to enable Junction Actions to be activated when moving your trains with the mouse. You can also adjust the text size used in the Script Central and Ops Central dialogs here, and adjust the length of the Command MRU list used by the Script Command Prompt dialog. |
||
Variables Tab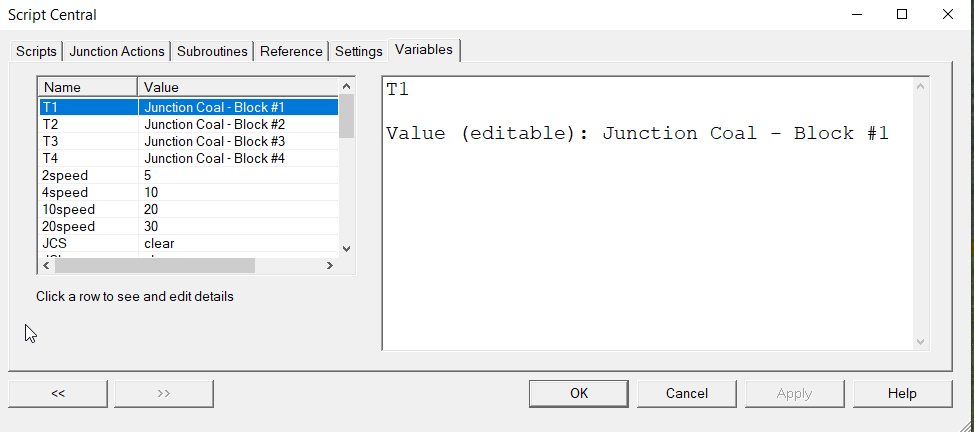
The Variables tab maintains a record of all variables used within the scripts and continually updates their values when you are testing your scripts. This information can be extremely valuable when you are attempting to debug your scripts. If you have more than one layout open it is important to be aware that these variables are Global and available to all open layouts. Care is therefore needed to ensure that values set on one layout do not inadvertantly affect the scripting operations on another open layout. |
Master ScriptThe Master Script is different to the other script types because it is not attached to any train or to any junction. What makes it special is that it will run automatically as soon as the layout is opened. A layout does not have to include a Master Script, but if it does then it can only have one of them. To add a "Master Script" open "Script Central" by clicking the SC button on the "Script Toolbar", select the "Scripts" tab. Right click in the left panel and select the option to "Add Master Script".
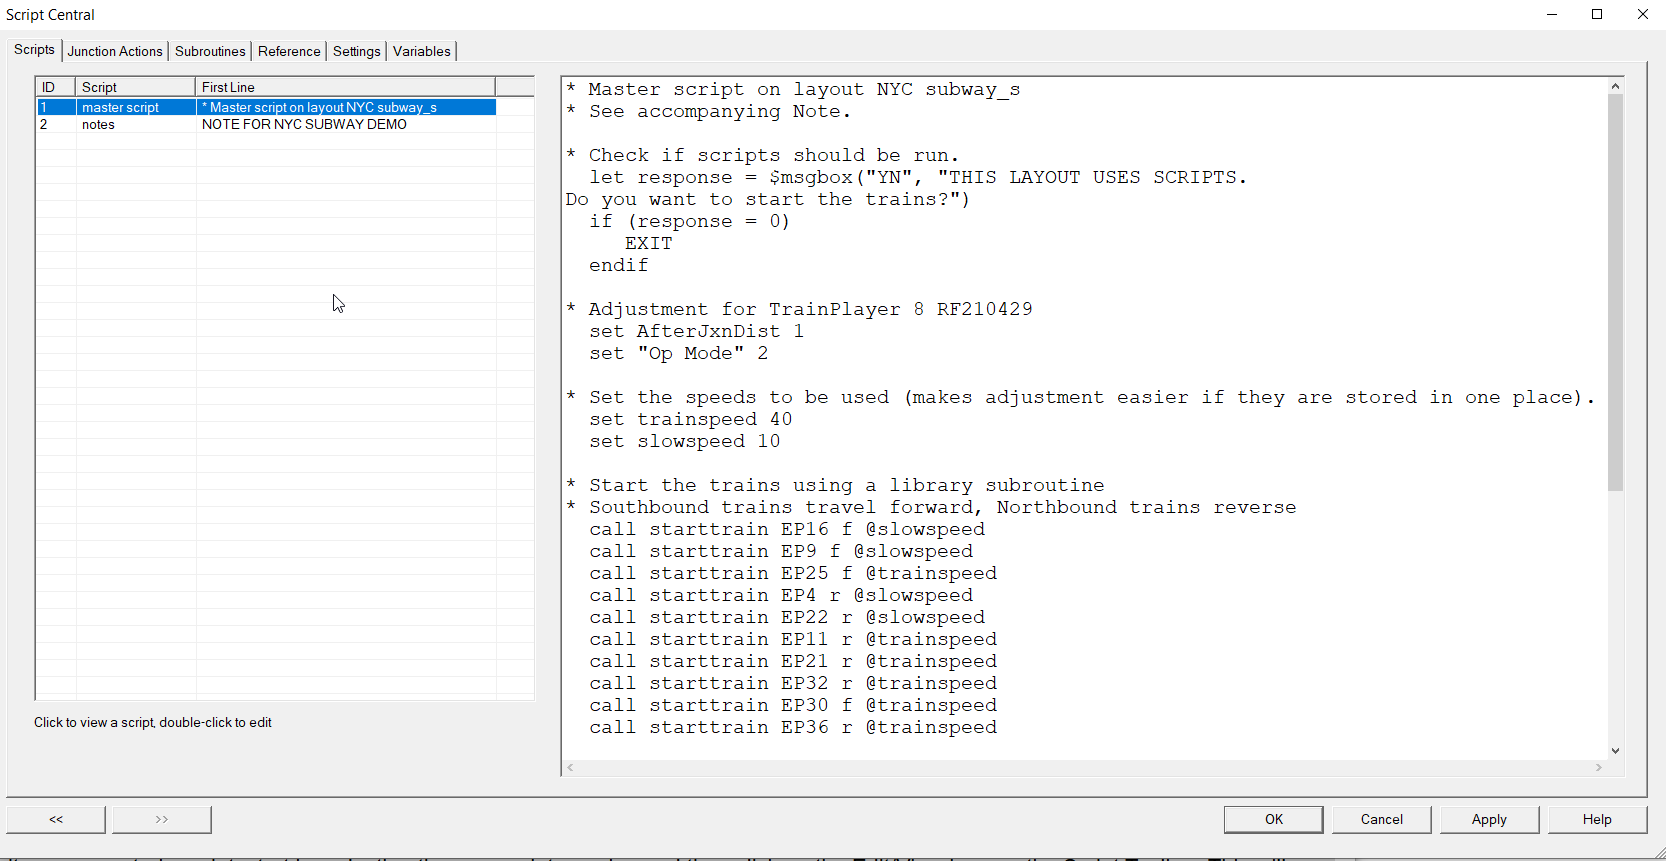
This will immediately add the new script to the list, including a default opening comment prefixed with an asterisk * which you can leave in place or edit as you wish. While you can use any TPL instruction in a Master Script, this would normally be used for tasks that you only want to run once as the layout opens. The example image depicts the first part of short Master Script for the automated version of the NYC_subway_s layout which controls a subdivision of 10 trains operating continuously. You can find this layout in the Scripts and Puzzles\Scripting examples folder on the web tab of your layout chooser. Comments can be depicted by * an asterisk, ** two asterisks, // two slashes, or a # followed by at least one space.
Our screenshot includes the code for displaying an introductory question, testing the user response, setting the speed variables and repeatedly calling a library subroutine to start all ten trains running simultaneously. Additional code in this Master Script includes defining a "Procedure"which can be called from Junction Actions which is used to hold up trains in the stations until the track ahead is clear enough to permit the trains to proceed. Other tasks commonly actioned in subroutines can include displaying comprehensive on screen notes, setting up and initializing variables and defining other new Procedures for evaluating conditional actions. |

Train Script Editor |
||
The San Jose Central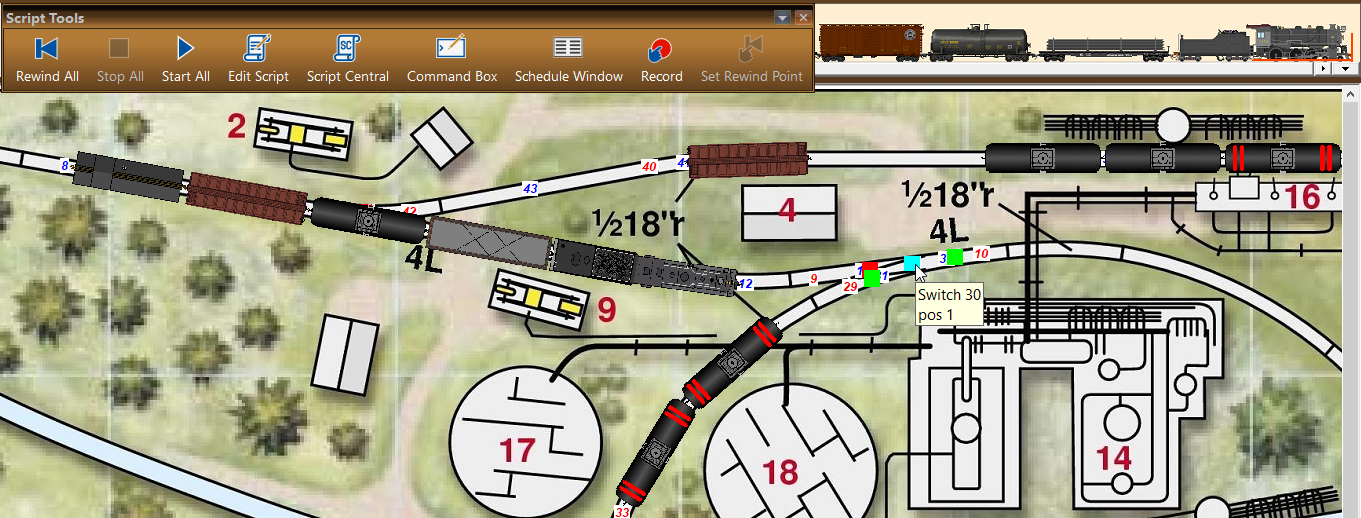
"The San Jose Central" can be found in the "Demo" folder of your Layout Chooser. There are no scripts on this layout and it opens with the "Extra ES1" at the top of the layout. As a demonstration we are going to use our "Train Script Editor" to instruct this train to pick up the two tank cars from the nearby siding. For the time being just take our word for it that the code is good. If you are a novice you will be able to learn about the syntax of all TPL commands and functions in Part 2 of this series of documents. In our image from the layout we have switched on the "Show Numbers" option from the "Tools Menu" to enable us to identify the Junction ID and position of the switch leading to the additional tank cars - Switch 30. |
||
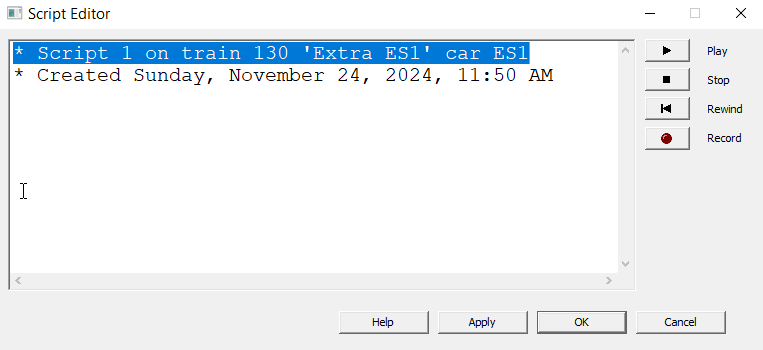
Getting StartedTo write your own "Train Script", start by selecting an appropriate engine and then click on the "Edit Script" icon on the Script Toolbar. This will open the Train Script editor with a blank script waiting to be filled in. The default text generated comprises two Comments which include the name of the selected engine. Comments are lines within a script that do not perform any actions, they are there solely to aid the readability of the script and we would recommend that any script should include lots of them. |
||

In its present form this script does absolutely nothing, but the purpose of this section is to demonstrate how to open the dialogue and write a simple Train Script of your own. If this is to be the first script on the layout then we recommend that you save the current train positions by clicking on the "Set Rewind Point" button on your Script Toolbar before you start coding. |
||

Alternatively if your layout already contains other scripts then you should click on the "Rewind All" button to ensure that all scripts start from a common position so that they can be run simultaneously. |
||
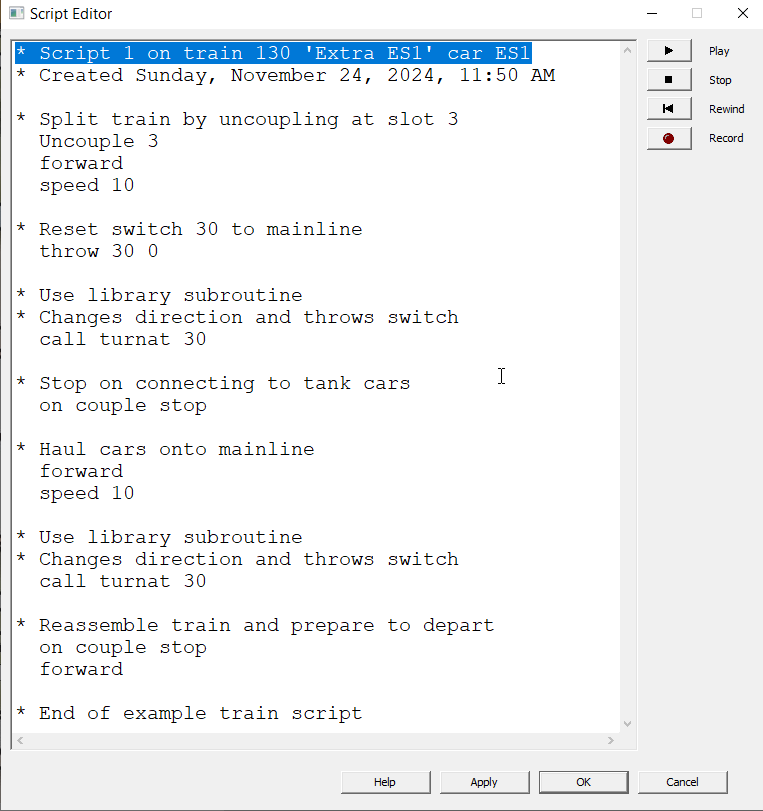
The Finished ScriptThe script is commented to explain what each block of code is doing. You can test the code as you work using the Rewind and Play buttons available in the editor. Once the script is completed and you are satisfied it is working properly you should click the Apply button, click the Rewind All button on your Script Toolbar and Save your layout. TurnAt SubroutineThis script uses "TurnAt" which is one of the many subroutines distributed with the TrainPlayer subroutine library.
|

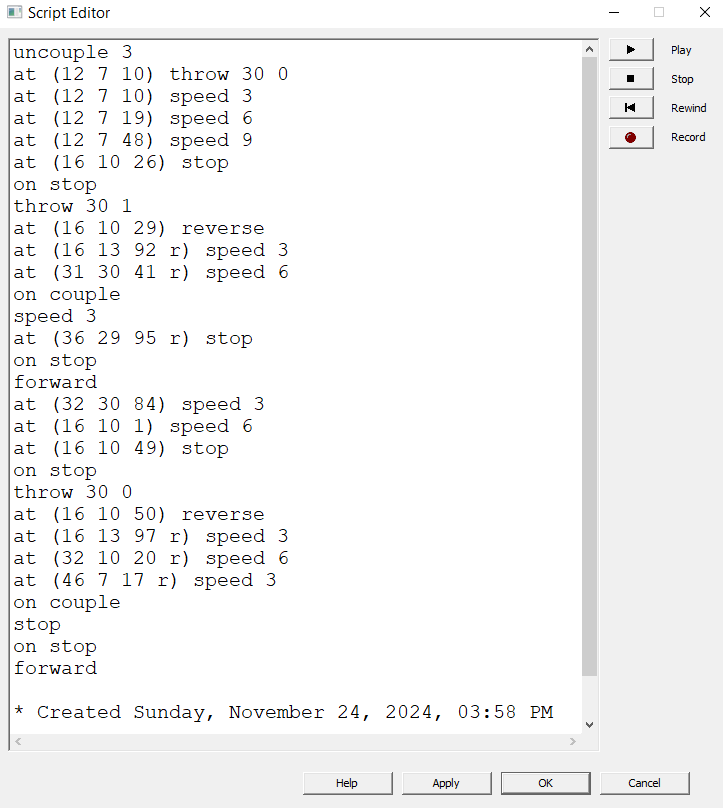
Script RecorderThe script recorder has been part of TrainPlayer since the introduction of scripts in 2006 and it still functions in the same way that it always did. Scripts written with the recorder only make use of the original Command Set, and they only use a single Wait Condition AT, which is applied to every line of the script which involves a moving train.
To use the Script Recorder, open the Train Script editor by clicking on the "Edit Script" icon on the script toolbar. Then click the "Record" button on the editor, set your route and drive your train. You will see the script being written automatically as you move. When you are done click "Stop". Rewind your script and click "Play". Return to "The San Jose Central"The script on the right has been recorded on the San Jose Central, it performs exactly the same task as the script which we wrote for our ourselves in the previous section. Although it looks substantially different and is not commented which makes editing difficult. All we needed to do was click the "Record" button and use the Control Panel to drive the train which picked up the two tankcars. This script was then written automatically for us. If you rewind it and save the layout you can reload the layout and play it as often as you wish. To help you to understand the meaning of this code we will translate only the sixth line [at (16 10 26) stop] which means: when the center of the engine reaches a point on track 16 which is 26% of the track length from junction 16 it must stop. The extra "r" character that appears in some of the other statements means that the direction control setting was set in Reverse when the "AT" position was recorded. This approach is great if you don't need all the power of the TrainPlayer language and won't want to fine tune or modify your script later. You could use this recorder method as a starting point for writing a Train Script but these documents are intended to help you to write your own code, so no further mention will be made of the Script Recorder. |

Junction Action Editor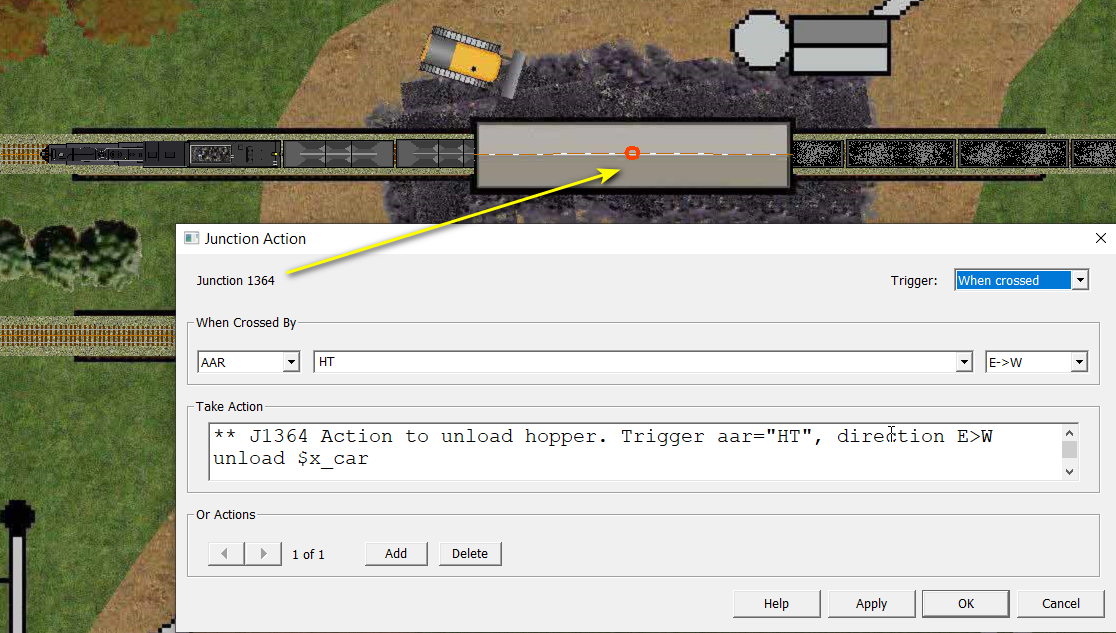
To locate, create or edit a Junction Action we need to use the "Edit Track" tool button from the Builder Toolbar to put the program into TrackLayer mode. All existing Junction Actions on a layout trackplan can be identified and located by the red circle highlighting its junction on the track. This circle is only visible when the "Edit Track" button is selected and TrainPlayer is in TrackLayer mode. This example comes from our "Junction Coal to Big Flats Power" layout which can be found on the web tab of the layout chooser in the "Scripts and Puzzles\Scripted layouts" folder. This simple script unloads a whole train of type HT hoppers, one by one, as they pass through the unloading shed. If you examine the image you will see how this works. The "Action" is triggered whenever it is crossed by a moving train or car. The script will only be run if a car with an AAR code of HT is crossing the junction in an East to West direction (right to left). $x_car refers to the car currently crossing the junction. The first line of code is a comment to remind the developer what the script does. The second line of code "unload $x_car" tells the program to remove the load from any car that meets these conditions as it crosses this junction. That is any loaded hopper, with an aar code of HT, which is traveling right to left across this junction. The script will ignore any car or train which doesn't meet these conditions.
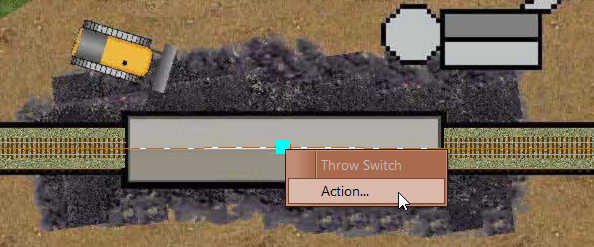
How to do itRemember to select the "Edit Track" button from the Build toolbar to put TrainPlayer into TrackLayer mode. Select an existing track junction, the node between two or more track pieces. Then right click on the required junction and select "Action..." to open the Junction Action editor for the selected junction. Alternatively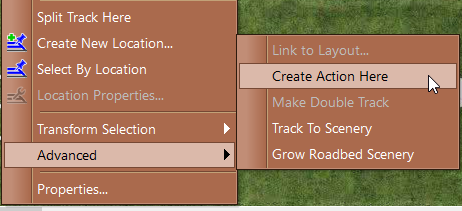
The procedure is slightly different if we want to create a junction action in the middle of an existing piece of track. Right click at the appropriate point on the track, then select the option to "Create Action Here" from the Advanced section of the track context menu. This will split the track at the appropriate point, create a new junction in the designated position and open the junction action editor. The Combo Menus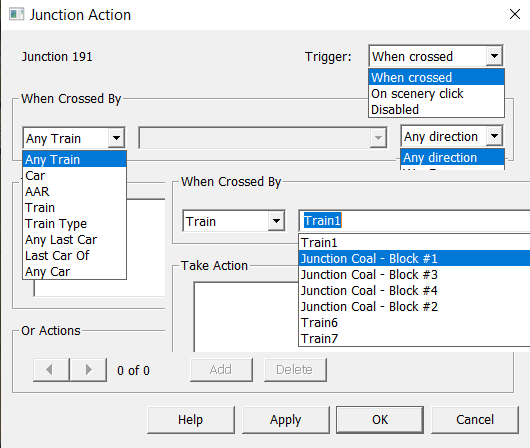
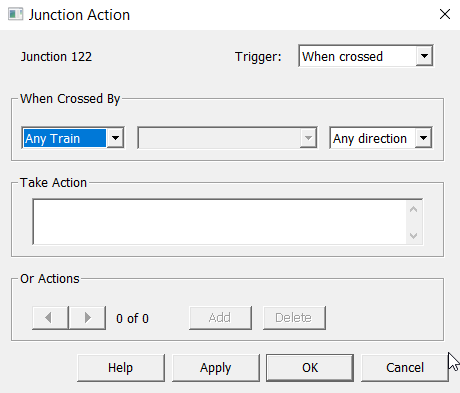
When the editor first opens for a newly created Junction Action the "Take Action" box will be blank waiting for your code. The Trigger will be set to "When crossed", and the conditions will be set so that the Action will be initiated by any train crossing the junction in any direction. These conditions can all be adjusted in the four combo menus which are shown in the image to the left. The central combo menu in the "When Crossed By" section sources its information from the current layout and is only available when the left combo menu requires additional information. Use the "Add" button to add more "Actions" to the same junction, perhaps something to be actioned when a train is traveling in the opposite direction. Or perhaps you require different scripts to identify and route the passenger trains through a station and the freight trains to the local yard. The "Delete" button completely removes the current script from the layout, so use this with care. An alternative is to "Disable" the script from the Trigger context menu. Click "Apply" at the bottom of the dialogue to add the script to the layout (Note: clicking "OK" also adds the script to the layout and simultaneously closes the Junction Action dialogue). SummaryA Junction Action reads the details of the train crossing its junction to check if the stored instructions relate to this particular train or train type. If appropriate the script is temporarily attached to the train and immediately executed. If the train doesn't meet the criteria then the script is ignored. Then a further check is made to see if a different Junction Action instruction has been stored for this particular train (or train type). If the train was already running a script when the "Action" was activated, the original script is suspended and will automatically resume on completion of the Junction Action script. Typical uses for Junction Actions might be to to stop a train briefly in a station, set down and/or pick up a cut of cars at an industry, route a particular train through a series of switches, call a subroutine, or even to add a complete train script to the train crossing the junction. |
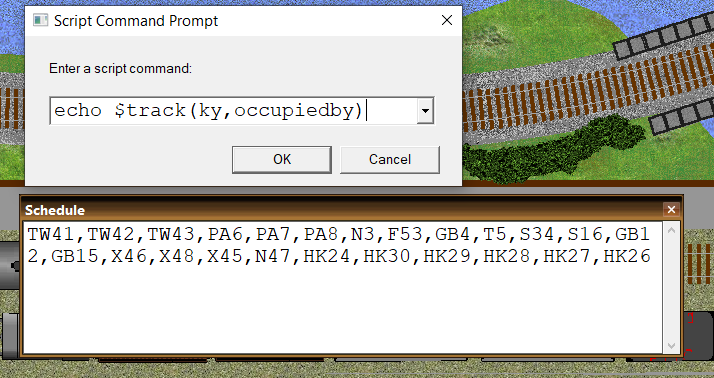
Script Command PromptLaunch the "Script Command Prompt" from the "Command Box" button on the Script toolbar. This is an invaluable tool for testing small snippets of script code, extracting data from the layout file, running subroutines or calling test code stored in temporary subroutines.
In our first example we have used the $track function to extract a list of the cars ocupying the KY yard on the Ffarquhar layout. The data has been sent to the Schedule window which can be opened from the Schedule toolbutton on the Scripts toolbar. The Script Command Prompt dialog can be expanded up to the width of your display. This enables it to be used to deliver a sequence of script commands delimited by the ; semicolon character.
For this second example we will return to "The San Jose Central" which we used in our previous explanation of the "Train Script". We can test a series of script commands to perform the task of pulling the two tank cars from the adjoining siding. If the script fails we only need to hit the rewind button and try again. First we need to expand the width of the "Script Command Prompt" dialog to accept our code in a single line of text. We can use the ; semicolon character in place of a line break for the delimiter between the individual commands.
|
|
drive es1 |
Instructs the program to apply this script to engine ES1 and then execute it immediately. |
|
uncouple 3 |
Uncouples the cars behind slot 3 of the train, i.e. in front of the first tank car. |
|
f 10 |
Calls the "F" subroutine with a parameter of 10 (mph). The call command is not needed because "F" is stored in the subroutines root folder. The subroutine converts "f 10" into the TPL commands "Forward ; Speed 10". |
|
call turnat 30 |
Calls the TurnAt subroutine with a parameter of 30 which is the junction number the train needs to turn at. TurnAt stops the train after switch 30, throws the switch and reverses at 5 mph into the siding. |
|
on couple |
This is a wait condition. The script waits for the reversing train to couple to another car before executing the next command. |
|
stop |
Stops the train from moving immediately after the coupling event has occurred. |
|
f 10 |
Repeats the call to the "F" subroutine with a parameter of 10 (mph). Once again the subroutine converts "f 10" into the TPL commands "Forward ; Speed 10". |
|
call turnat 30 |
TurnAt again calls the subroutine to turn the train after the designated switch. The train stops after switch 30, throws the switch and reverses at 5 mph down the main line. |
|
on couple |
The script waits for the train to couple onto the rest of its original consist before executing the next command. |
|
stop |
Stops the train from moving immediately after the coupling event has occurred. |
|
forward |
Sets the Control Panel switch to "Forward" so that the train is ready to continue its journey. |
|
enddrive |
Terminates the script that was applied to engine ES1. |
MRU List
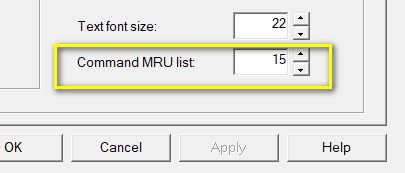
The combo menu gives access to a "most recently used" list of commands and scripts that have been actioned in the Script Command Prompt. This list can be cleared at any time using the "Clear List" item at the bottom of the menu. The number of commands that can be stored in this MRU list can be defined on the "Settings" tab of the Script Central dialog. |
Read Only Flag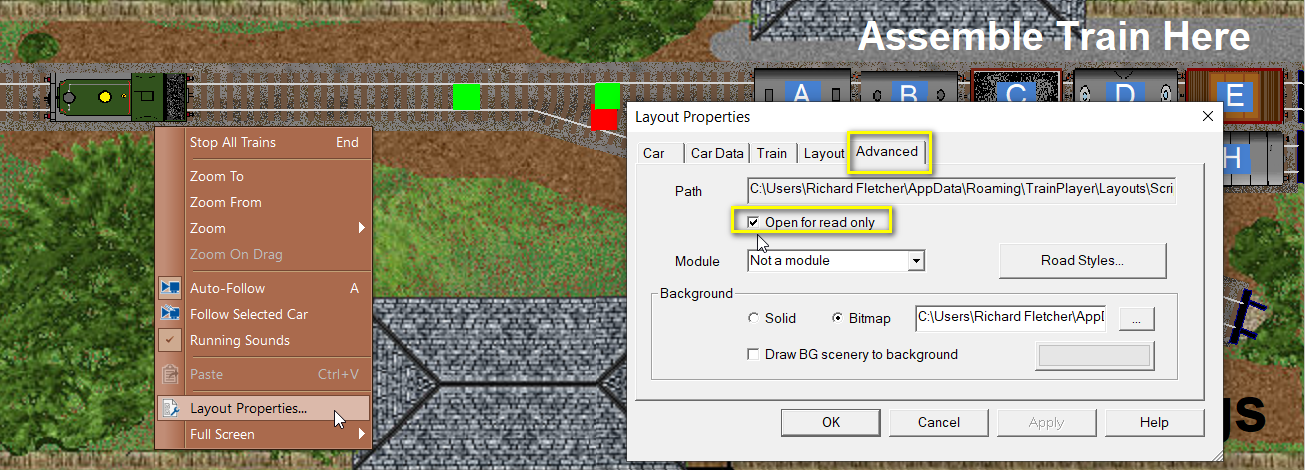
Once you are satisfied that the scripting of your layout is complete, you can use the "Read Only" flag to protect your Scripts from accidental damage by enthusiastic users. Right click on your layout and select Layout Properties from the context menu. Go to the Advanced Tab and put a checkmark in the box which states "Open for Read Only", then Save your file giving it the default name you require. When this file is reloaded it will be set for "Read Only" so that if a user accidentally clicks "Yes" when prompted to Save on closing the file, this will not overwrite the original scripted scenario. Instead it will offer an incremental file name in the "Save As" dialogue. |
Richard Fletcher for TrainPlayer - December 2024

 If we examine this code we can disassemble it as follows: