|
OVERVIEW |
STEP BY STEP |
ADDITIONAL RESOURCES Part 2 - Commands and Functions |

|
Our Hopper Loading Demonstration uses just four scripts, a Master Script and three Junction Actions. This layout was first devised in 2014 and the best way to familiarize yourself with how it works is to open and run it from the Scripts and Puzzles\Scripting Examples folder in your Layout Chooser. |

|
"Old_King_Coal" needs to travel to the mine, reverse its consist onto the mine storage track, uncouple the caboose, load the empty hoppers by propelling them in reverse through the loading shed and reattach them to the caboose. As capacity on the loading track is limited the loading operation will be restricted to loading only two cars at a time. Once the train is loaded it can highball back onto the main line and head for home via a complete circuit of the track. |
|
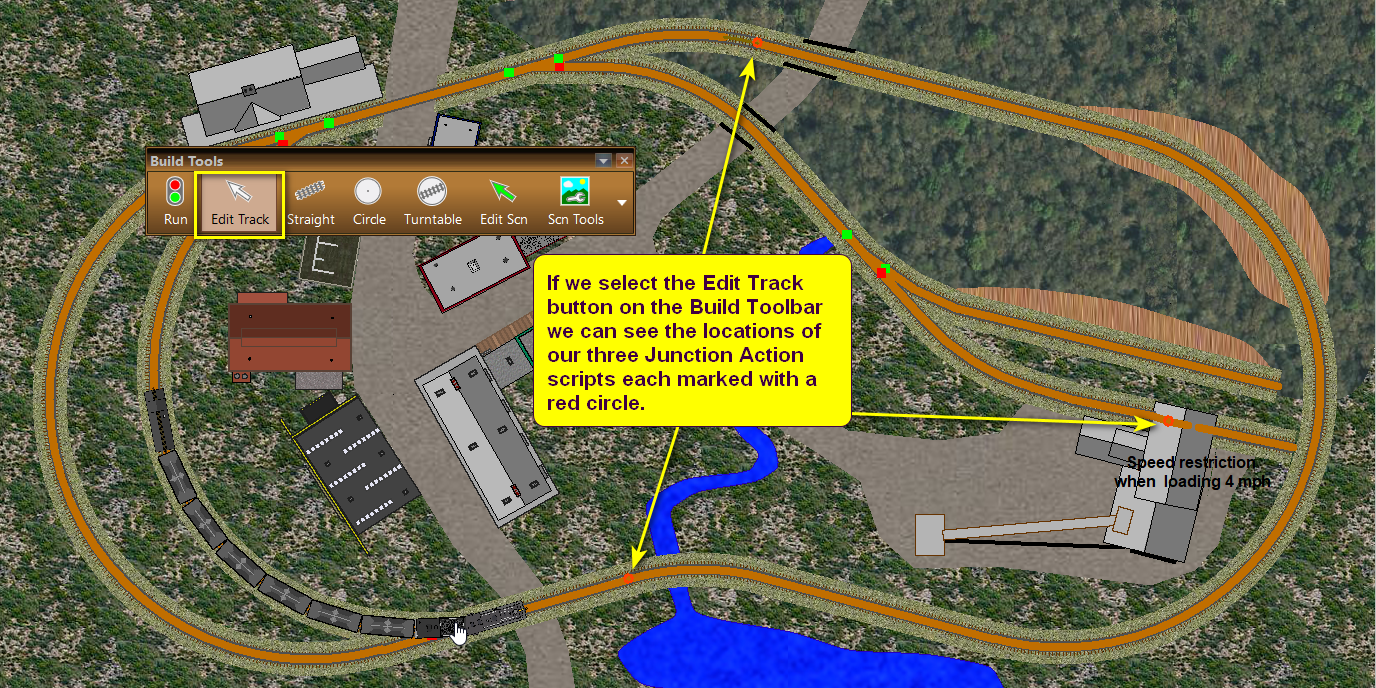
Each of the three Junction Action scripts serves a different purpose. The Action in the loading shed handles the loading of any empty hopper that is pushed or pulled through the shed. The Action on the bottom track ahead of the train applies a temporary, but full, Train Script to the train for controlling all its movements, and the third Action at the top of the image performs a check on the departing train, analysing its consist to ensure that it has been loaded properly and that its cars are in the right order. The Master Script performs three separate tasks, it starts "Old_King_Coal" moving towards the mine, then it displays an introduction and instructions for the task, and finally it offers the user a choice between performing the task for themselves or watching a scripted demonstration. These are all the right steps but they are not necessarily presented in the right order and our first step in preparing this layout was to write the Junction Action code needed for the loading shed because loading the hoppers is the key purpose of this layout. Once the loading shed is functioning properly the layout can be tested prior to preparing the additional scripts. |
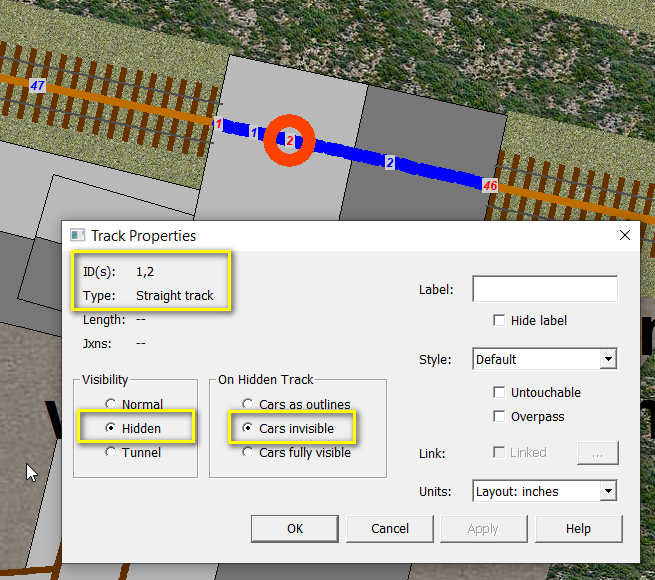
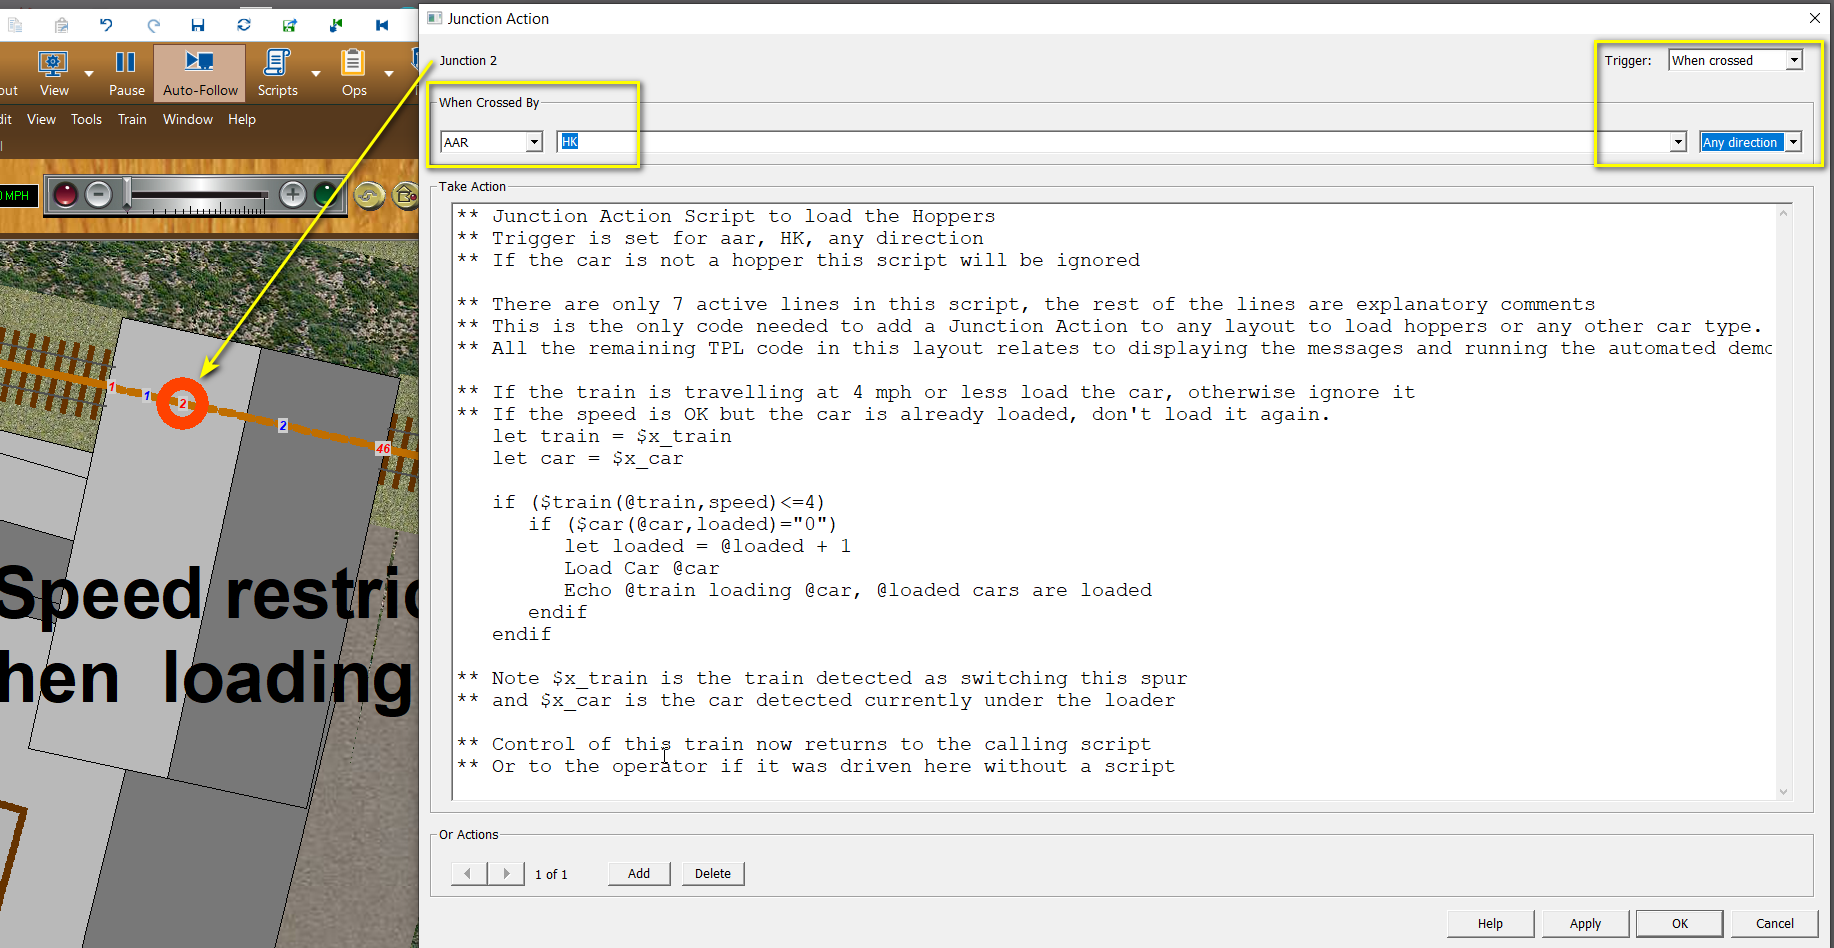
Before we examine the script used for loading the hoppers it is worth taking a look at the track arrangement inside the loading shed. To do this we select the Edit Track button on the Build toolbar and select the two short lengths of track within the shed. To assist in finding the junction locations we also select Show Numbers from the Tools Menu. The track visibility on the two short lengths of track, tracks 1 and 2, is set to Hidden and the visibility of any cars on the hidden track is set to Cars invisible. This ensures that any car entering the shed for loading cannot be seen while it is inside the shed, but if the load status changes while it is out of sight the effect will be immediately visible when the car emerges from the shed. To create our Junction Action script we right click on Junction 2 and select Action from the context menu. This opens the Junction Action Editor. We set the Trigger combo at top right to When crossed, and the Direction combo to Any direction. We set the left hand combo to AAR code and the car type combo to HK which is the code used by the hoppers on this layout. This ensures that only cars with an AAR code of HK will execute this script and all other car types entering this shed will be ignored. Now we can turn our attention to the script itself which is heavily commented to assist the novice to understand what is happening. The actual commands are restricted to just nine lines in the middle of the text.
|
||
|
The first line of this script makes use of the System Function $x_train to extract the name of the train containing the car which triggered the script and store this name in the variable train for processing. The second line uses the System Function $x_car to extract the car label (AAR code plus CarID number) and store this in the variable car for further processing.
The remainder of the script is a conditional statement to check that the speed of the train (whose name we have stored in the variable train) does not exceed 4 mph, AND the car which triggered the script, and whose label is stored in the variable car is not already loaded. Both of these conditions need to be true to execute the command to Load the car which triggered the script as it entered the loading shed and crossed Junction 2. In addition to applying a load to the car, the script will also increment the loaded variable by one. This variable is initiated in the Master Script with a zero value and is used to enable us to know exactly how many of our hoppers have been loaded, and identify when the loading task has been completed. In Step 2 we will take a look at the Master Script. |
||
|
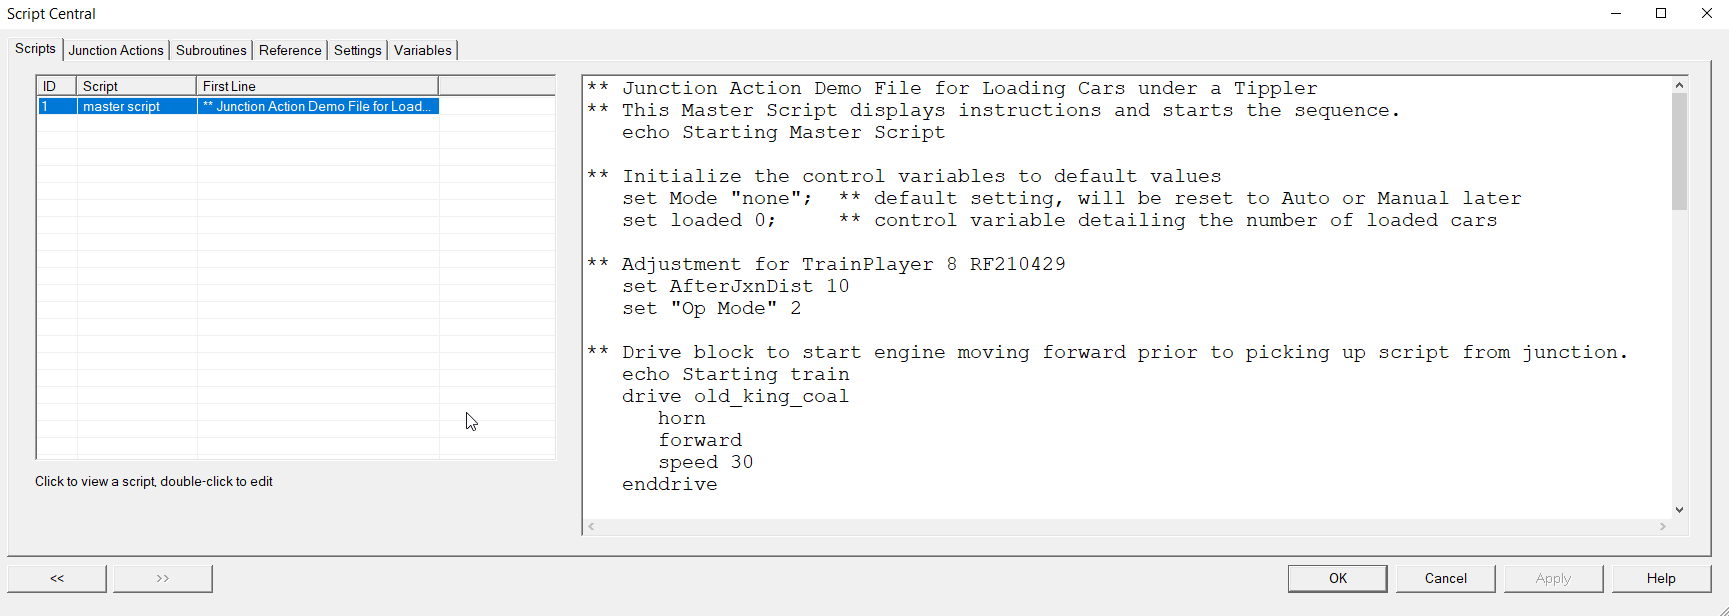
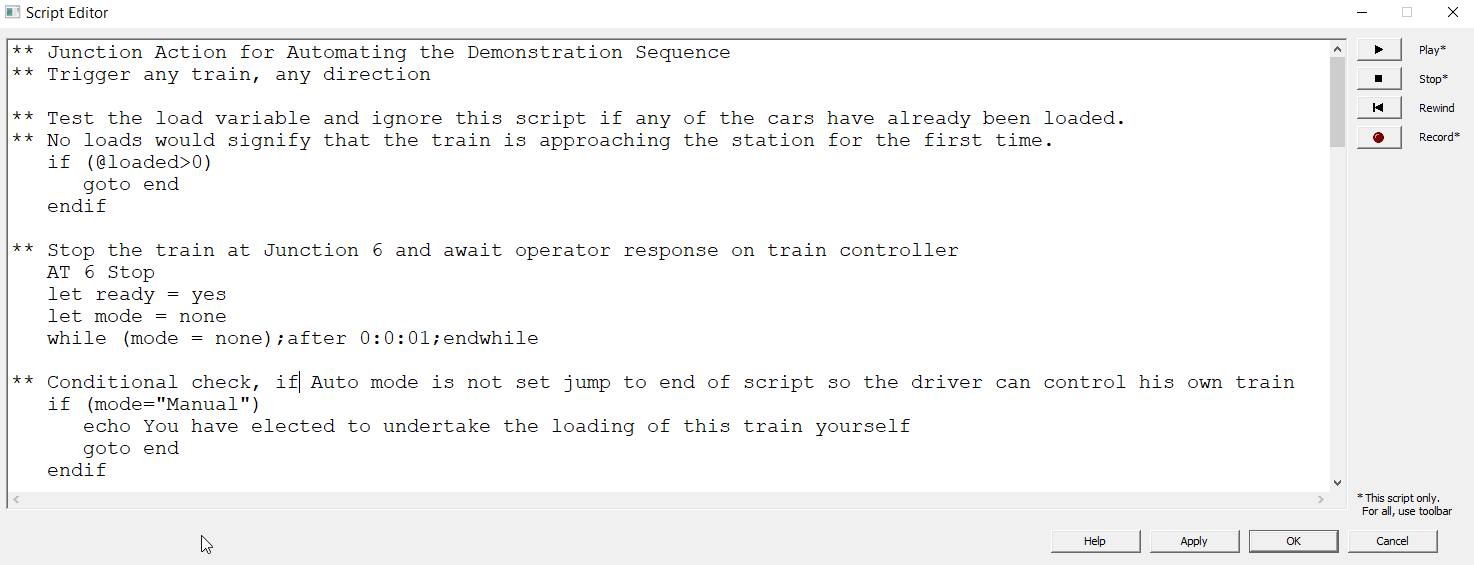
The Master Script runs automatically each time a scripted layout is loaded - unless it has been deliberately disabled on the context menu of the Scripts tab of Script Central. The first block of code in this Master Script is used to echo a message to the status bar and Schedule Window to the effect that the Master Script is being started. The second block of code is used to initialize two variables which will be needed later by the other scripts. The Mode variable which will record the user's choice as to whether he wants to operate the layout manually, or whether he would prefer to watch an automated demonstration. The loaded variable is set to 0 and will be used by the Loading Shed script to keep track of the number of hoppers that have been loaded. Our third block of code was added in 2021 to make use of two new features that were added to TrainPlayer with the introduction of version 8. These are the introduction of the AfterJxnDist System Variable which specifies how far in RRU units a train will travel beyond a specified junction when an AFTER <Jxn> command is used - to ensure the switch is not obstructed if it needs to be thrown. The other change makes use of a new option 2 for the System Variable "Ops Mode"to just Stop the train if a derailment occurs. Previously the options were restricted to 0 for Crash and scatter the wreckage, or 1 for Bounce and start traveling in the opposite direction. Our final block of code in this first section of the Master Script is a Drive block to place a few lines of code on the engine of Old_King_Coal to start him out on his trip towards the mine. He will receive further instructions on route from a Junction Action script located at Jxn 13 (See Step 3 - Train Control Script below). The next task performed by the Master Script (see below) is to put up a Note to explain to the user exactly what he is expected to do with this layout. To protect this note from accidental closure we modify another System Variable and set the value of NoteDownOnEsc to 0. If we were to lose this note before the user has read it then he wouldn't know what to do next - so we lock him into following our instructions. |
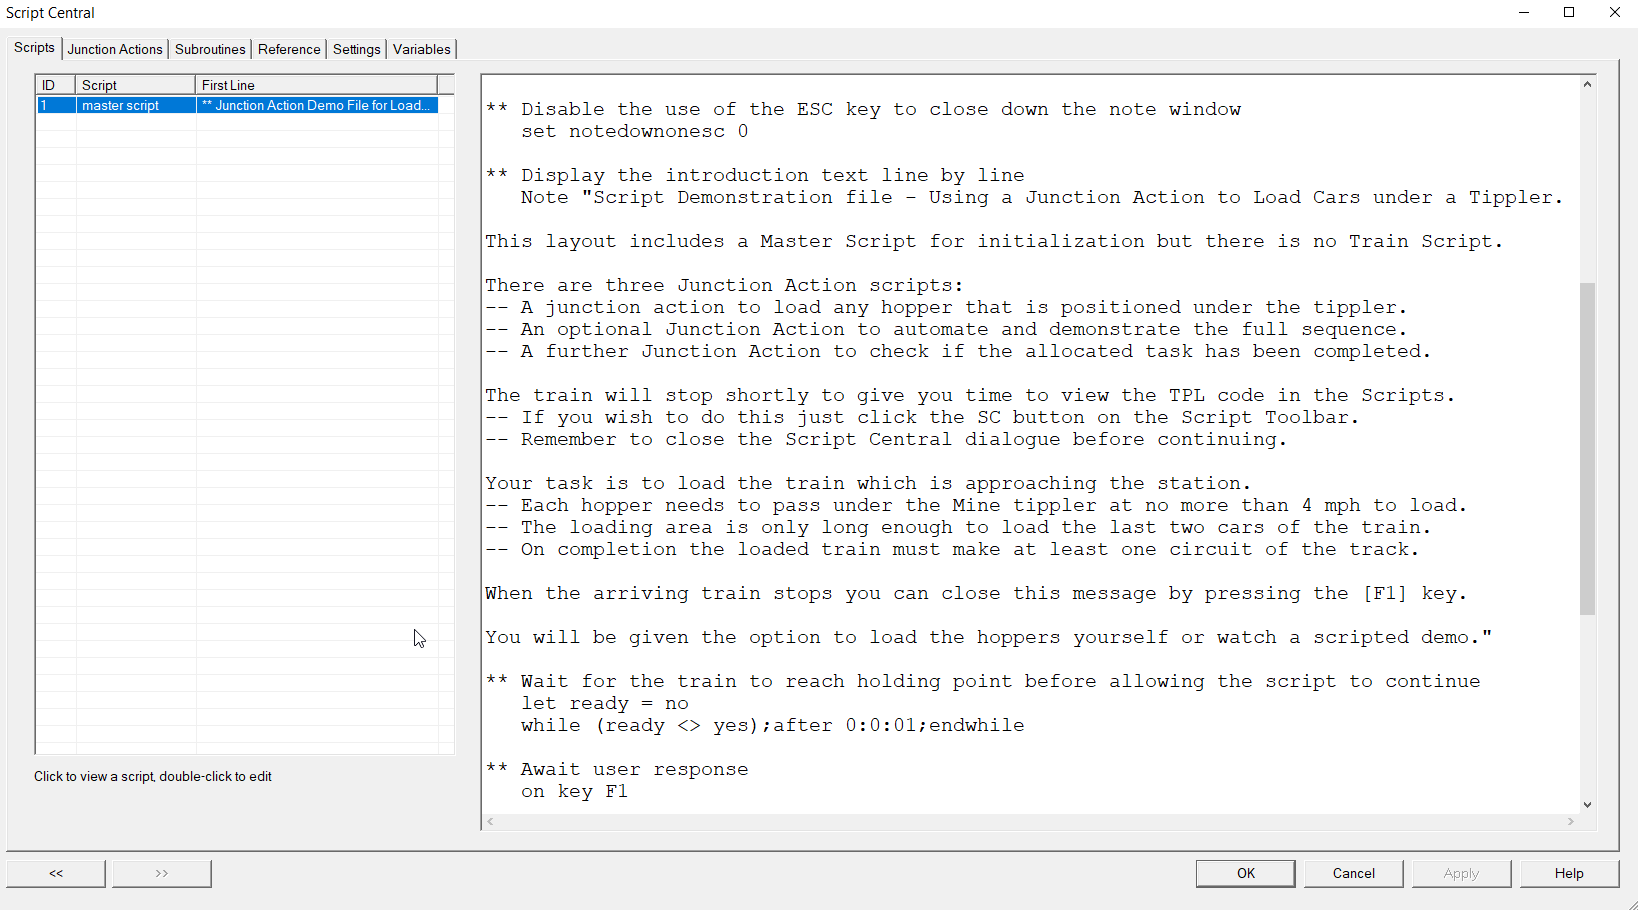
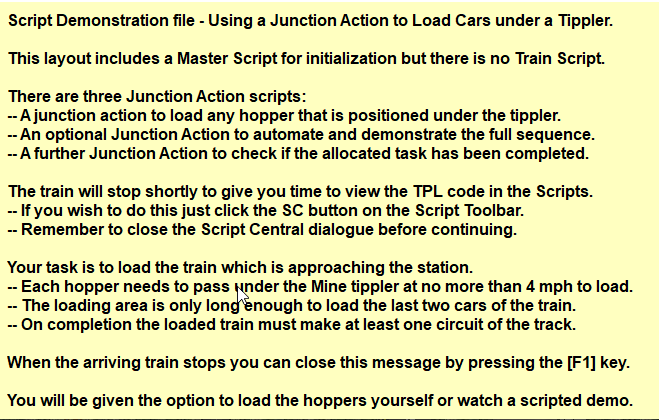
The Note itself is presented in the form of a multiline display string enclosed in quotes. The command is Note and the note itself will display all the text following the open quotation mark right through to the closing quote which is several lines further down in the script. The image on the right shows how this note is displayed, the size and position were first set up during testing and this data was then automatically saved with the layout. If we were writing this script today we would make use of the NoteWndRect System Variable to define the exact top,left,bottom,right co-ordinates for the required Note window. This system variable was not available to us in 2014 when this script was written. After displaying the Note Window, the Master Script waits in a little loop for the train to Stop just prior to the trailing junction leading into the mine area. This line of code is in effect a customized Wait Condition. It assigns a value "no" to the variable ready and waits for this value to change to "yes". It would wait for ever if it were not for the fact that our Train Control Script will change this value automatically to "yes" as soon as our train stops moving to wait for further instructions. Once the train stops the script can continue, which it does by waiting for the user to press the F1 key - as per the instructions in the Note window. |
|
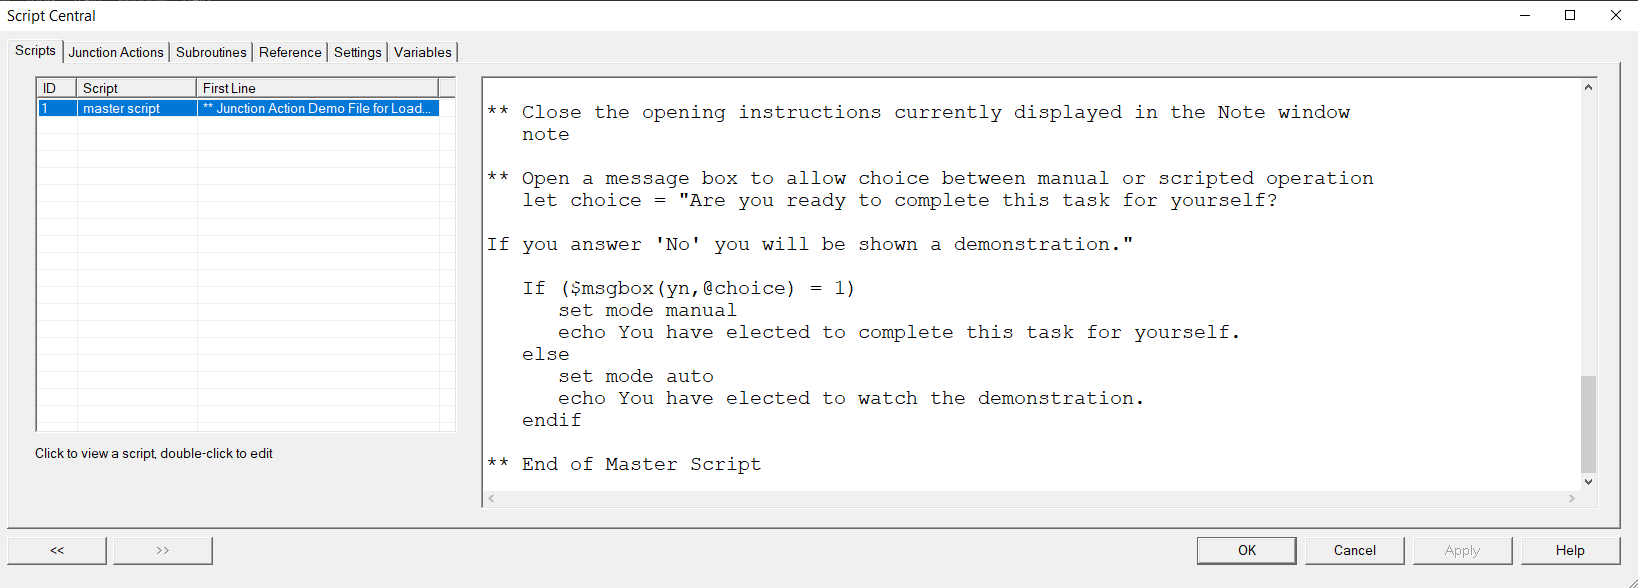
The final part of our Master Script starts after the train stops and the user presses F1 to close the Note window.
The next command to be executed closes down the Note window. A multiple line display string is allocated to the variable choice and a message box is opened within a conditional statement to put this question to the user. $msgbox(yn,@choice) is a System Function which returns 1 if the user clicks the "Yes" button or 0 if he clicks the "No" button. Our script reads ths response and if the user opted to complete the task himself by clicking Yes the Master Script allocates the value "manual" to the variable Mode, if he clicks No the Mode variable is set to "auto". These values will be processed by the "Train Control Script" which we will turn to in Step 3. |
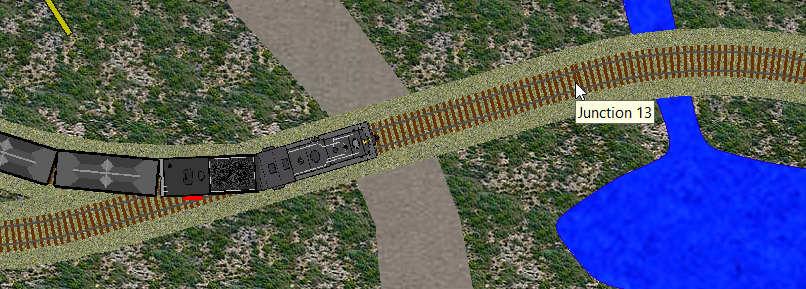
In the previous step we used a Drive block in our Master Script to start our train moving towards the mine at 30 mph. However we didn't include any other instructions for the train within the Drive block and we opted not to provide "Old_King_Coal" with a "Train Script". This is largely a matter of personal preference, had we used a Train Script we would have needed to rewind the script before starting it because Train Scripts require all trains to be in exactly the right position for the script to start. Had we written the whole script within the drive block the Master Script may have become a little unwieldy and difficult to follow. So we opted to just start the train rolling and issue it with further instructions through another Junction Action script. This script is positioned on Junction 13 which is a point the train has to cross shortly after starting out on its run to join the main line. When a train triggers a Junction Action script, the script is added to the train as a temporary Train Script and actioned immediately. If the train is already running a script that script is suspended and will not resume until the temporary Train Script has completed. So once the engine of "Old_KIng_Coal" has passed Junction 13 it is once again under script control, albeit with a temporary Train Script that will disappear once it reaches its end. You can check this out by clicking the "Edit Script" button on the Script toolbar - lo and behold "Old_King_Coal" is running a Train Script that has been loaded from the Junction Action which we stored on Junction 13. |
|
If we compare the first few lines of this temporary Train Script with the Junction Action script we placed on Junction 13 we will see that the commands to be executed are identical. Our Junction Action is set to trigger when crossed in any direction by any train. These are the default settings for triggering a Junction Action. We could have changed "Any Train" to "Train" and selected "Old_King_Coal" in the middle combo but as there is only one powered train on this layout the defaults were considered acceptable. Next we will analyse the script. |

|
The loaded variable was set to 0 in the Master Script when we first loaded our layout, we only want to run this script if this is still the case; because if any of the cars have already been loaded this can't be the first time this train has passed this junction. If any loaded cars are detected the script control jumps to the "end" label and no further action is taken. If there are no loaded cars on the layout the train is required to visit the mine for loading so the script continues. The next command is to stop at Junction 6 just ahead of the trailing spur into the mine. Once the train stops the variable ready is set to "yes" and the variable mode is set to "none" which allows the Master Script to accept the F1 key to close the initial opening Note. Closing the Note authorizes the Master Script to display the message box which asks the user if he wants to load the cars himself, or watch the demo. If the user opts to do the job himself the mode variable is set to "manual", if he declines it is set to "auto". This Train Control script then checks the "mode" variable continuously using a custom wait condition which holds up the script until the mode variable is no longer equal to "none". When the value of mode changes we check to see if it has been changed to "Manual" and if so we jump to the end of the script because the user has opted not to watch the demonstration. NOTE: If we were writing this script today we would probably have used "EXIT" rather than "GOTO END" but that option was not available to us in 2014 when this script was written. As the mode variable does not contain "none" and does not contain "Manual" then it must contain "auto" (the only other possible option) so our Train Control Script now continues with instructions for our demonstration of loading the train.
The report referred to above is prepared by the Task Analysis Script which is described in Step 4. |

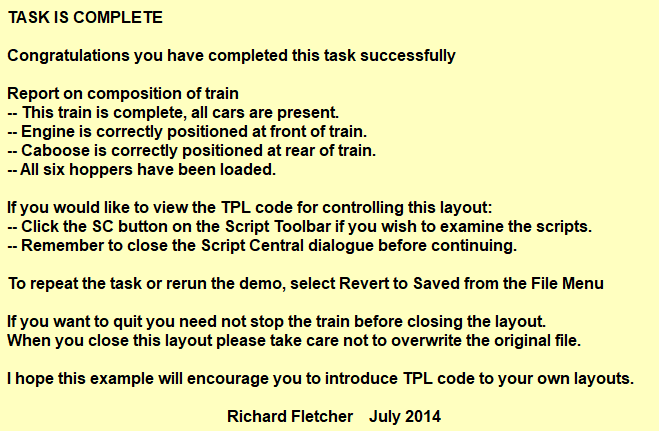
The final Junction Action on our Hopper Loading demonstration layout checks that all six hoppers have been loaded and the departing train is in the correct order. The script is attached to Junction 6 which is the same junction where the empty train stopped prior to commencing the loading operation. It is triggered by "Any Last Car" crossing the junction in an East to West (right to left) direction. A transcript of the full script is shown below, it works by testing the length of the train for all nine cars, ensuring the engine is the lead car and the caboose is the last car. It also tests that all six hoppers have been loaded. A multiple line display variable is built for the final report and presented in the form of a note indicating success or failure when the train has completed its first circuit of the track. The first block of code in this script tests the loaded variable to ensure that at least some cars have been loaded. If none are loaded the script terminates without a report. This is because the first time the train crosses this junction will be when the empty train first arrives at the mine for loading. We do not want the script to run until it detects the departing train after the loading operations have been undertaken.
|
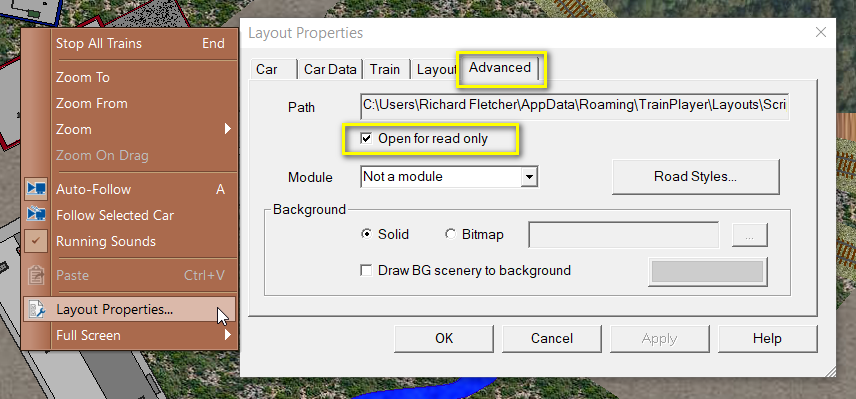
Once you are satisfied that the scripting of your layout is complete, you can use the "Read Only" flag to protect your Scripts from accidental damage by enthusiastic users. Right click on your layout and select "Layout Properties" from the context menu. Go to the Advanced Tab and put a checkmark in the box which states "Open for Read Only", then Save your file giving it the default name you require. When this file is reloaded it will be set for "Read Only" so that if a user accidentally clicks "Yes" when prompted to Save on closing the file, this will not overwrite the original scripted scenario. Instead it will offer an incremental file name in the "Save As" dialogue. |
Richard Fletcher for TrainPlayer - December 2024