Advanced Ops for the Operator

An introduction to TrainPlayer Advanced Ops

Advanced Ops (abbreviated to AO) is a sophisticated, customizable, easy-to-use system for conducting both freight and passenger train operations on our TrainPlayer simulated model railroads. The new AO system recognizes that all layouts have different needs regarding operations and incorporates the advantages of the Tag on Car, Card Waybill, Card Order and Computer Generated Switchlist methods of model railroad operation to provide a satisfying operating experience on layouts which may have many different design features.

Incorporating these different modes of operation into a single system makes AO suitable for controlling individual car movements between staging and industries, running block trains to and from major industries, routing blocks of cars in fast freights to classification yards for subsequent breakdown and handling by local trains, and the routing of passenger trains from station to station by updating the "Tag on Car" label automatically each time the "Active Train" stops at an intermediate destination.

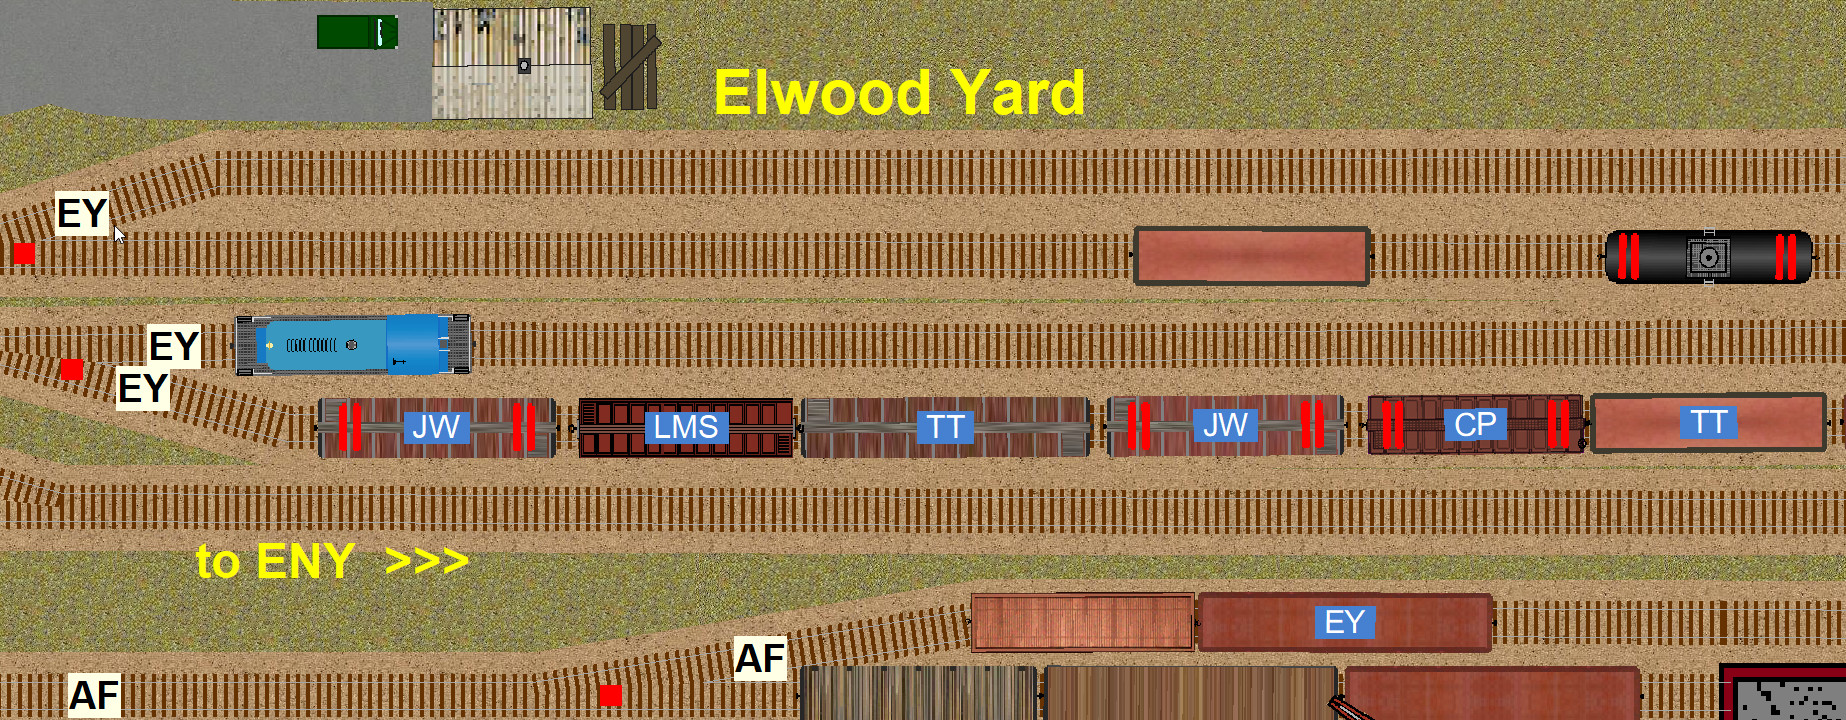
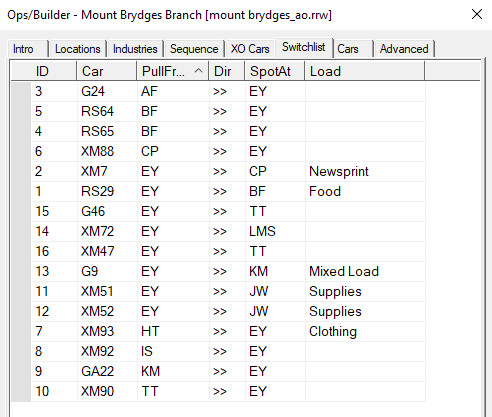
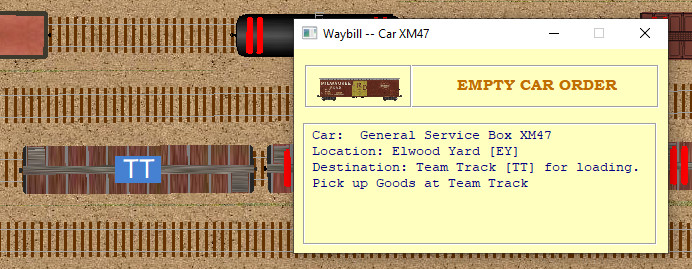
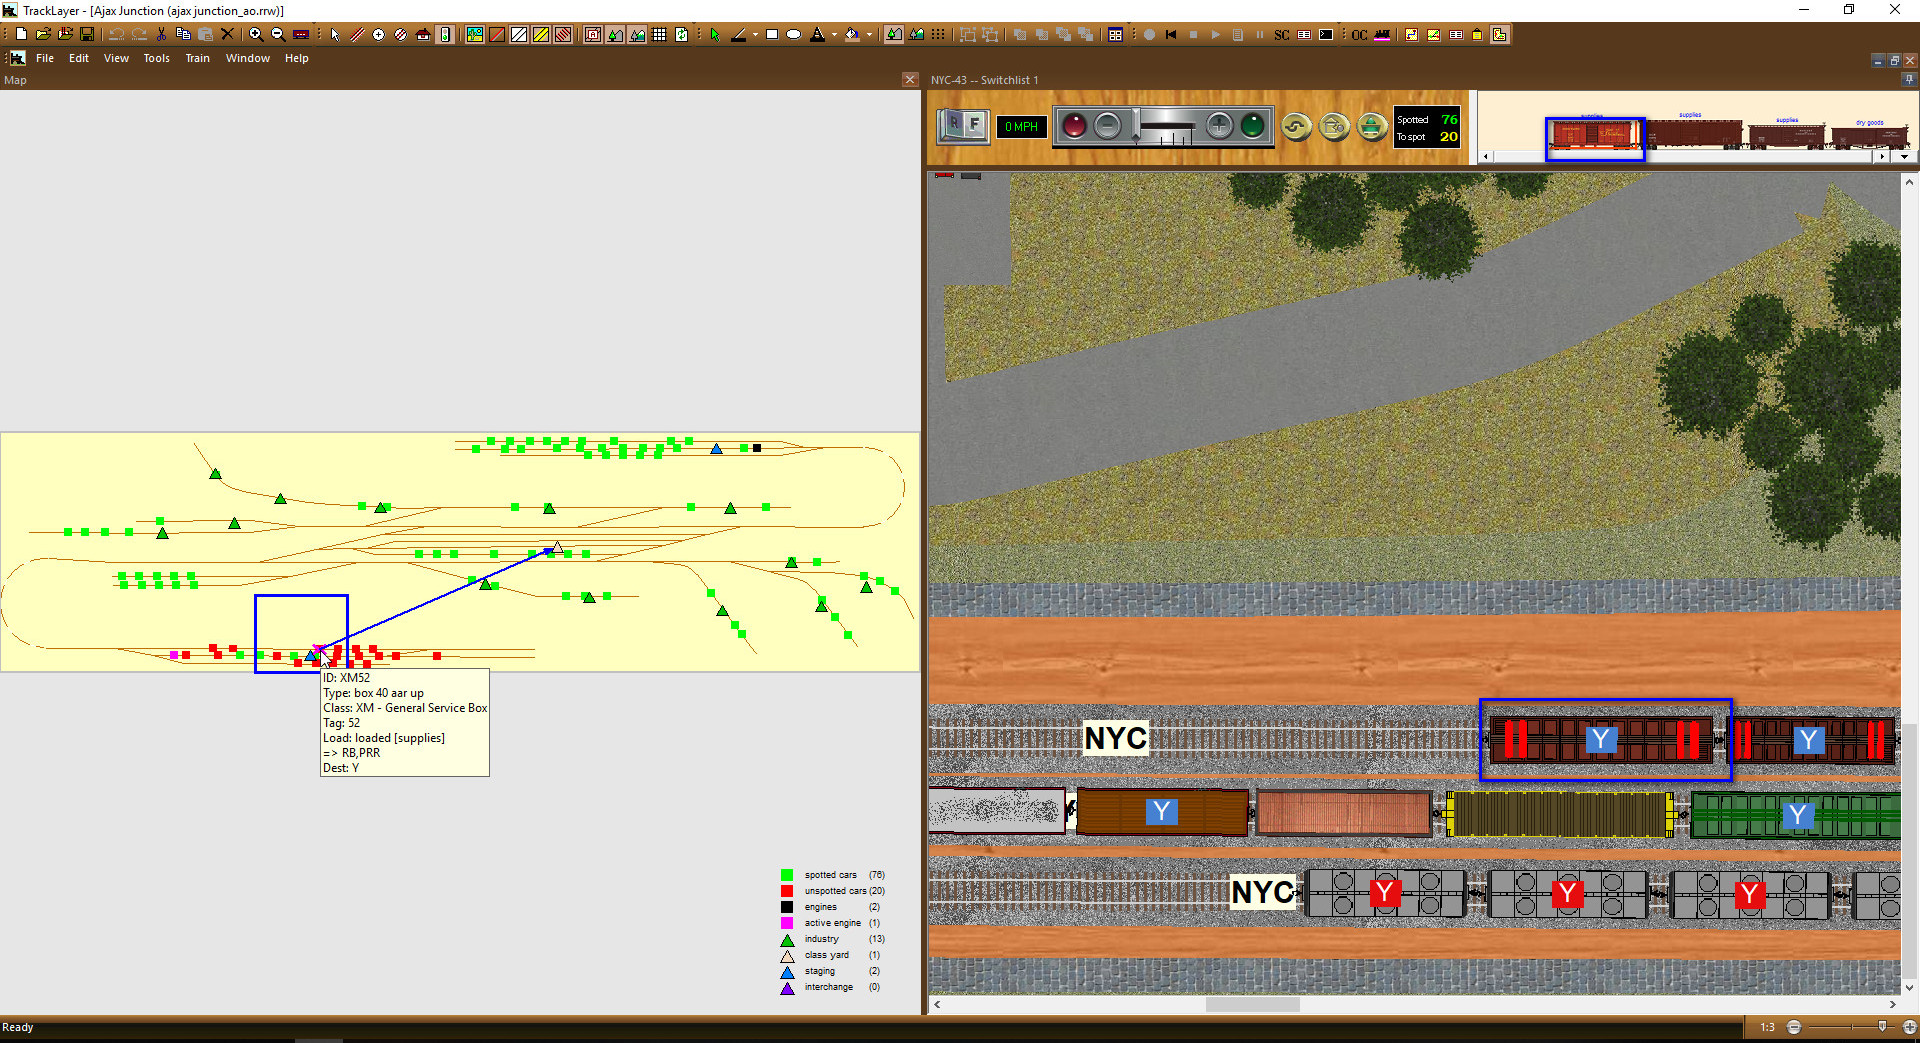
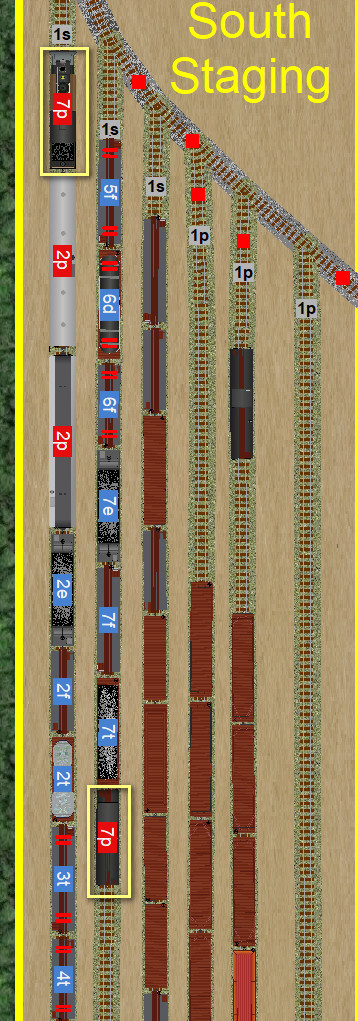
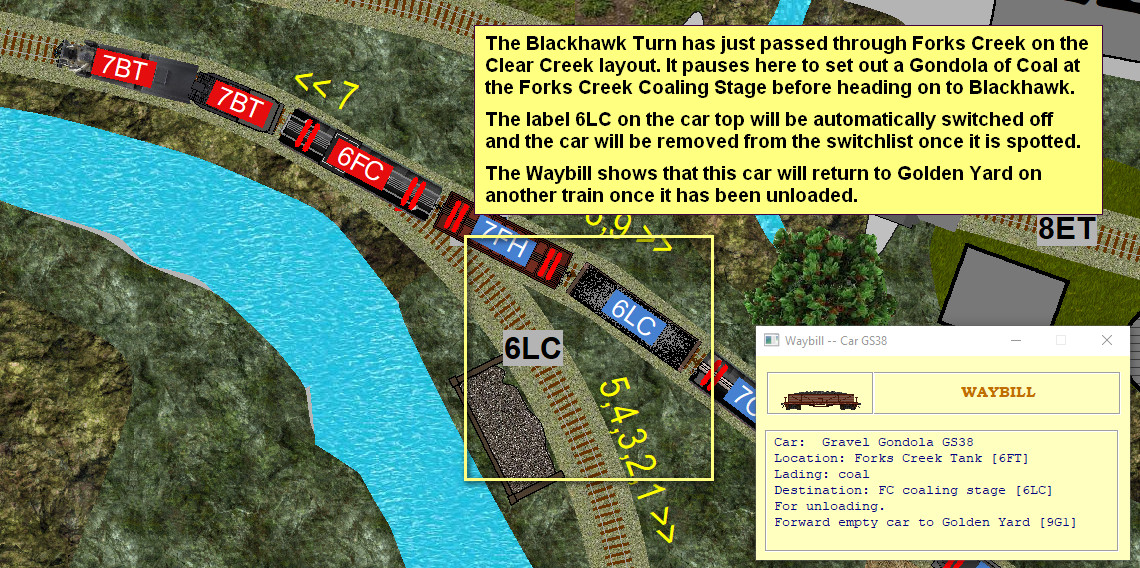
In place of the usual AAR and ID number label on your cartops, you will see a short 'routing' label showing the destination track code from the current car waybill. The aim is to use these car labels to identify the destination for each car and spot it on the track which is labeled with the same code. This means there is no need to constantly refer to the switchlist, but the switchlist is available in the OC grid to consult if you should need it. You just work to match your car labels with the labels on the track. To avoid confusion, only the cars which need to be moved will display their labels. You may also have to move other cars to access the cars you need, any unlabeled cars which you move off spot will be automatically labeled to ensure they can be returned to their original spots.

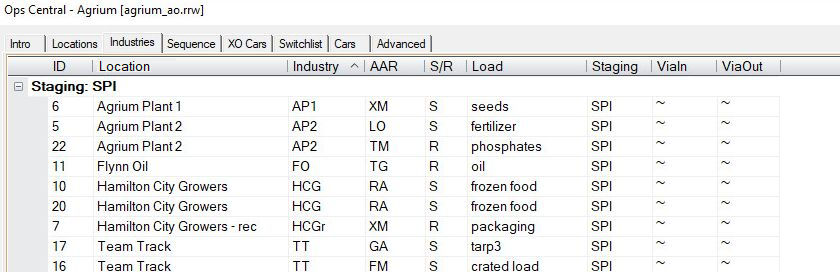
The AO system works on the assumption that industries dispatching their loads or returning their unloaded cars to staging will be regularly repeating these actions. Cars located at the industries will always require pulling and moving on to Staging (often via an intermediate Classification Yard) and the industries will then need to receive new loads or replacement empty cars for loading. The busiest industries will handle the most cars so the layout designer only has to ensure that he has placed his cars at the industries in the proportions that reflect the ratio of movement required. If industry A has one car at the start of the first switchlist, industry B has two cars and industry C has four cars; then C will generate four times the traffic of A and twice the traffic of B.

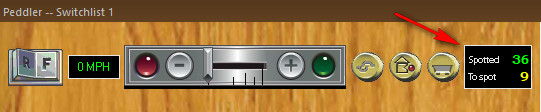
Your switching progress is continuously monitored and the number of cars still to be spotted is always displayed on the Train Control Bar.

Double click the Car Monitor button at any time to select and zoom to the Active Engine.

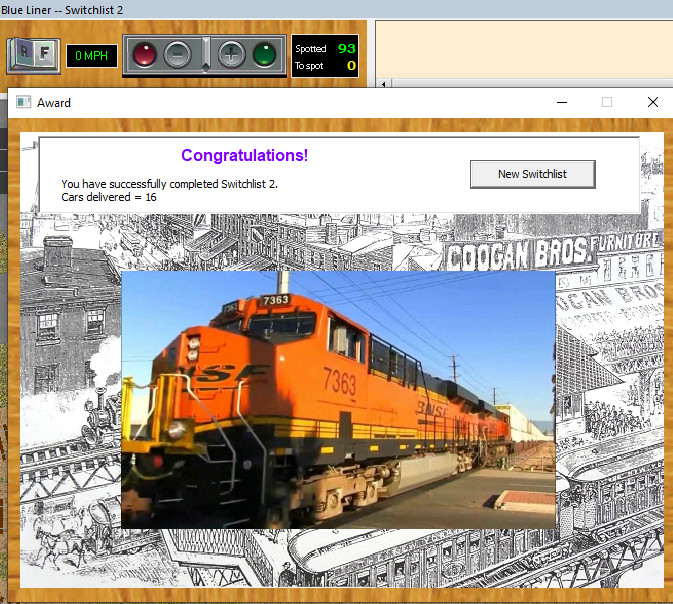
To summarize, there is no need to constantly refer to the switchlist as all the car destinations are shown on the car tops and as coded track labels on the layout plan. All that is needed is to move the cars which are displaying their labels to the tracks which are displaying identical labels. Only cars which need to be moved in the current session will display a label, once a car is correctly spotted its label will no longer be displayed. When all the cars are spotted you will receive a virtual reward and be prompted to generate the next switchlist. You can save your current situation on an Advanced Ops layout at any time to enable you to reload it and continue working from your present position in a later session.

The "Ready to Run" Advanced Ops Layouts

There are more than 280 "ready to run" Advanced Ops layouts from Bruno which are available in the Layout Chooser for downloading by holders of a TrainPlayer Operator license.

These layouts can all be identified by the _ao filename suffix and they are all located in the Layouts/Advanced Ops Layouts/ folder structure. For convenience these layouts are divided into three subfolders based on the size of the layout.

A Shelf sized layout would be a good place to learn the basic switching moves while dealing with a smaller more manageable number of cars. Room sized plans will usually involve more trains operating in a predefined sequence, while Club sized plans may demand some management skills which will often require cars to travel on more than one train to reach their assigned destinations.

If you are unsure which of the layouts you would like to download from the Web Chooser you can check out what is currently available by visiting the three AO layout galleries.

Shelf sized layouts - small layouts taking up to 30 minutes to complete.

Room sized layouts - larger layouts taking up to an hour to complete.

Club sized layouts - very large layouts taking several sessions to complete.

Holders of a TrackLayer license have access to a full set of tools for designing their own Advanced Ops scenarios.

The Ops Central User Interface

The User Interface is a modeless dialog called Ops Central (OC). This dialog uses a series of tabbed pages to provide an introduction to the layout and several spreadsheet type grids for editing the locations, industries, train sequences and car data; plus an advanced page with the tools needed to develop an Advanced Ops scenario for your own custom layouts.

Intro Tab

When you first load an AO layout your switching instructions will appear in the form of destination labels on the car tops.and you will see an Introduction on the first page of Ops Central which explains the purpose of the layout.

If you wish you can also examine the Switchlist Tab of Ops Central to see a complete summary of the current task.

By all means take a look at the other tabbed pages, if you need to know more about how the grids are constructed you can check this out in our Advanced Ops for the Designer guide.

Locations Tab

The Locations tab is used by the layout designer to provide meaningful names to the track labels and to allocate the required track class to each location (Staging, Interchange, Class Yard, Industry or XO reserved track).

Industries Tab

The Industries tab displays the data used for Waybill generation. Each row shows the Location (Industry Name), Track Label, Car Type, whether for Shipping or Receiving, Loadname, Final Staging destination (~ = any staging) and any ViaIn or ViaOut intermediate destinations used by the cars servicing the industry. (~ = no via dest).

Sequence Tab

The Sequence tab contains a list of scheduled trains which simulate a day's work on the railroad. Each row in the Sequence includes a Staging location supplying cars to the layout, a Staging location receiving cars pulled from the industries and a comma delimited list of all Industry or Yard locations authorized to be visited by the specified train. Individual cars can't be forwarded to their next destination until a train runs which is scheduled to visit both the car's current location and its next destination.

Advanced Tab

Once you are familiar with the design and purpose of a layout you may want to disable the display of the Introduction page every time the layout opens. You can do this by removing the tick from the checkbox on the Advanced Tab and then saving the layout.

When you are ready to start working your switchlist click the OK button to close the Ops Central interface.

Information about the Cars tab and XO Cars Tab can be found on our Advanced Ops for the Expert pages.

You can reopen Ops Central at any time by clicking the OC button on your Ops toolbar.

Alternatively you can use the Tools menu option to select Ops Central.

Working the Switchlists

Car Labels

Once you have closed the OC Interface you will find the engine for the "Active Train" already selected. All the cars which need to be moved to new locations will be displaying destination track labels. Each car should be delivered to the industry or yard with the matching track label. Unlabeled cars should only be moved when this is necessary to gain access to labeled cars.

Switchlist

You can view all the outstanding tasks on your current switchlist for the "Active Train" by clicking the "Ops Central" button and selecting the Switchlist tab.

The Switchlist can also be useful when the Car Monitor shows that you still have cars to spot but you are unable to locate them.

Waybill

You can view the Waybill (or Car Order) for any car by selecting the car and clicking the waybill button on your Ops toolbar.

Alternatively select "Show Waybill" from the context menu.

The Waybill display is modeless and once it is open you can select any other car on the layout to review its waybill and identify its next planned move.

Award

Your progress will be monitored as you work through your Switchlists and you will receive a virtual reward when the task is completed.

You will then be able to generate a new switchlist based on the current position of the cars. Cars spotted at the industries will still need to complete their assigned tasks on a later train and additional cars will be selected from staging to deliver incoming loads and service empty car orders.

When you have completed your current operating session don't forget to save your layout so that you can continue from the same position the next time you open the layout. Any outstanding tasks will still need to be done when you restart the layout.

Tools for the Staging Yard

We recommend that trains operating on the scenic part of your virtual layout are operated prototypically using the Control Panel to drive the trains as you pull and spot the cars according to the requirements of the Switchlist. However some leeway seems reasonable for preparing and manipulating trains within your Staging areas. This is much the same as you might need to manhandle or turn some of the cars in Staging when operating a model railroad in your basement.

These extra tools for manhandling your trains can be found on the "Train" toolbar.

Note: These tools are available regardless of location but are only intended for use in a Staging area.

The use of these additional tools is optional and you may still prefer to prepare your train for dispatch using standard switching moves. You can also accesss most of these tools from the Car Context Menu.

Shift Forward: Shifts the currently selected car one place forward towards the front of the train. Very useful for blocking a train into the correct order prior to dispatch. Forward means towards the right in the Train Window image (which may be different to the top down view).

Shift Backward: Shifts the selected car one place backward towards the rear of the train. Permits unlabeled cars which are not selected as part of the switchlist to be moved to the rear of the train and uncoupled before the train departs.

Flip Car: Picks up a single car or engine, either solo or within a train, and turns it end to end.

Flip Train: Picks up a complete train, turns it about end to end and puts it back on the track. This is much the same as picking up a Staging Cassette track to turn a train. Also useful for turning Engine and Tender combinations.

Follow Selected Car changes focus on the car being used for "Auto Follow" away from the lead car to a selected car within the train.

Train Properties opens the Properties dialog for the selected train.

Add Car opens the Add Car menu.

Note: You should not Add Cars to a prepared Ops plan without also generating a new first switchlist.

The Map View Window

The Map View button on the Ops toolbar opens a schematic diagram of all cars and locations.

The first time you open the Map View it appears in a floating window which can be docked alongside or below the main top down display.

The blue rectangle on the map represents the portion of the layout which is currently displayed in the adjacent top down view.

To explore the layout just drag this rectangle to another part of the map to change the area and location displayed in the adjacent view.

Cars are represented on the map by squares, labeled tracks are represented by triangles.

A color coded key of the car types and AO track classes is provided.

Hovering the cursor over any rectangle or triangle will display a tooltip identifying the relevant car or track label.

The selected car is highlighted on the map with a Magenta X.

To help you to navigate the layout, hovering over an unspotted car on the map displays an arrow pointing to the car's destination.

Right click on the Map View to see a context menu which enables you to select which of the map objects you want to display.

Zoom To Cursor immediately moves the blue rectangle to the current mouse position and adjusts the main view to cover the same area.

Settings is used to adjust the line thicknesses and the colors of the rectangle, arrow and map background.

Using Route Finder with the Map View

When you open an unfamiliar layout it can be difficult to get your bearings, usually the view is zoomed in to one of the Yards and the car destinations are displayed on the car tops. While the Map View can help to show where a car is to go it isn't always obvious how to navigate to the required destination.

In this example a train has been assembled in Staging. The cars need spotting at several locations but it isn't clear what route to follow even with the help of the Map View.

The destination of the engine and caboose give us a good idea of how far the train needs to travel and we can use these coordinates to plan a route for our train and identify the initial direction of travel.

First we need to open the Map View using the icon on the Ops toolbar.

Here we can check the destination for any of the cars by hovering the mouse over the rectangles which represent them. This shows us where the cars need to go, but not how to get there.

To resolve this dilemma we need the Route Finder which also opens from the Ops toolbar.

The Filter button on the Route Finder dialog allows the search criteria to be adjusted.

Here we excluded routes with more than 30 switches, routes with more than 0 turns and routes with more than 0 cars standing on the tracks.

Click OK to return to the Route Finder once the filters are set.

Route Finder

Next set both the 'From' and 'To' boxes to show Track Label. Enter the current location of your train (1S) in the 'From' combo box. Enter the engine destination (7P) in the 'To' combo box, and then click 'Go'.

In this example the Route Finder found 51 routes to the target location which match the criteria in the Filter. The shortest routes are not always the best as they may cut through industries or yards but if you sort the data on the Switches column the optimum route can usually be identified close to the top of the list.

Map View

Here Route 6 has been selected and a plan of this route appears on the track in the main top down display AND in the Map View window.

If you right click on your chosen route you will see an option at the bottom of the context menu to set all the switches for the train to follow the selected route.


Note 1: You will need to memorize your route as it will disappear when you close the Route Finder window.

Note 2: Script savvy users may wish to copy the data from the Route column of the selected row and use it as a parameter for the SetRoute subroutine which will set all the switches needed for the journey each time this train runs.

Resetting the Layout

Each time you complete an AO Switchlist and move on to the next scheduled train your task will change. When all the trains in the Sequence tab have operated the sequence will start again at the first train. The switchlist produced will not be identical to your very first session because many (or most) of the cars will have already moved to new positions.

If you saved your layout after each session you should not encounter an identical task to one you have completed before except for situations such as regular passenger trains or block trains deliberately designed to repeat daily.

There is no reason for this pattern to change and you should be able to continue advancing your switchlists more or less indefinitely.

Unfortunately, there could be times when you need to recover the original Ops set up. Perhaps you have added or deleted some cars without realizing this would disrupt the ops plan which relies on data carried on cars you have deleted.

If your layout stalls for any reason you can always Reset Trains to Start Positions from the Development Menu which can be found on the Advanced Tab.

If you want to modify any part of your trackwork or change the cars on your layout to you should always perform this Reset before making your changes (failure to do this will mean that a subsequent Reset will remove your changes).

Any alterations to the car inventory, car distribution or trackwork following a Reset should be immediately locked into the Ops pattern by running the Generate First Switchlist option which can be found on this same Development Menu.

If you have attempted any other layout modifications that have not worked out satisfactorily you can always recover a fresh copy of the original layout by downloading again from the Layout Web Chooser.

Richard Fletcher for TrainPlayer - June 2024