|
Now that you’ve set up your layout for Ops or chosen one of the
prebuilt layouts and generated a switchlist, you’re asking
yourself “Okay, how do I move all those cars efficiently?” The
purpose of this clinic is to help you understand some of the
basic principles of freight movement as they apply to
TrainPlayer and to illustrate those principles graphically.
-
Organize your switchlist. Group the cars by CURRENT location so
that you can see your initial moves. On most layouts, the
majority of cars will be in a yard. That’s a good place to start
organizing.
-
Remember that you may use as many engines as necessary to
complete your switchlist. Of course, TrainPlayer requires that
you use one at a time, but the proper sequence can save you time
and moves.
-
Look
at the color codes or the destinations for the cars. Use either
the Route Finder or your Mark I eyeball to scope out a route
that will take you past all or most of the destination points.
Keep in mind that some may be better served by another engine or
train.
-
Take
careful note of drop off and pickup points that are on facing
point switches. Cars will need to be in front of the engine for
these. Is there a nearby runaround track or do we need to push
these cars a long distance?
-
Look
at each location where cars are to be dropped. Are there cars
there already that are not scheduled for pickup? Good practice
says to move these and place your cars behind them. Plan
accordingly.
-
Examine each drop off location for capacity as well. It is NOT
uncommon for Traffic Departments (or TrainPlayer) to schedule
more cars than will fit in a siding or stub. Such cars may be
left at nearby empty sidings for the next available train or
simply left behind at the yard for the “next day.” In fact, many
yards had a special track called the “fornow” track, where
excess cars were left “for now.”
-
Now
that you have a general plan, organize the cars in the yard
first.
-
Finally, make
up the initial train and get moving!
|
|
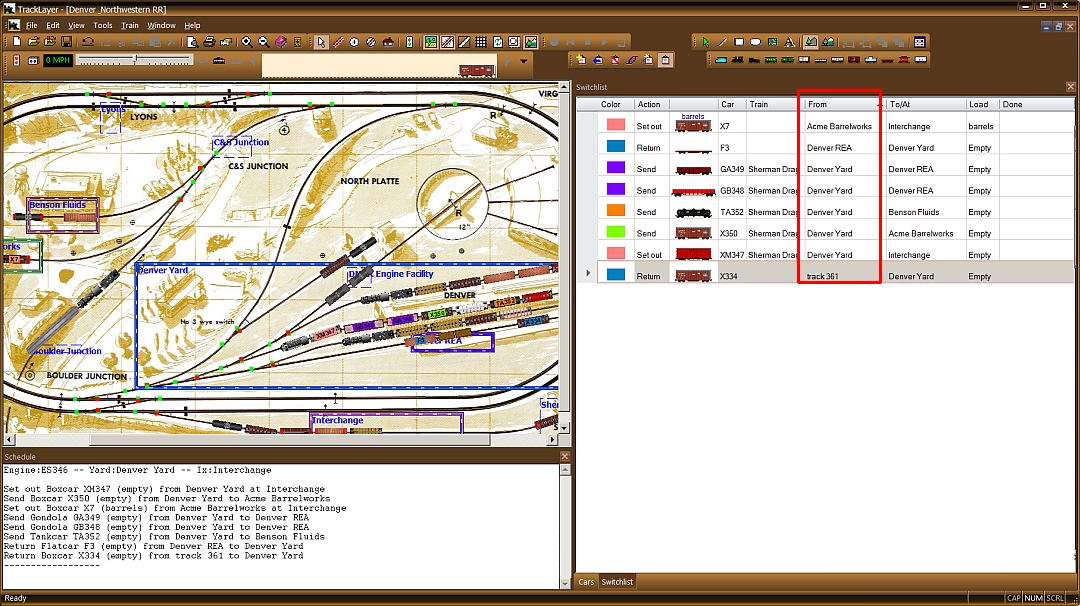
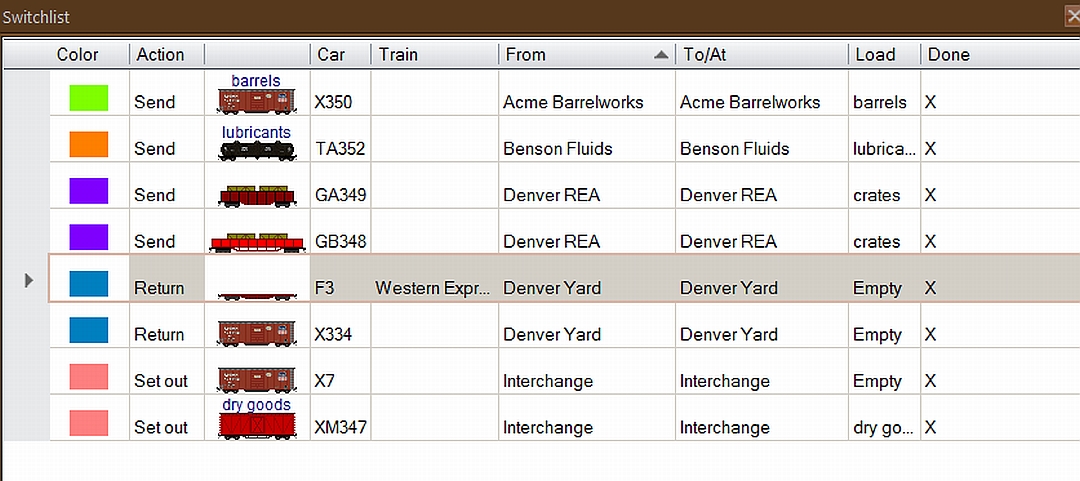
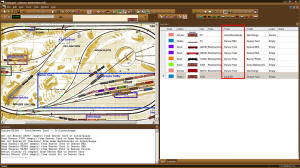
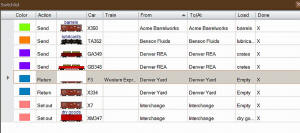
1. Organize your switchlist
One of the best ways to see what you need to do is to select the
columns shown below using the Field Chooser. Then sort your cars
by current location. You’ll notice that most of your moves start
in the yard:
|
 |
|
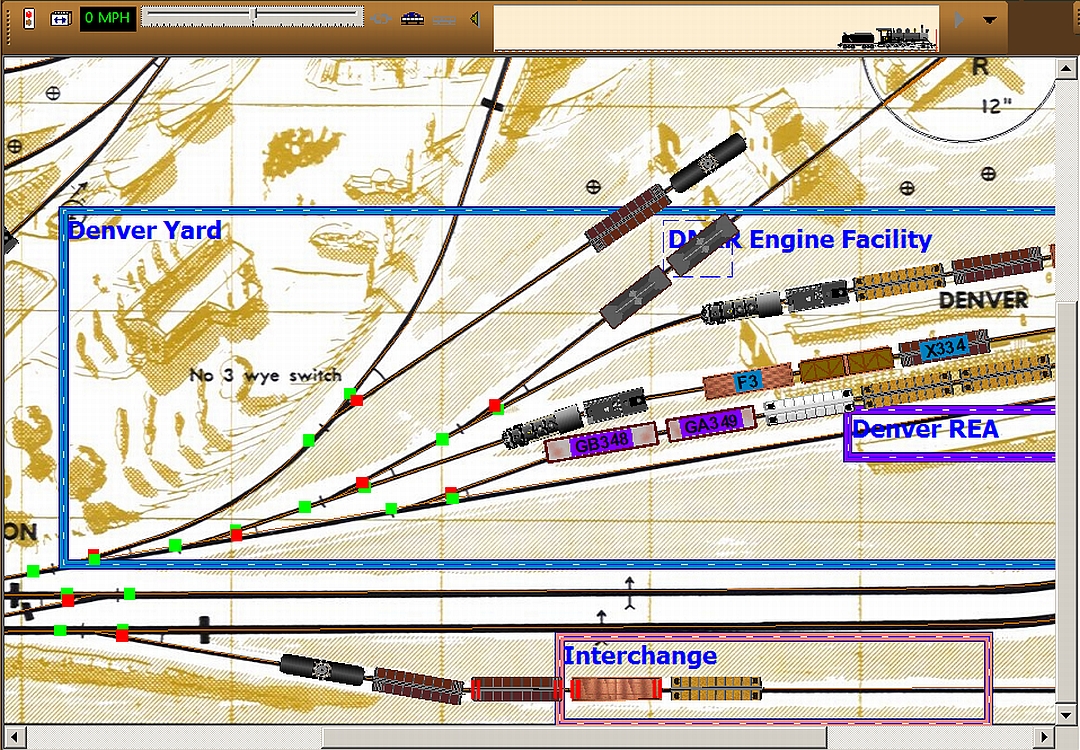
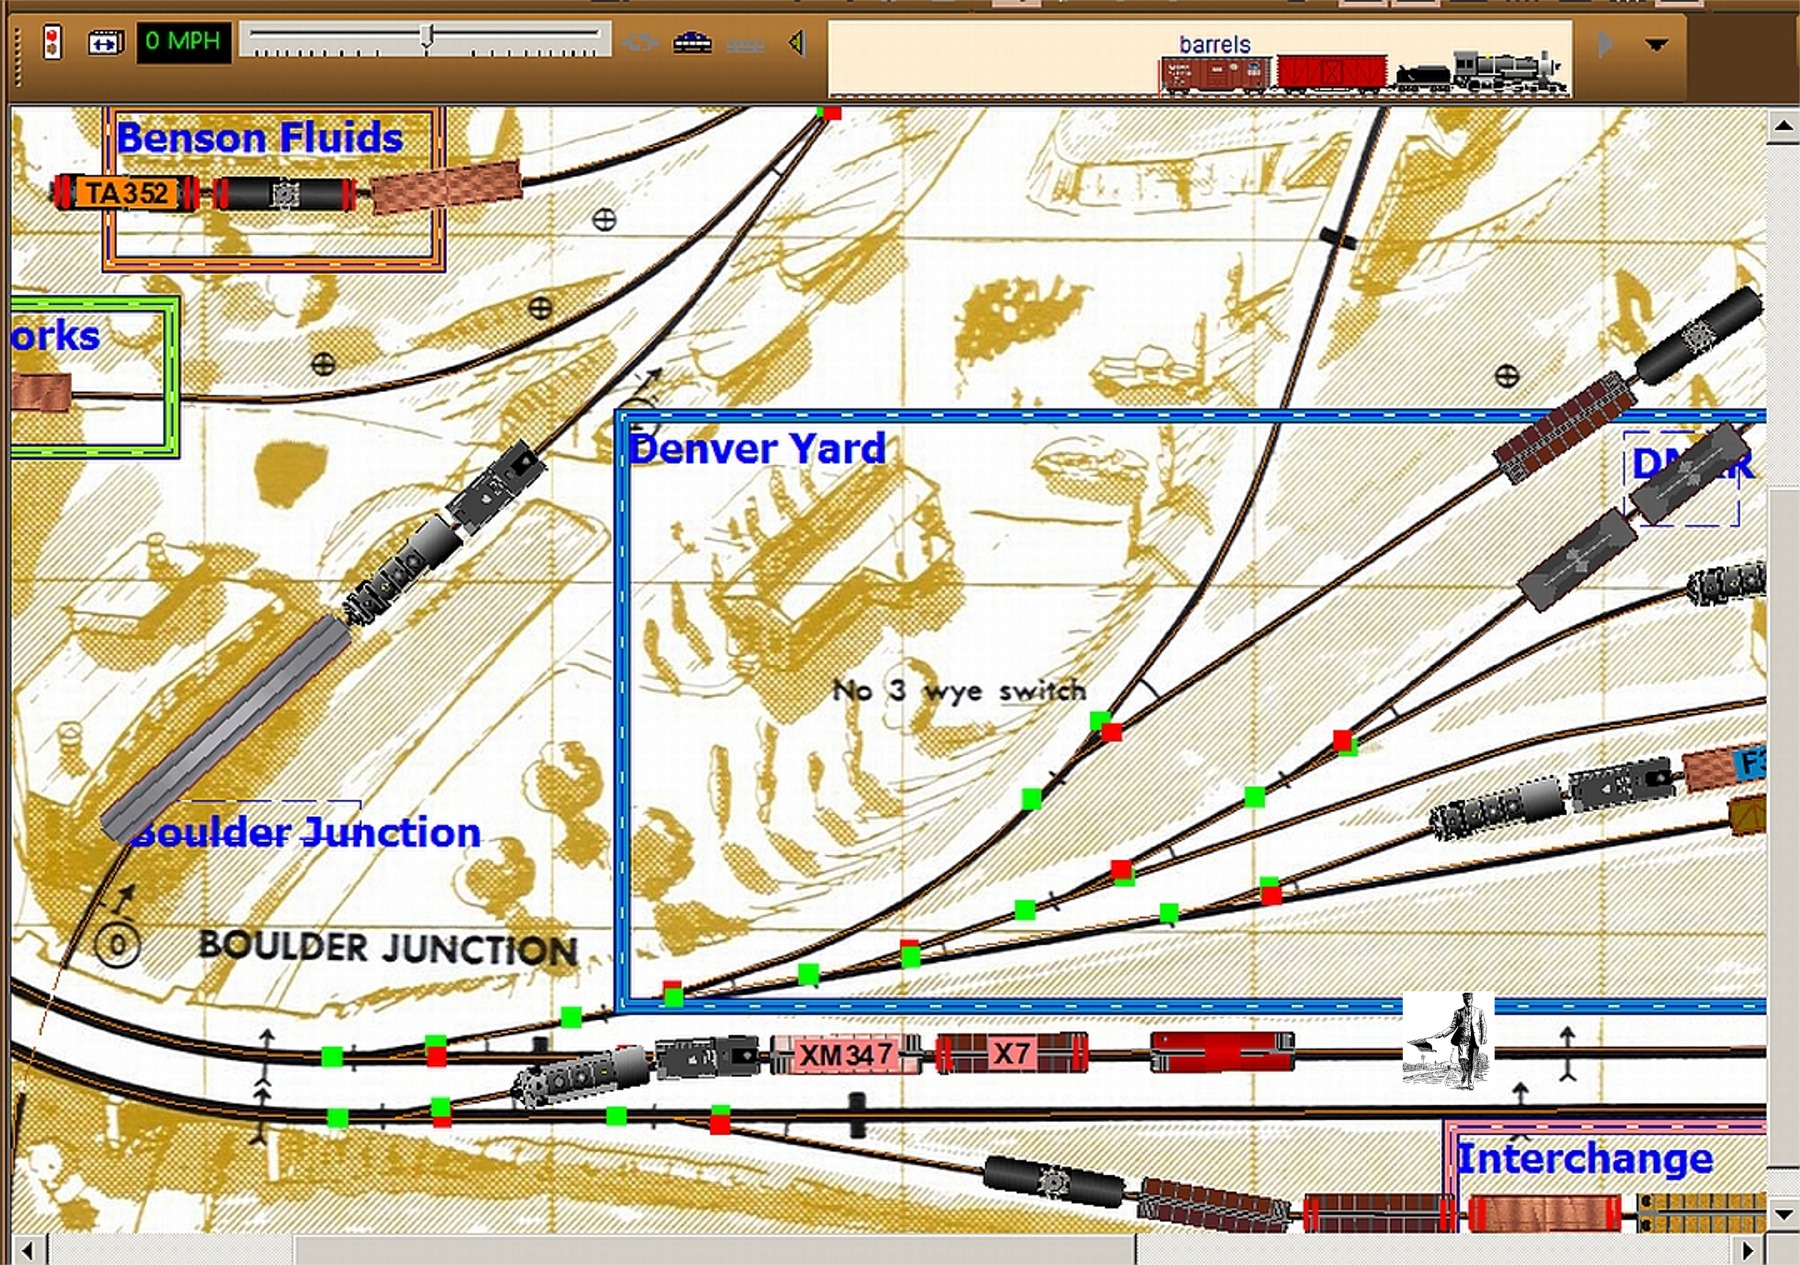
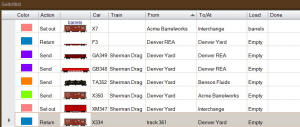
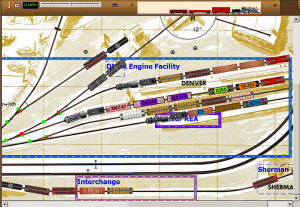
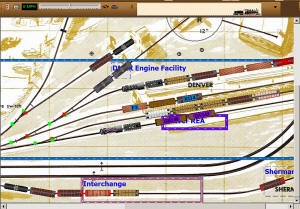
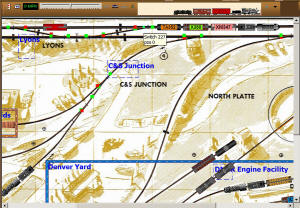
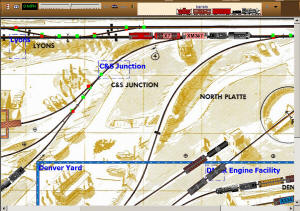
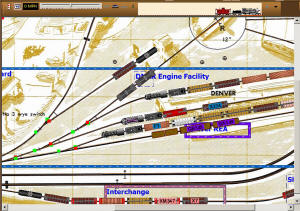
2. Look at the color codes or the
destinations for the cars:
It seems that we have a nice variety, with much of the action
centered near the yard. We have two outbound cars for the REA
facility and there’s one there to pick up, as well as what looks
like a “for now” car right behind the REA. We also have to
deliver cars to the Barrel Works and Benson Fluids. There’s a
pickup at the Barrel Works, too. Finally, we have traffic for
the interchange. Since the car from the Barrel Works is destined
there, we as well handle that traffic last.
|
 |
|
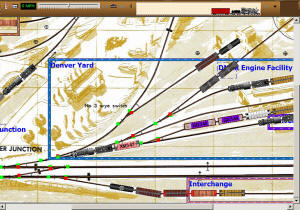
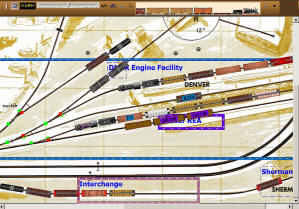
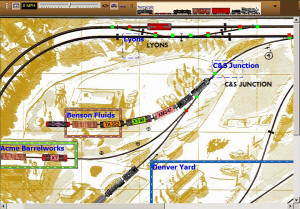
3. Take careful note of dropoff and pickup points that are on
facing point switches:
Fortunately, our chosen route doesn’t require any facing point
moves.
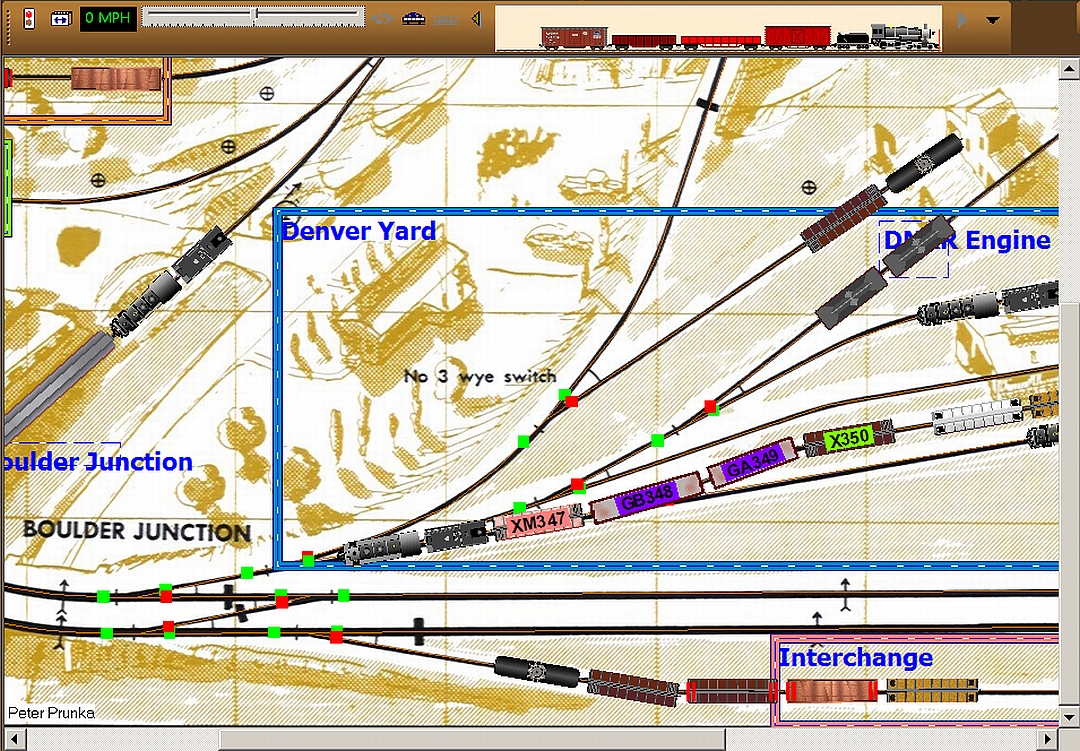
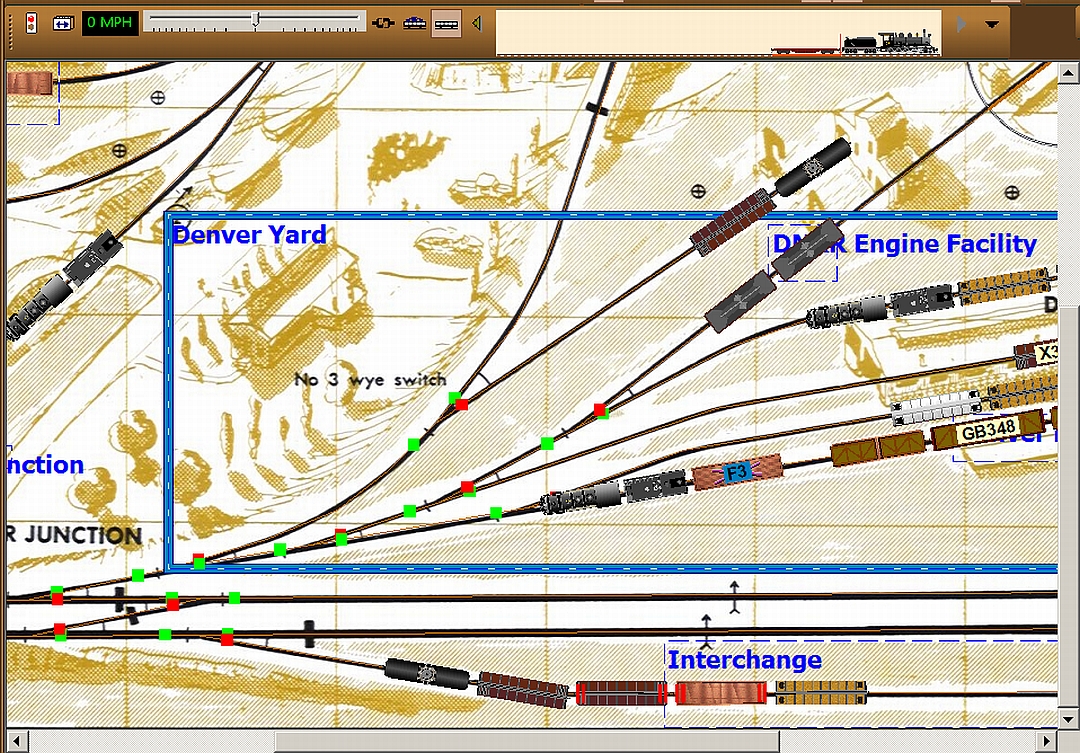
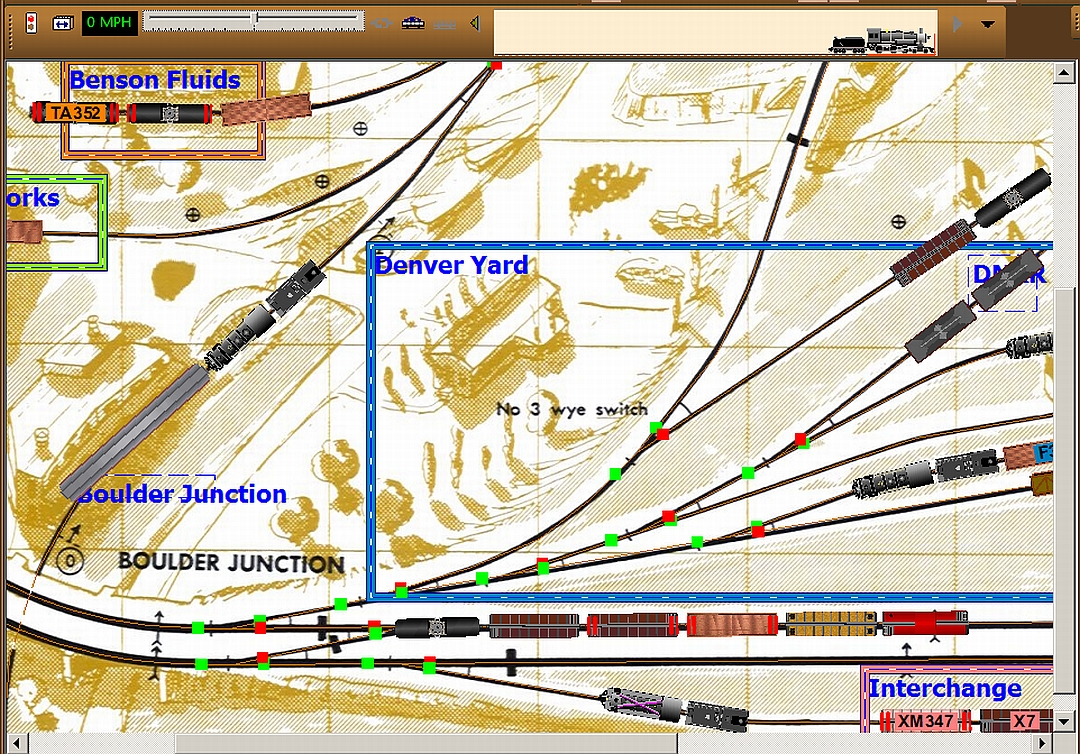
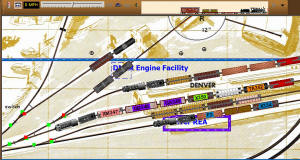
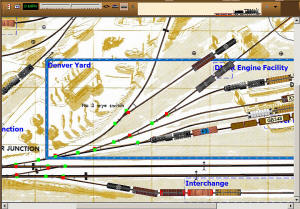
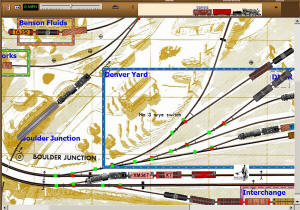
4. Look at each location where
cars are to be dropped. Are there cars there already that are
not scheduled for pickup? Examine each dropoff location
for capacity as well.
Hmm … this would seem to apply to just
about ALL of our destinations! In addition, our yard is pretty
full already. Perhaps we can make some room by sending the
engine from the Western Express off to the REA siding to arrange
and collect those cars.
|
 |
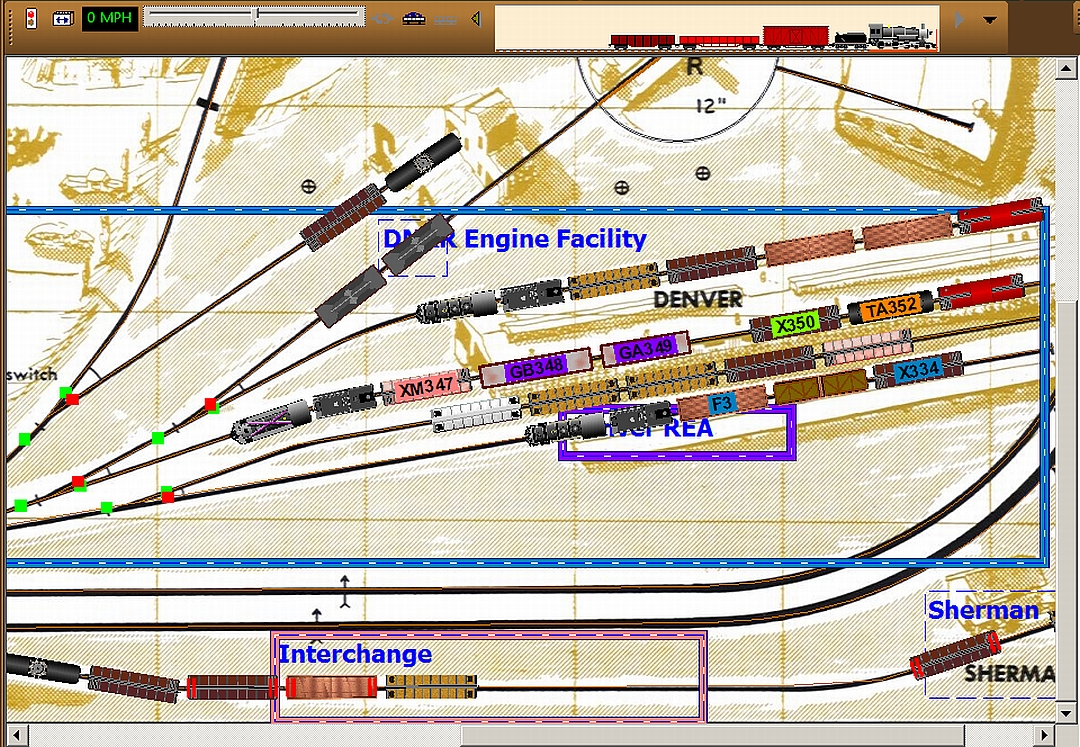
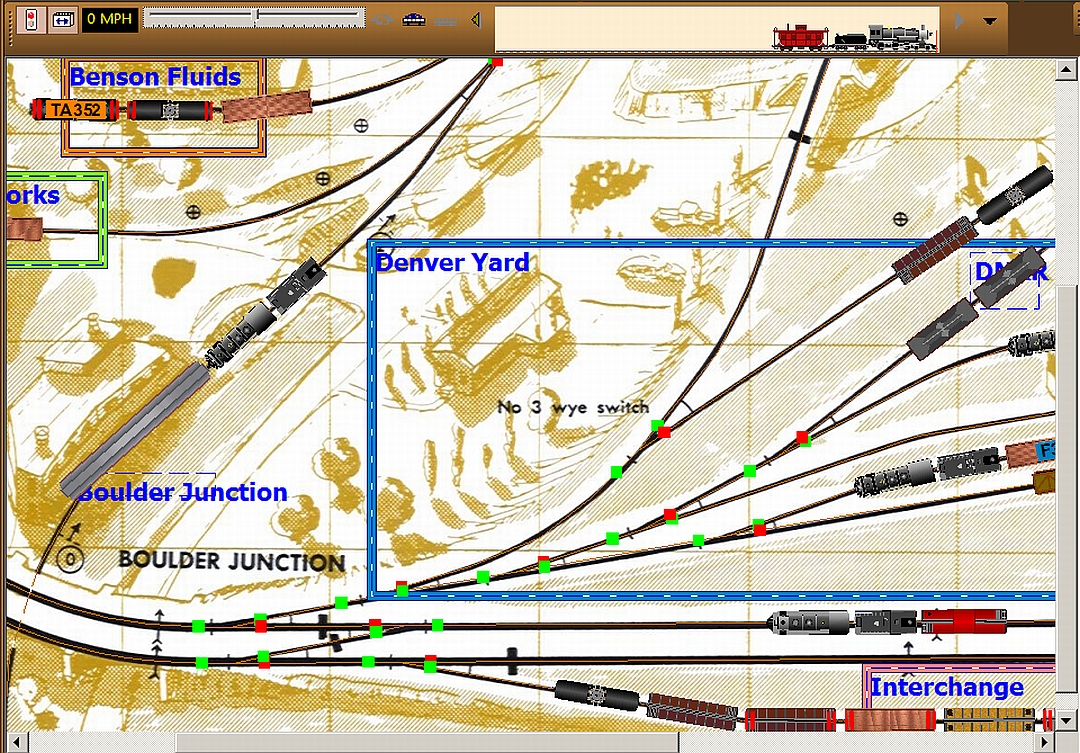
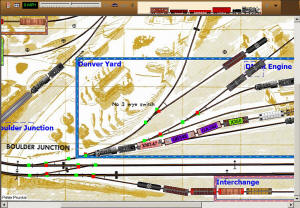
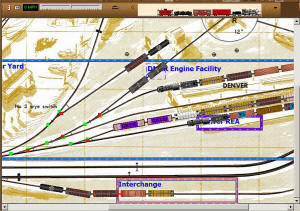
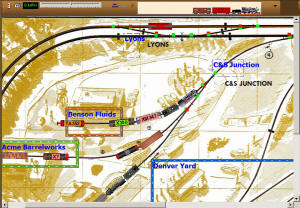
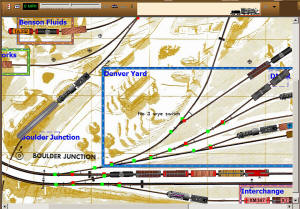
5. Now that you have a general
plan, organize the cars in the yard first.
Now that we have some room, we see that our train is in pretty
good order. First we drop the RS351 on the yard track below
ours. |
 |
|
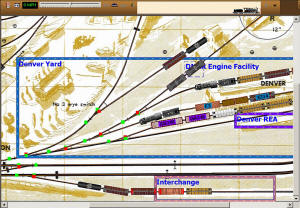
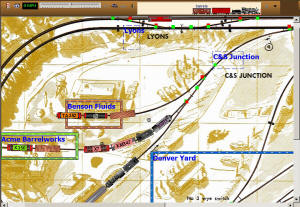
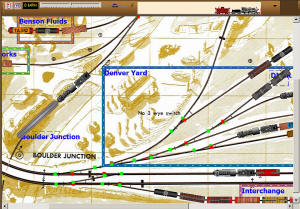
The REA-bound cars are near the front and can be spotted next.
We return the X350 temporarily to our track.
|
 |
| Then we drop the REA-bound cars on the yard track below ours |
 |
|
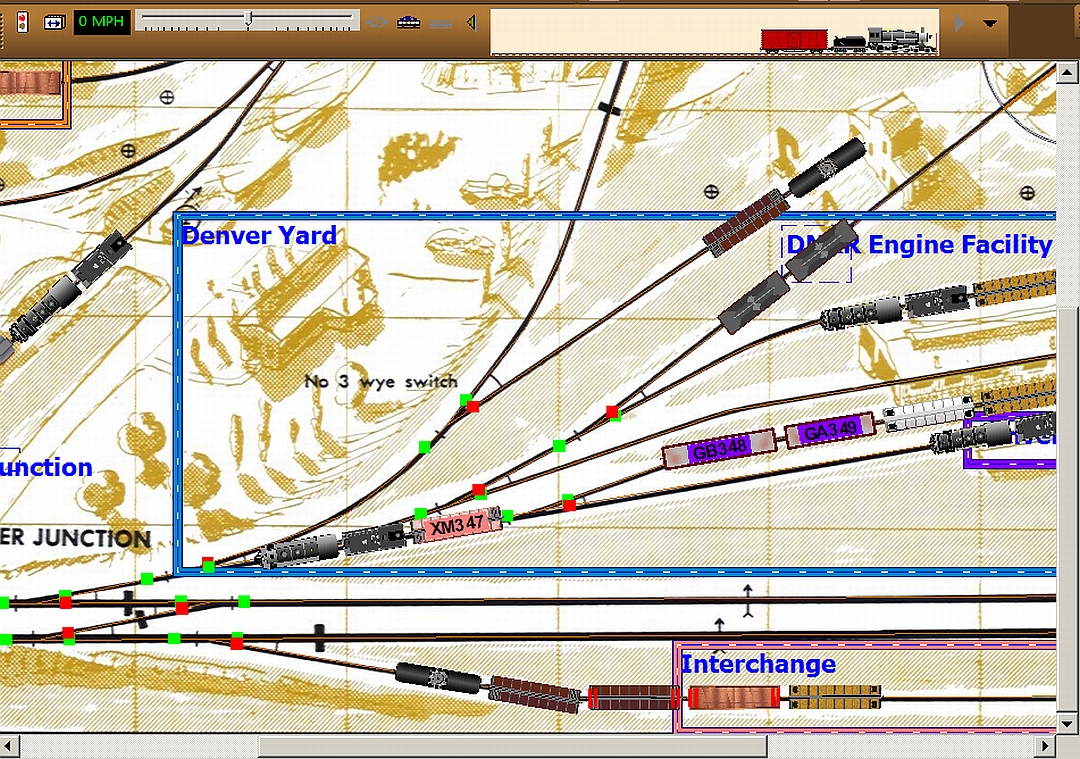
6. Make up the initial train and get moving.
We recouple with the cars bound for the barrel maker, Benson and
the interchange (as well as our caboose, of course!).
|
 |
|
While we’re gone, the Western Express will sort out the REA
moves and recouple to his train, awaiting further orders. Of
course, in TrainPlayer we can’t do both simultaneously, so we’ll
send the Sherman Drag out on the main, headed for its
destination while the Western Express finishes the local work at
the yard area.
|
 |
|
The Western Express now pulls all three cars from the REA area
and drops them temporarily at the empty yard track.
|
 |
|
Next, the Western Express will pull the two cars destined for
the REA and deliver them.
|
 |
|
Next, the Western Express must get and return flatcar F2 to its
spot at the REA, in front of the newly delivered cars. To do
this, it takes flatcar F3 along for the ride.
|
 |
|
Its work is now done and Western Express, with F3, returns to
its yard track to await further orders.
|
 |
|
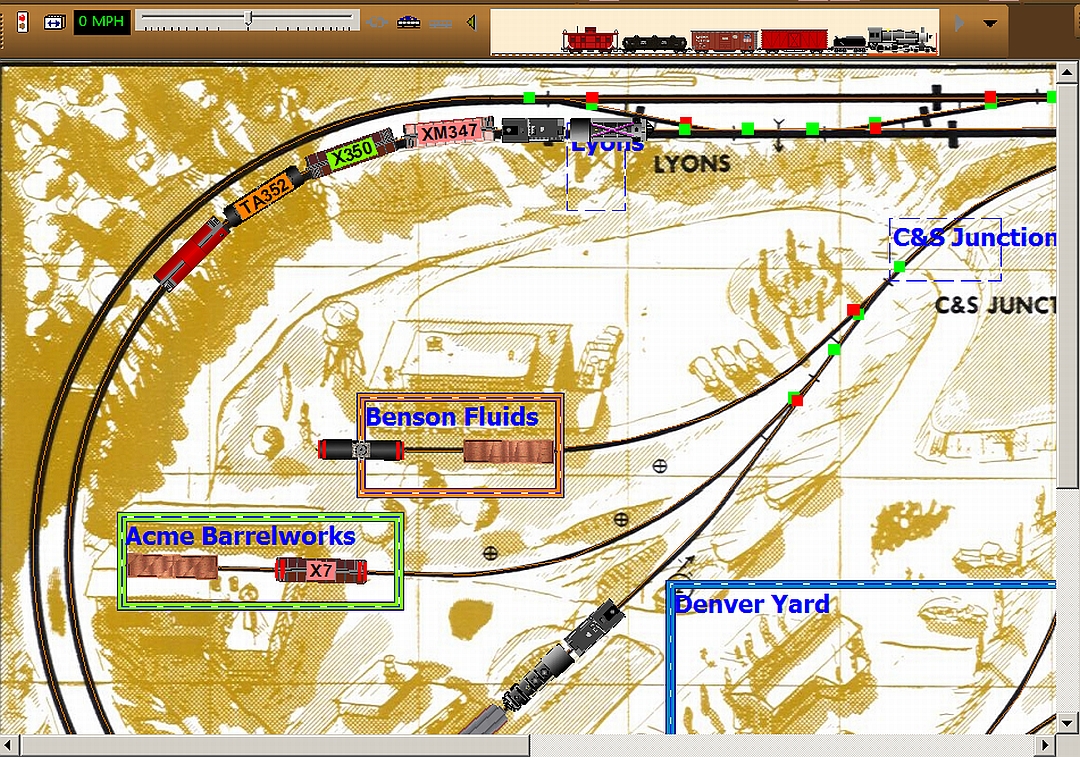
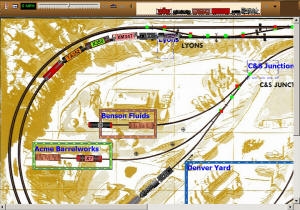
Meanwhile, we return to the Sherman Drag, up near Lyons, where
it is ready to go to work.
|
 |
|
Let’s see what we have to do. First, we can’t leave the caboose
on the mainline, so we move it into the siding at Lyons,
uncoupling the caboose, leaving it there. (Nitpicker’s note:
Yes, we know that this is not really a siding, but a different
manline, but this is an exercise. Our other choice would be to
set out a flagman.)
|
 |
|
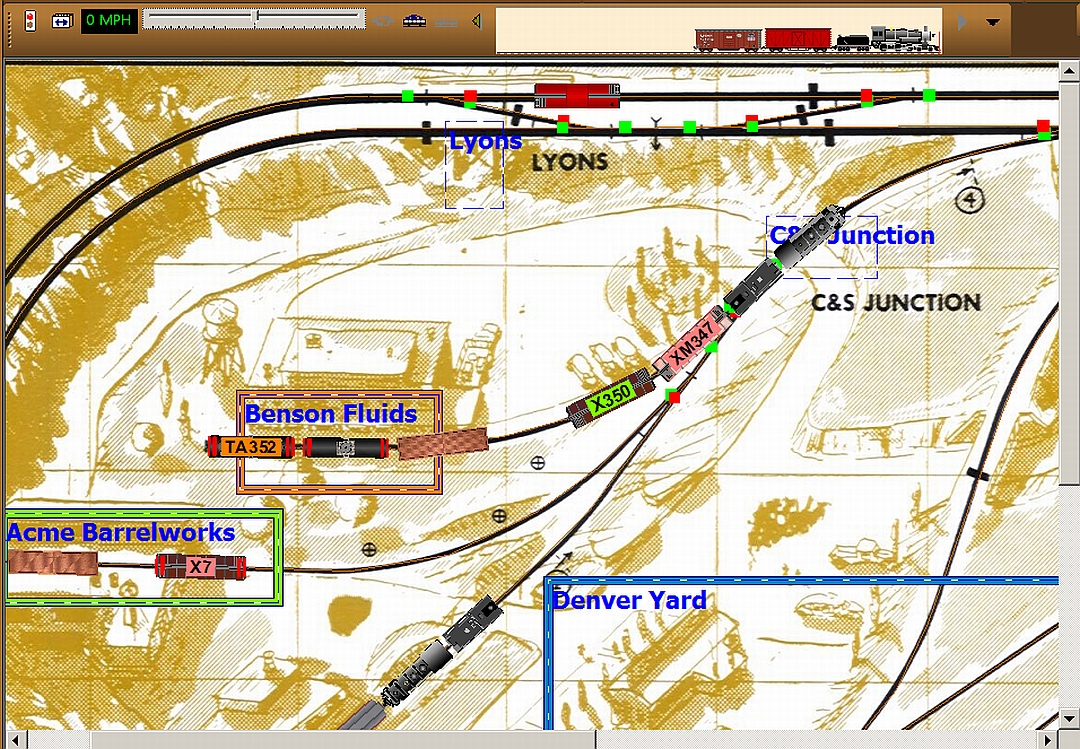
Now we have a pickup at the barrel maker and set outs at the
barrel maker and Benson Fluids.Since the benson car is at the
rear of the train, we’ll work with that first. We need to pull
the cars already at Benson, so we can place our car at the spot.
|
 |
|
We can drop them temporarily on the barrel works siding while we
set out our car.
|
 |
|
TA 352 has been set out, so now we get the two Benson cars and
return them to the siding.
|
 |
|
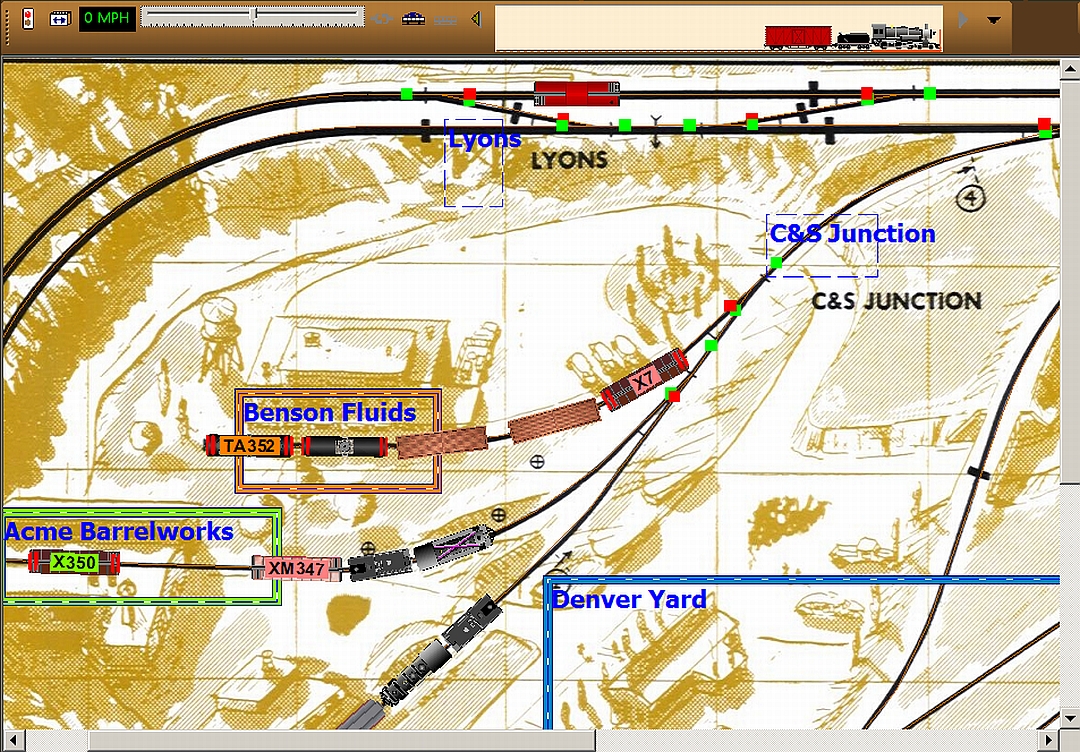
Next we have to set out X350 at the Barrel Works and pick up X7 for
return to the yard. Of course, we also have to move F339 to make
room for our set out. We’ll grab both cars and temporarily drop
them on the Benson siding while we set out X350.
|
 |
|
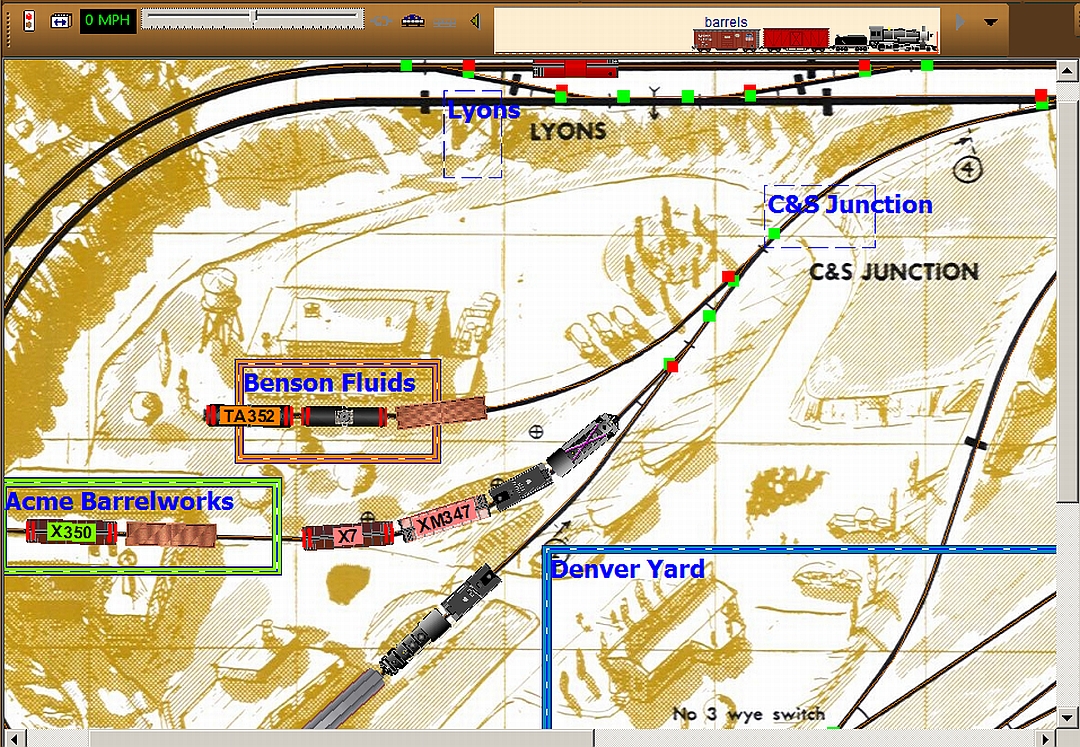
Next, we’ll return F339 to the Barrel Works, keeping X7 coupled
to the train.
|
 |
|
Our final bit of work in this area is to get our caboose and
head back towards the yard
|
 |
|
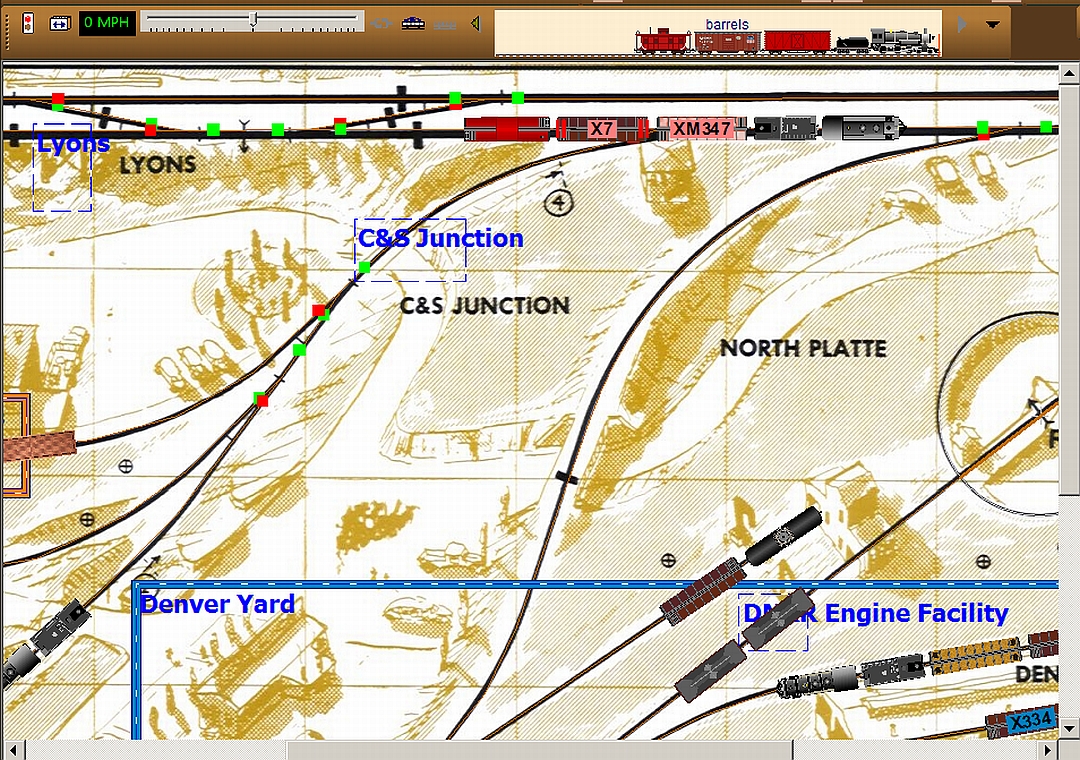
Of course, our work isn’t done yet. We still have to set out X7
and XM347 at the interchange.
This time, we leave our caboose on the main and send the
rear brakeman out to flag. Remember that our set outs must go to
the rear of the cut now on the interchange, so we’ll need to
pull that cut first.
|
 |
|
We set out the last two cars on our switchlist and go get the
interchange cars in order to replace them. (No, we didn’t run
over the flagman. He moved further back in accordance with the
rules.)
|
 |
|
Finally, having returned the interchange cars, we head home to
do the paperwork and grab some dinner.
|
 |
|
And now we’re home and here’s the completed paperwork. Don’t
forget the flagman!
|
 |
 |
|
We hope you enjoyed this little clinic
on operations and that it gave you a feel for TrainPlayer’s
newest upgrade!
A few notes for the nitpickers:
-
Although the Western Express is usually a road engine, it
received special orders to work within yard limits to perform
the switching at REA. Because the yard limits do not extend to
the interchange, it could not do that work without violating the
BLE agreement.
-
TrainPlayer does not maintain switchlists between sessions, so
it isn’t really necessary to move standing cars before spotting
new cars. It DOES add to the “play value” and is far more
prototypical.
-
RS351
should have been moved to an empty track, rather than being
included in an existing train. I know. I just missed that.
-
Got
more nits? Post them on the Yahoo Group and we’ll address them.
It’s part of the fun!
|
Freight Operations
by Peter Prunka
|
|